Connecting a laser from a DVD drive. How to make a laser pointer from a DVD diode
Instructions
The first thing you need to do for this is a CD-RW, DVD or BLU-RAY drive. Make from CD- drive laser you can too, but have them all the necessary properties He will not. Moreover, it will not exist, since laser ov from cd drives infrared radiation. In other household devices laser there is not enough power.
Unscrew all screws from drive, remove the top cover from it, find and remove the diode from it. Since the design of the drives is different, study its location in advance. A diode is like two combined cylinders of different diameters. If you look at it, it looks like a schematic picture of a hat. He has three. To make out drive laser, you will need the top - plus - and the middle - minus. The bottom one can be removed or folded. Check the performance of the diode using two ordinary AA batteries. The most important thing during the entire operation and during further use laser a - do not shine in any way. Otherwise, you may lose your sight.
As outer packaging laser and Chinese pointers are great. Having disassembled it, insert a diode from drive. The only upgrade you will need is a two-finger pointer. You can also use a small flashlight as a body and use it laser diode instead of a reflector. Like laser can light matches, burn through paper and leave marks on plastic.
note
The most important thing during the entire operation and during further use of the laser is not to shine light into your eyes under any circumstances. Otherwise, you may lose your sight.
Sources:
- Video on how to make a laser from a disk drive
Real powerful laser, capable of burning and cutting various surfaces - this is not a fantasy or an expensive device, but a device that you can create in home conditions, having small skills working with tools.
You will need
- a piece from a CD box,
- fluorescent dye for textiles,
- LEDs,
- acetone,
- laser pointer,
- GP batteries.
Instructions
Pour acetone into a clean, transparent container and, breaking the case into pieces, place it in the acetone. Wait until it dissolves, then drain the acetone and fill with new acetone. Stir the mixture and pour off the acetone again. Fill the plastic with fresh acetone until it is completely free of impurities.
Pour the acetone from the container with the dissolved plastic and pour the filtered dye into the plastic. Stir the plastic, drain the dye, and then prepare and filter a new one to refill the plastic. Leave the dissolved plastic in the dye for several days. After a few days, when the plastic turns dark red and transparent, drain the liquid and add fresh dye.
For plastic, prepare a mold in which it will take a cylindrical shape with a diameter of 4 mm and a length of 5 cm. Pour dye into the mold, rinse it and drain the dye. Then pour the dye again and pour the colored plastic into the mold. Pour the dye back over the plastic and cover the surface of the mold to prevent the acetone from evaporating from the dye. Do not touch the mold for a week, and then add pure acetone, replacing the dye with it. Open form Place carefully in the freezer.
After three days, when the plastic has dried, break the mold and clean the plastic from it. Correct unevenness on the surface of a plastic part using a piece soaked in acetone and pressed against the plastic part. Place the part on a flat metal surface, lubricating it with Moment glue. Place a pointer on one of the ends of the part, laser which should show through your tube.
Prepare powerful LEDs with a radiation wavelength of 485 nm in ten pieces of 4 watts each. Place on top of the plastic piece, placing them in a row along its surface, and build the circuit so that you light first laser a pointer, and then the diodes lit up.
Received laser will have a power of 20-30 watts.
Video on the topic
It is known that setting up any laser– it’s not an easy matter. Expensive cars have a built-in laser nal pointer based on red laser diode, to set up “simpler” devices you can use the following option - “shoot” a beam at paper targets mounted on the mirrors.

Instructions
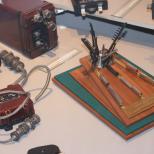
Take out the board. A diode, a micro-power button, a lens and a protective diode (for power supply) are mounted on it.
Remove the button, “bite” the board with wire cutters (to shorten it) to the diode, solder the power wires. For food laser and use the same elements that were used in laser no pointer. Solder the wires to them.
A piece of foam rubber with reverse side your his laser The correct indicator must be of such a size that you can fix it in the socket laser of the emitter, and it is also necessary that it be soft enough, otherwise it may damage the translucent one installed in the socket. Before securing laser indicator in the bell, you will have to make a rough adjustment - you need to laser the ray hit.
Now turn it off laser engraver, mount laser indicator in the bell laser and ensure that the beam is aligned laser diode with a mark on the target from shooting laser ohm So the beam of red laser of the original indicator was located exactly along the beam of the standard one laser nogo emitter. Now you can start setting up the optical path laser nogo
After combining the rays of red laser index and regular laser new emitter, you can begin adjusting the optical path laser engraver. To do this, attach a paper target and, by moving the mirror along the Y axis, ensure that the beam hits the target exactly at the minimum and maximum distance from the first mirror.
After adjusting the second mirror, adjust the beam from the second to the third mirror: place the target on the third and move the cutting head carriage along the X axis with your hands. Rotate the adjusted screws on the second mirror. Your beam must accurately hit the center of the target at the minimum and maximum distance of the third mirror from the second.
Now remove the target from the third mirror and determine the focal length by placing a sheet of paper on the table and rotating the table lowering/raising screw. There is one more procedure left - the third mirror of the optical path laser engraver. Using red laser With a pointer, this will not be difficult to do - on a sheet of paper you can see a focused point in a halo of a pale red spot. Rotate the adjustment screws on the third mirror until the focused point is in the center of the halo. It is best to do this setting in .
To complete the adjustment, set the focal length again by rotating the table lowering/raising screw. Measure the focus - the distance from the paper to the bottom edge of the cutting head.
Video on the topic
Sometimes, to quickly burn and rewrite discs, you need two drives. You can, of course, use special programs, allowing you to create disk images, but this will significantly increase the process time.

You will need
- IDE-SATA adapter.
Instructions
Connecting two drives may not require any additional hardware. Problems, as a rule, arise only if the drives have different ports for connecting to the motherboard. Find out the types of these ports.
There are IDE and SATA channels. The first connector has a wide cable for connection, so they are easy to distinguish with the naked eye. Find out the types of ports present on the motherboard.
Many motherboard models have mixed types connections, i.e. They contain both IDE and SATA ports. If you need to connect an IDE drive to a SATA channel, purchase a special adapter.
Perhaps to connect a second drive You will need to purchase a cable with three ports. Connect one to the motherboard, and the other two to drive m.
After installing both drives, turn on the computer. Install Nero Burning ROM. Launch this application.
To copy the contents of one drive to another, open the Copy menu. Specify the purpose of each installed DVD drive.
Video on the topic
note
If you want to connect drives that have different channels, one of which will be connected to the hard drive cable, do this very carefully. It is not recommended to connect the drive to the cable hard drive, on which it is installed operating system.
The copying process will only save time if both drives are capable of sufficient performance. high speeds. IN otherwise It’s easier to copy information to your hard drive and then write it to a second drive.
Modern high quality semiconductors diodes unthinkable without superpure chemical substances, precision structural elements. However, the current model of the rectifier, which has modest parameters, can easily be manufactured in a home laboratory.

Instructions
Take a half-liter glass jar.
Pour into a jar cold water, add a few spoons baking soda. Mix the solution well.
Place two metal sheets into the jar: one aluminum and one steel. They should not be completely immersed in the solution. Secure them in any way so that they cannot touch each other.
Assemble a series circuit using an electrical cord and plug, a socket containing a 60-watt incandescent lamp, and a galvanic bath of your own making. To connect the wires to the plates, use alligator clips located above the water-air boundary.
Remove any sources of open flame from the bathtub. Without touching any live parts, connect the laboratory unit to the network. At first, the light bulb will light up brightly, then its brightness will begin to decrease, and it will begin to flicker noticeably. Remember that exactly the same effect is achieved when turning on a light bulb through a diode. This phenomenon proves that the experiment produced exactly a diode.
Try, de-energizing the installation every time, to connect the 1N4007 diode in series in one polarity or the other in the circuit. In one case, the light bulb will go out completely, in the other it will shine and flicker in the same way as without an additional diode. Knowing the pinout of a factory diode, try to independently determine the location of the anode and cathode of a homemade one.
When mentioning a laser, most people immediately recall episodes from science fiction films. However, such an invention has long been firmly established in our lives and is not something fantastic. The laser has found its application in many areas, from medicine and manufacturing to entertainment. Therefore, many people are wondering whether and how to make a laser themselves.
Depending on the specifics and requirements put forward, lasers can be completely different, both in size (from pocket pointers to the size of a football field), and in power, the working media used and other parameters. Of course, it is impossible to make a powerful production beam yourself at home, since these are not only technically complex devices, but also very difficult to maintain things. But you can make a simple, but reliable and powerful laser with your own hands from a regular DVD-RW drive.
Principle of operation
The word "laser" came to us from in English“laser”, which is an abbreviation of the first letters of a much more complex name: light amplification by stimulated emission of radiation and literally translates as “light amplification through stimulated emission”. It can also be called an optical quantum generator. There are many types of lasers, and their scope of application is extremely wide.
The principle of its operation is to convert one energy (light, chemical, electrical) into the energy of various radiation fluxes, that is, it is based on the phenomenon of forced or induced radiation.
Conventionally, the operating principle is shown in the following drawing:

Materials required for work
When describing the basics of laser operation, everything looks complicated and unclear. In fact, making a laser with your own hands at home is extremely simple. You will need some components and tools:
- The most basic thing you need to create a laser is a DVD-RW drive, that is, a burner drive from a computer or player. The higher the recording speed, the more powerful the product itself will be. It is preferable to take drives with a speed of 22X, since its power is the highest, about 300 mW. At the same time, they differ in color: red, green, purple. As for non-writing ROMs, they are too weak. It is also worth paying attention to the fact that after manipulating the drive, it will no longer work, so you should take either one that is already out of order, but with a working laser, or one that you won’t be sorry to say goodbye to.
- You will also need a current stabilizer, although there is a desire to do without it. But it is worth knowing that all diodes (and laser diodes are no exception) “prefer” not voltage, but current. The cheapest and preferred options- this is an NCP1529 pulse converter or an LM317 microcircuit (analogous to KR142EN12).
- The output resistor is selected depending on the supply current of the laser diode. It is calculated using the formula: R=I/1.25, where I is the rated current of the laser.
- Two capacitors: 0.1 µF and 100 µF.
- Collimator or laser pointer.
- AAA standard batteries.
- Wires.
- Tools: soldering iron, screwdrivers, pliers, etc.
Removing the laser diode from the DVD drive
The main part that needs to be removed is the laser from the DVD drive. This is not difficult to do, but it is worth knowing some nuances that will help avoid possible misunderstandings during work.
First of all, the DVD drive needs to be disassembled to get to the carriage on which the laser diodes are located. One of them is a reader - it is too low-power. The second writer is exactly what you need to make a laser from a DVD drive.
On the carriage, the diode is installed on the radiator and securely fastened. If you don’t plan to use another radiator, then the existing one is quite suitable. Therefore, you need to remove them together. Otherwise, carefully cut off the legs at the entrance to the radiator.
Since diodes are extremely sensitive to static, it is a good idea to protect them. To do this, you need to wind the legs of the laser diode together with a thin wire.
All that remains is to put all the details together, and the ROM itself is no longer needed.
Assembling the laser device
It is necessary to connect the diode removed from the LED to the converter, observing the polarity, since otherwise the laser diode will immediately fail and become unsuitable for further use.
A collimator is installed on the back side of the diode so that the light can be concentrated into one beam. Although, instead, you can use the lens included in the rum, or the lens that the laser pointer already contains. But in this case, you will have to make adjustments to get the required focus.
On the other side of the converter, wires are soldered, connecting to the contacts of the case where the batteries will be installed.
It will help to complete the laser from dvd drive DIY diagram:

When all components are connected, you can check the functionality of the resulting device. If everything works, then all that remains is to place the entire structure in the housing and securely fasten it there.
Homemade body design
You can approach the manufacture of the case in different ways. For example, the body of a Chinese lantern is perfect for these purposes. You can also use a ready-made laser pointer body. But optimal solution It may turn out to be homemade, made from an aluminum profile.
Aluminum itself is lightweight and, at the same time, very easy to process. The entire structure will be conveniently located in it. It will also be convenient to secure it. If necessary, you can always easily cut out the required piece or bend it in accordance with the required parameters.
Safety and Testing
When all the work is completed, it is time to test the resulting powerful laser. It is not recommended to do this indoors. Therefore, it is better to go outside to a deserted place. At the same time, it is worth remembering that the device made is several hundred times more powerful than a conventional laser pointer, and this requires using it with extreme caution. Do not direct the beam at people or animals; be careful that the beam does not reflect or get into your eyes. When using a red laser beam, it is recommended to wear green glasses; this will significantly reduce the risk of vision damage in unexpected cases. After all, it is not recommended to look at laser beams even from the outside.
Do not direct the laser beam at flammable or explosive objects and substances.
The created device, with a properly configured lens, can easily cut plastic bags, burn on wood, pop balloons, and even burn - a kind of combat laser. It's incredible what you can do with a DVD drive. Therefore, when testing a manufactured device, you should always remember safety precautions.
Many people had laser pointers as children, which could be purchased in toy stores. But with the development of modern technologies, it became possible to create such a laser from DVD drive with your own hands. To do this, you just need a faulty DVD drive (it is important that the LED itself remains working), a screwdriver and a soldering iron.
It should be remembered that it is better to use a non-working DVD to create a laser! This is due to the fact that after disassembling and removing the LED, it fails. Do not forget that such a laser from the drive is much more powerful than a conventional pointer and can cause irreparable harm health, so you should never point the beam at a person or animal.

When pointing the beam of such a device at human eye The retina is burned out, and the person may partially or completely lose vision.
So, let's create a laser from a DVD drive with our own hands. To do this, you need to carefully unscrew the bolts on the back of the case to get to the LED of the future laser. Under the cover there is a unit that drives the carriage. In order to remove it, you need to unscrew the screws and disconnect all the cables. Then the carriage is removed.
Now you need to disassemble it, for which you need to unscrew many screws. Next, two LEDs will be detected. One of them is infrared, it is responsible for reading information from the disk.
You need red, with the help of which information is burned onto the disk. A circuit board will be attached to it. In order to disable it, you need to use a soldering iron. To check the functionality of the diode, it is enough to connect two AA batteries to it, but it is important to take into account their polarity. Remember that the laser diode is fragile, so you need to be very careful with it.
Next you need to purchase any laser pointer. When creating a laser from a DVD drive with your own hands, use it as a “donor” for the case. After purchase, you need to carefully unscrew the pointer into two parts and remove it from the upper half. You can use a knife to do this. It is important to do everything carefully, because the diode may be damaged. Using a small screwdriver, select the emitter. Using hot melt adhesive, install the new LED into the housing. And to ensure that it is firmly installed, you can use pliers, pressing them on the edges of the diode.

The DIY laser from a DVD drive is almost ready. Before you run it, you need to check if the polarity is correct. Now you can safely connect the power. After the first launch, you may need to adjust the focus. Next, you can install the pointer in the flashlight and connect AA batteries. Do not forget that the laser can burn various items, so you need to remove the plexiglass from the diffuser.

A well-tuned drive can not only burn paper or light matches, but also leave a mark on plexiglass, explode balls (it is better if they are black) and leave visible marks on plastic. If you install a diode in the plotter head, you can engrave on plexiglass.
Computer tips (collection of articles) Author unknown
Laser from DVD
Laser from DVD
Experience of creating a laser from a DVD-RW drive by Artyom Kalinin
Probably everyone has had a dream since childhood to have their own powerful laser capable of burning through steel sheets, now we can get one step closer to the dream! Sheets of steel will not be cut, but bags, paper, and plastic are easy!
For our laser, we first need a broken or not very good cutter! The less broken the cutter is and the faster it can burn discs, the better, and by the way, it should be DVD-RW. If the drive writes DVD+/-R at 16x speed, then there are 200 mW red lasers, in 20x drives there is a 270 mW laser, and in drives with 22x speed the power can reach up to 300 mW. All DVD drives also have an IR laser, but you will learn how to determine it later. Let me clarify right away, as many questions arise. Excerpt from the FAQ, which you can read on our website http://lasers.org.ru/faq.html
Question: Which laser diode is suitable?
Answer: An LD only from a write drive will do! and:
CD-RW - powerful 100–200 mW IR laser 780nm
DVD-Combo (DVD-Drive/CD-recordeble) - a weak red diode approximately like a Chinese pointer and a powerful 100–200 mW 780 nm IR laser
DVD-RW - powerful red LD 650nm 150–300 mW and powerful 100–200 mW IR laser 780nm
BLU-RAY ROM - blue-violet diode 405 nm with a power of 15 mW.
BLU-RAY RW - blue-violet diode 405 nm with a power of 60-150 mW. Shines brighter than red.
All other household devices (printers, mice, barcode scanners, etc.) do not have lasers of sufficient power! Everywhere the power is about 5 mW.
So let's get started! We disassemble the cutter and take out the optical part. This is what this part of the cutter looks like:
The only valuable things there are the output lens and two lasers. Now we take out the most important thing - the DVD laser:
Now attention! Before you start playing with the new toy, I’ll tell you the safety precautions. The laser from the DVD-RW drive belongs to class 3B, which means it is very dangerous for your eyesight! Do not direct the beam into your eyes or mirror! Before you even have time to blink your eye, your vision will become much worse! a guy accidentally showed himself on one forum and ended up with several thousand scams. Consider him lucky. A focused beam can damage your vision even from a hundred meters away! Watch where you shine!
Is it possible to damage an LD (laser diode)? Can! Even very simple. Once the current is exceeded, the diode will end. Moreover, a fraction of microseconds will be enough! This is why LDs are afraid of static electricity. Protect LD from him! In fact, the LD does not burn out, the optical resonator inside simply collapses and the LD turns into a regular LED. the resonator collapses not from the current, but from the light intensity, which in turn depends on the current. You also need to be careful about the temperature. As the laser cools, its efficiency increases, and at the same current the intensity increases and can destroy the resonator! Be careful! It can also be easily killed by transient processes that occur when turning on and off! It's worth protecting yourself from them.
We take out the laser and immediately wrap a thin strand of stranded wire around its legs! so that the LD terminals are electrically connected! We solder a small non-polar capacitor of 0.1 µF and a polar capacitor of 100 µF to its legs and only then remove the core that we wound! This way we will save it from statics and transient processes, which LDs really don’t like!
Now it's time to think about powering our laser. The LD is powered by approximately 3V and consumes 200–400 mA depending on the power (drive speed). A laser is not a light bulb! Never connect it directly to batteries! Without a limiting resistor, 2 batteries from a laser pointer will quickly kill it! LD is a nonlinear element, so it must be powered not by voltage, but by current! that is, current limiting elements are needed.
This is what the laser looks like from the inside:
So, we need to power our laser!
Let's consider three LD power supply schemes from the simplest to the most complex. All circuits are powered by DC sources such as batteries.
Option 1. Current limitation by resistor.
The resistance of the resistor is determined experimentally, based on the current through the LD. It is worth stopping at 200 mA for 16x, further the risk of burning is greater. Although my LD worked perfectly at 300 mA. Any three batteries of the required capacity will be suitable for power supply; it is also convenient to use a battery from mobile phone(anyone).
Advantages: simple design, high reliability.
Flaws: the current through the LD gradually decreases. And it’s not really clear when it’s time to recharge the structure. Using three batteries complicates the design and makes charging inconvenient.
This circuit is convenient to place in a Chinese lantern, which contains a battery of three AAA (pinky) batteries
And this is what it looks like assembled:
Two 1 Ohm resistors in series and two capacitors.
Option 2. Using the LM317 chip.
In this scheme, everything is much more complicated, and it is perfect for a stationary version of the laser! The driver uses an LM317 chip, which is included with a current stabilizer. See picture.
The driver maintains constant current through the LD regardless of power (at least 7V) and temperature. I advise you to download the datasheet for this chip and understand it more thoroughly, otherwise this is the best driver for the home!
Option 3. Compact. On LM2621.
This is what you need! Powered by two batteries, stable voltage(and therefore the current) to the LD, which does not depend on the battery charge level! When the batteries are discharged, the circuit will turn off and a small current will flow through the LD (weak glow). The smartest and most economical driver! Efficiency is about 90%. And all this on one LM2621 in a tiny 3x3mm package!! It's hard to solder, but I ended up with a 16x17mm board! And this is not a chapel! See picture.
I wound the L1 throttle on the ball, the mikruha is smart, she will figure it out on her own). I wound 15 turns of 0.5mm wire on the inductor from a computer power supply. The inner diameter of the choke is 2.5mm, the permeability of the ferrite is unknown. Any 3-amp Schottky diode. For example 1N5821,30BQ060,31DQ10,MBRS340T3,SB360,SK34A,SR360. Resistor R1 adjusts the diode current. I advise you to connect a 100k variable there when setting up. By the way, it is advisable to carry out all tests on a dead LD! electrical parameters remain unchanged. Choosing for yourself suitable scheme, let's collect it! Well, then the flight is up to the imagination!! I need to figure out how to secure the optics! Moreover, the LD must be placed on the radiator! At high current it heats up very well! so think about the design in advance.
Laser optics.
It is convenient to use a laser pointer as a basis for a collimator. It has a good lens. But the beam turns out to be approximately 5mm in diameter, which is a lot. top scores The native optics (output lens) shows, but it has its own difficulties. The focal length is short, which means it is very difficult to adjust the focus, but at the same time it allows you to get a beam with a diameter of 1mm!! By the way, the narrower the beam, the more energy is applied to 1 mm 2 with such a beam you can easily shred black bags)) if you focus not on the beam, but on a point, then at this point the plastic melts, the electrical tape is cut, the wood begins to glow white light from heating! (6000 degrees is no joke) and much more!! By the way, on our forum you can buy laser modules from AixiZ - they can perfectly focus the beam both for range and for burning!
Here are a few photos of the beam and the pointer itself
How to choose a laser pointer using the example of a 300 mW red laser
Good evening!
The other day I thought about what an amazing invention the laser is... Just think, the energy capable of melting plastic is concentrated in a beam and rushes into infinity! A ray that comes from your hands and reaches the clouds! To those that seem inaccessible to people... well, look at the looks of passers-by! There is no talk about classmates and work colleagues, they are shocked when they see how a sharp beam quickly cuts out circles from a black bag! I decided to tell you about the characteristics of the laser, namely the characteristics of a laser pointer based on a semiconductor laser. It just so happens that people like to compare and find out who has more, better, more expensive... and by what parameters should they compare lasers? And then marketing began... 99% of people when choosing a laser are guided by power! She interests them first of all! How wrong they are... although about the same as people who are chasing megapixels.
In fact, the power is far from ideal parameter, according to which you should organize laser pointers. I will list the parameters that are important to the end user: Power, reliability, beam thickness (aperture), beam divergence, dimensions, overheating protection, stability of emitted power, ease of power supply, mechanical strength. Quite a few parameters, right? And now about each little by little...
Power-power of the luminous flux. is it really that important? undoubtedly! the more powerful the better! however, a 100W light bulb emits much more light power, but does not burn anything... In general, the general idea is: you need as much power as possible, but provided that the other parameters are also at their best.
Reliability: Well, everything seems to be clear here, the longer it works and the more “foolproof” it is, the better. This is about Chinese pointers that are sold on the Internet. Read people's reviews and you will understand that if the laser works for a week, it is already a success.
Beam thickness: It would seem, what’s wrong with it? and that's what! If you distribute 300 mW of laser radiation power over an area of 1 square meter, then it will almost not be visible! There are no melting or burning effects to speak of! In short, in order to melt, cut, and ignite, a sufficient radiation density is required. it can be increased in two ways, either increasing the power or reducing the area on which we act. If 300 mW of power is concentrated on a round area with a diameter of 3 mm (the point of an ordinary Chinese pointer at 1 mW), then the maximum you can melt through packages, and for a long time! plastic doesn’t melt, matches don’t light... but if you install good optics and make the beam twice as thin, then the density increases 4 times! here the plastic melts and the matches are lit.
Beam divergence: It just so happens that nothing is ideal, and the laser beam gradually becomes wider and wider... after just a couple of tens of meters, the diameter of the beam reaches 1 cm! The divergence depends on the thickness of the beam. The thinner the beam, the faster it diverges. However, even a thin beam reaches the clouds and a small dot is visible on them.
Dimensions: everyone strives to minimize size and weight without compromising on other parameters..
Overheat protection: The laser is quite powerful and gets noticeably hot. Without cooling, it overheats in a couple of seconds. By installing a larger radiator and ensuring good contact, we can say with confidence that the laser will not fail because you forgot to turn it off.
Stability of radiated power: This is where it’s interesting) have you seen bright slogans on the Internet? 100 mW, 200 mW, 300 mW? but in fact it’s two times less... the fact is that when using primitive drivers, the laser power greatly depends on the condition of the batteries. I walked around the websites of battery manufacturers and saw graphs of battery discharge, so when the battery is new, it has 1.5 Volts, but after a second the voltage drops to 1.2–1.3 Volts! that's enough for a long time, after which the voltage begins to drop rapidly - the battery is discharged. Well, this power is given for a supply voltage of 4.5V, and in real life after turning on, the laser will first blink at full power, and then go to half power mode... these are the results... to prevent this from happening, you need to use intelligent drivers that stabilize the laser current, regardless of the state of the batteries. but they are expensive and are not used by the Chinese.
Convenience of food: I saw a laser online, it’s powered by two CR2 lithium batteries, it seems good, right? small, light... but why pay 100 rubles for each battery? in an hour she will sit down, so what? Should I throw away 200 rubles again? And not every store sells these rare batteries. Another thing is standard AAA and AA batteries and accumulators. cheap and common.
Mechanical strength: it’s very disappointing to look at the fragments of a laser that fell out of your hands onto the asphalt... the stronger the laser, the more likely that he will survive extreme conditions. I sell lasers, so all these parameters are extremely important to me. And this is what I have achieved in this area:
Fine? The “head” is turned on a lathe from aluminum, the laser will definitely not overheat!)) The rest of the part is taken from a flashlight.
Driver: This is where I tried and developed an excellent driver! It maintains an output power of 300 mW regardless of the power source! That is, you don’t need to worry that when replacing batteries with rechargeable batteries, the power will drop, and the effect of the first three seconds is eliminated here, the power is always 300 mW until the batteries run out. By the way, the temperature is also controlled! There are known cases when the laser burned out from the cold. In the cold, efficiency increases and the laser fails. My driver monitors the temperature and, as it cools, gradually reduces the current through the diode. I tested it down to 0 degrees, everything works! I’ll warn you right away that there are no descriptions of this driver anywhere on the Internet, and asking me to provide a diagram is useless.
Optics: I offer customers two options, either a thick beam (~3mm) or a thin beam (~1mm). Those who need it for lighting effects take the thick one, because it diverges less. And for burning, igniting and observing the beam, buy one with a thin beam. A thin laser lights matches, melts plastic, a DVD box in a few seconds through! All this can be seen in the video at the end of the article.
Nutrition: To power the laser, 3 AAA elements (rechargeable batteries or rechargeable batteries) are used; regardless of this, full power is guaranteed. When powered by batteries, full power is about half an hour, then gradually decreases. from batteries (due to their larger capacity) full operation time is 4 times longer.
Many of us have once wanted to have a real laser. As children, we bought laser pointers, played with them, scared birds and animals, but quickly became disappointed in their power. They didn't look like a Jedi sword. A laser pointer for 50 rubles, bought in a tent with a bunch of attachments, could neither burn through plastic and paper nor shine for hundreds of meters during the day!
For more impressive results, we will need:
1. DVD drive (RW)
2. Driver (Power for laser)
3. Optics
Let's start creating a DVD laser! First you need to buy a DVD-RW drive. You can look on the radio market for a dead DVD for 100 rubles, or you can buy a new drive - LG GH22. This article on disassembling the drive will be based on this DVD-RW drive. This fast drive can record DVD discs at 22x speed - an absolute recording speed record! And it costs only 600 rubles....
Before disassembling the drive, open the tray by applying power to it from the computer; if the drive is not working, use a needle:
Turn the drive over and unscrew the 4 screws circled in red:

We remove the cover and see the board that controls the entire drive:

Turn the DVD over again and remove the aluminum top, unscrew the 2 screws circled in red:

We disconnect the cables connecting the drive chassis and the drive itself:

Unscrew 1 screw circled in red:

We unscrew 3 more circled screws and try to pull out the crap that contains the diodes and optics:

We break off the soldered protection of optics and diodes:

We safely remove the protection and see 2 diodes - CD and DVD:

We take out the cooled diode with pliers, tie its legs with wire or solder the capacitor to the legs.... or use an antistatic bracelet:

Using a knife, carefully pry up the diode in the circled area and slowly and carefully try to remove it:

Congratulations! You have removed the laser diode from the DVD drive! But that's half the battle. The main thing is to protect the diode from static electricity by tying its legs with wire or soldering a capacitor. You can also use antistatic equipment, such as an antistatic wrist strap and an antistatic soldering iron.
Driver.
What is this, driver? why is it needed? The light bulbs work without it! The fact is that a laser diode is a very delicate element! This is not an oak light bulb, which doesn’t care what it’s powered by.
A laser diode (LD) driver is a small circuit that sets the laser power mode. it ensures that the current through the LD does not exceed the set level. The thing is that the LD is a semiconductor element, which means it is terribly nonlinear... that is, the LD current does not increase in direct proportion to the voltage, but much faster! This is why it is worth using current stabilizers to power the laser diode.
Well, the first driver... is not the ultimate dream, of course, but it will do for the first time!

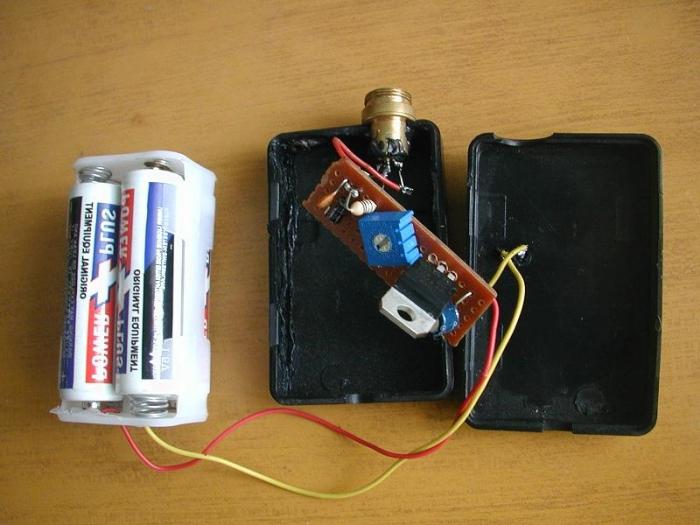
What do we see? firstly the battery. This is either a battery from any phone, or made up of three AA batteries. not to be confused with batteries!!
Then a button... actually any button.
A resistor... its resistance is selected experimentally; in principle, for a 16X drive its resistance should be two Ohms, then the current through the LD will be approximately 250 mA. you can either buy a resistor or find it on the drive board... often there are 1 Ohm resistors, connecting two in series we have two Ohms. if this current value does not suit you, you will have to select a resistor. For this you need an ammeter, which is connected to the positive wire of the battery and by changing the resistance we select the required current.
The capacitor is 100nF.. this is a ceramic capacitor, if there is a capacitance meter you can find it on the drive board! By the way, if you have old boards, you can look for orange round parts on them with the inscription 104, this is such a capacitor.
2200 µF electrolytic capacitor... of course this is the capacitance perfect option, however, a 100 µF capacitor at 6.3 volts is often sufficient. By the way, the voltage can be 10V or 16 or 25! it doesn't matter! Well, and actually LD itself! Solder the LD into last resort with legs wrapped in wire (remember about static, right?) when the installation is finished, remove the wire! That's it, the first driver is ready!
Results:
The simplest driver does not stabilize the current, it only limits it... which means your laser will be like a flashlight; the thinner the batteries, the dimmer it will shine! and the worst thing is that it is very difficult to understand exactly when the batteries begin to run out, because the beam is always bright to the eye... so as soon as the bags stop melting, it’s time to charge! Disadvantages are disadvantages, but the driver is very simple and miniature!
Option 2.
Using the LM317 chip.
In this scheme, everything is much more complicated, and it is perfect for a stationary version of the laser! The driver uses an LM317 chip, which is included with a current stabilizer.
Drawing

Optics
Optics are a very important component of a laser or laser pointer. Without optics, the laser will shine approximately like a regular light bulb and will neither burn nor shine for hundreds of meters! You can't go anywhere without a collimator!
What is it? assembled a laser, and it just glows like a spotlight? where is the expected “ray”? But no! The point here is this... the laser diode crystal is very small... accordingly, the resonator is too! Well, since the range of the photons is small, they fly not strictly parallel to the crystal axis, but also a little to the side... which means our laser diode shines not as a beam, but as a cone of laser radiation...
Don't despair, people have invented lenses! lenses allow you to transform this cone into a parallel beam, collimating it! But the lens must be installed so that the laser diode is at the focal distance of this very lens, otherwise nothing will work. And since it is very difficult to position the lens accurately, we come up with different ways adjusting the distance to the LD, for example, as in a laser pointer, where the lens is recessed into the body under the action of a screw.
It is convenient to use a laser pointer as optics. Also, a laser pointer can be used as a basis for a collimator. It has a good lens. But the beam turns out to be approximately 5mm in diameter, which is a lot.

Very good results shows the native optics from the DVD-RW drive, namely the latest lens that directly focuses laser radiation onto the surface of the disk. But it has its own difficulties. The focal length is short, which means the focus is very difficult to adjust. but at the same time this allows you to get a beam with a diameter of 1mm!! By the way, the narrower the beam, the more energy is applied to 1mm^2 with such a beam you can easily shred black bags)) if you focus not on the beam, but on a point, then at this point the plastic melts, the electrical tape is cut, the wood begins to glow white light from heating! (6000 degrees is no joke) and much more!!