Draw the dog's face step by step with a pencil. How to draw a dog with simple pencils
Dogs are perhaps the cutest creatures in the world. It is not surprising that many owners want to capture their pets not only in photos, but also on paper. We are ready to help you and tell you how to draw a dog. For beginners, these lessons will be simple and understandable, since we will have to depict the dog in an unusual cartoon style.
All you need is Blank sheet paper and pencil. If you wish, you can try to repeat the drawing on a graphics tablet.
Step 1
Start drawing the animal from the head. Draw a small curved line as shown in the picture. After this, add another arched line, which will slightly extend beyond the first one. You will end up with something that looks like a simplified drawing of a seagull.
Step 2
 From the two points where the back of the dog's head ends, draw two short straight lines. Continuing to draw the ears, draw 2 more lines on the paper. They should run perpendicular to the previous ones and be slightly inclined to the side. If you make the drawn lines perfectly straight, it will look unnatural.
Step 3
 Before drawing the dog completely, draw the first ear. Draw a short diagonal line with a pencil to outline the bottom of the ear. If desired, the line can be slightly rounded. Finish the drawing with two strokes - long and short. Do the same with the second ear, but you don’t need to draw the lower part.
Step 4
 Finish drawing inner part the first ear and the outer corner of the second. Draw 2 short lines indicating the corners of the mouth. Add 2 curved lines representing the main part of the dog's mouth.
Step 5
 Just below the corners of the mouth, mark 2 points. Draw a semicircle from the first point, a small dash from the second point, after which add the same semicircular line.
Step 6
 Continue drawing the bone. Draw a second semicircle and connect it to the first one as shown in the picture. Add a long line connecting both circles.
Step 7
 Go back to the dog's face and add a nose. Draw it in the form of a small oval, leaving a small gap at the bottom. Add a small triangle. The nose is ready.
Step 8
 Before you draw the dog's head completely ,
add eyes to your dog. First, draw two short lines, slightly directed upward - these will be eyebrows, depicting slight joy or surprise. After that you can start working on the eyes. Draw them just below the eyebrows, in the form of small ovals, slightly turned down.
Before you draw the dog's head completely ,
add eyes to your dog. First, draw two short lines, slightly directed upward - these will be eyebrows, depicting slight joy or surprise. After that you can start working on the eyes. Draw them just below the eyebrows, in the form of small ovals, slightly turned down.
Step 9
 Draw the dog's eyes and mouth. Add the pupils and jaw. The latter looks like an inverted trapezoid and is drawn in the middle of the bone.
Step 10
 Start drawing the dog's body. To do this you need to draw 3 lines. The first line is the beginning of the dog's neck. It should go from the left ear and end just below the bone. Start the second line from the dog’s neck and draw it more curved. Draw a third line from the right end of the bone and round it towards the end.
Step 11
 Continue drawing the dog's body as shown in the image below. Draw 3 more short lines on the left and right sides of your future dog's body. The lines on the left side of the picture represent the dog’s outstretched paw, the lines on the right half of the picture represent the dog’s paw in a lying position.
Step 12
 Continue drawing the animal's paws. Draw a curved line symmetrical to the one shown in the previous drawing. The second line should represent the dog's hip, which is lying on the surface of something.
Step 13
 Anyone who is wondering how to draw a dog with a pencil understands that paws are an important part of the drawing. Be sure to draw the animal's fingers. Pay attention to detail. Please note that the fingers should be slightly rounded.
Step 14
 Connect four more lines: from the left side of the bone and a point located slightly lower and to the left. You should now have the base for your dog's third leg.
Step 15
 Draw a line with a pencil from the left paw to the right. This is necessary in order to complete the body of your dog. Also at this stage you need to draw the fingers of the third paw. It is enough to draw three fingers, since the paw is slightly turned to the side.
Step 16
 At this point, add a slightly curved, “wagging” tail to your dog. Draw 2 more lines from the bone, which should end at the point where the paws begin. If you did everything correctly, you will get a unique and very elegant collar.
Do not press too hard on the pencil lead - in the next stage of drawing you will have to slightly change the dog's tail.
Step 17

If desired, add grass for your dog to lie on. Grass can be drawn in several places at once, for example, next to the paws, tail or on the horizon line.
Step 19
 The final touch is the dog's eyes! Make them more expressive by adding highlights. You can do this using white pencil or by erasing part of the pupil.
 Your dog is ready! If desired, you can color it or add new elements, for example, making the fur thicker and more noticeable.
So, the coveted drawing has been received, so the question “how to draw a dog” is no longer relevant for you. You are full of enthusiasm and ready to start new drawings! It is at this stage that most aspiring artists commit typical mistakes. Before you start learning new lessons and continue drawing, we suggest you familiarize yourself with simple recommendations:
- When starting to draw, buy plain paper and pencils. If you have expensive materials in front of you, you will think that you simply have to create something worthwhile. This will significantly slow down your work - you will be afraid to even start for fear of failure.
- Don't expect to succeed on the first try. Even experienced artists make mistakes and suffer from creative block. For those who are just starting their journey in drawing, the difficulties are quite natural. You shouldn’t give up a hobby that interests you just because of the first failures.
- Be selective when purchasing art books. Select literature that describes general rules and principles that are suitable for beginning artists. Books on anatomy and color perception are intended for students and may be incomprehensible to readers without the appropriate education.
If our lesson helped you, we suggest you read other articles, for example. In one of them we tell
In this lesson I will tell you... More precisely . Many, if not all, consider them the cutest creatures in the world (after, of course, cats always rule). No matter what they say, it’s better to draw something great once than to watch it a hundred times. Actually, this is what we will do now. But the dog won’t turn out cute if you don’t follow some rules of real artists:
- First, give the drawing a piece of your love;
- Second, sharpen your pencil;
- Draw all over the paper;
- Did not work out? Throw it away and start again!
- Turn on your imagination!
- Look at the result and rejoice, your smile is wider! =)
Drawing a dog step by step is easy and simple. Even if my dear readers skipped all the fine arts classes at school (which is what I did at one time), with the help of our tips they can easily draw a dog, or.
Where do we start? Let's draw just two oval shapes, from which we will create the torso and head best friend person. Approximately at their junction we draw another circle from which a muzzle will grow. We also make blanks for the paws.  The next step to mastering the art of drawing cute animals will be the head. What is important to remember here:
- The head is a very important element in the painting;
- It shouldn't be too big or small;
- Maintain proportions between body parts;
- Don’t make straight lines, they don’t exist in nature;
- Draw the lines with light movements, do not press the lead into the paper;
Let's move on to drawing the details of the face: ears like a bear, mouth and nose. Well, and most importantly, the eyes. Important points when depicting eyes:
- Animals' eyes are usually round;
- The pupils can be dilated, constricted, of different shapes;
- The highlight must be added relative to the light;
- The mood of the whole picture will depend on the eyes: sad, cheerful, aggressive, kind, and so on.
 Let's move on. Now the outline. It should be highlighted with a thicker line. On the paws we draw pads and claws like those of a cat. Let's add a tail. difficult for beginners. I strongly recommend that after the first attempt, do not put the work aside, but try again.
  The next step is to erase all the extra lines. And now our sketch has already become more realistic. The main thing is not skill, but desire.
 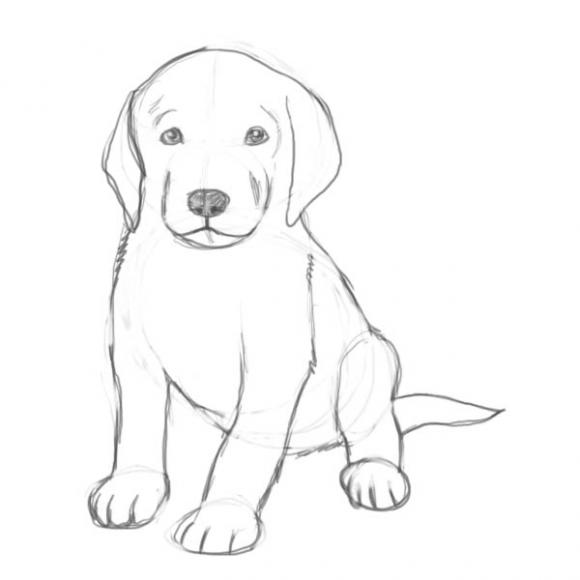 If you want, you can give his fur a slight tint, like in the first picture. Add shadows and colors. Use your imagination. It is not worth copying 1 to 1 from here. They say that every artist sees the world in his own way. I hope now you know how to draw a dog with a pencil step by step. I also recommend reading the lesson about drawing. Show off your work. This is how it happened for me:
  Try drawing something else, like a dove. I will be glad to see the results of your work. Leave comments, visit us often, and you will learn a lot of new things. Thank you for your attention! Continuation of this lesson, let's try to draw other breeds.
On the nose New Year and now I want to create for myself good mood. And creativity is best suited for this. Today we'll talk about how to beautifully and easily draw a dog step by step with a pencil.
Puppy "Sharik"
You should start with the easiest drawing. The puppy Sharik from the Soviet cartoon “A Kitten Named Woof” will come to life on paper very quickly if you follow a simple scheme:
Dog “Ball” – photo 1
In the center of the sheet, from the very beginning, the outline of the head is drawn, which gradually tapers towards the bottom and is vaguely shaped like a “thick” balloon.

Dog “Ball” – photo 2
Afterwards, oval eyes with dark pupils appear, the nose resembles a triangle with smoothed corners, and at the end a smiling mouth is depicted on the muzzle.

Dog “Ball” – photo 3
From the top right side a raised ear is depicted, as if the puppy is listening to something. The second ear is placed slightly lower in a lowered position, as shown in the picture below. At the same stage, with light movements, a line is drawn on the head, which will later become a black spot of fur.
A thick but short eyebrow is also drawn above the right eye, the inner corner of which points slightly upward.

Dog “Ball” – photo 5
After this you should move on to drawing the body. First, two horizontal arcuate lines are drawn - quite short, which will act as a neck.
One of them lengthens down and is rounded at the very end - this will be the front paw. You shouldn’t make it too long, since the picture still shows a puppy, not an adult dog.
The top short line becomes horizontal, turning into the back of the Ball - at the end it is rounded (becoming a tail), goes down, where it is drawn hind leg, as shown in the figure.

Dog “Ball” – photo 6
At the penultimate stage, the second hind leg is drawn - only a small part of it is visible in the drawing, so drawing it will not be difficult at all. Also on the back is a large brown spot, which perfectly complements the drawing.
And finally, the most pleasant thing - the ears, and spots on the back and head are painted over with black, or brown. All the rest of the “fur” remains light, so the drawing can be considered complete.
You can draw such a dog on, which you make with your own hands.
Sitting Dog: An Easy Way to Draw
If the last time a cartoon character appeared on paper, then this lesson will show you how to draw a beautiful realistic dog with a pencil step by step and without unnecessary difficulty.

How to draw a sitting dog - photo 1
If you look at the photos below, you won’t have any difficulties:
In the drawing the dog will be shown sitting, so initially it is drawn frontal lobe head, smoothly turning into an elongated muzzle and reaching the lower part of the mouth.

Afterwards, the nose and the left eye, which looks straight ahead, are drawn with thin lines. At the same stage it lengthens slightly top part head and the ear appears.

Now is the time to draw an arched line that will smoothly go into the front of the body. Here the front paw is drawn out with neat and smooth movements - as shown in the figure below.

When drawing the back, at the very beginning you need to depict small bump, since all dogs have shoulder blades that stick out a little. Further, the back is depicted slightly arched and smoothly turns into a long tail.


At the very end, the second front paw and the hind paw, which is visible quite a bit, are completed. If desired, you can draw shadows in the drawing or make the dog colored.

Despite the fact that this drawing is not complicated and even a novice artist can handle it, the result cannot but please. Plus, it's a great way to hone basic skills.
Puppy with kind eyes – pencil drawing
The next lesson is probably the most difficult of those presented above, because here Special attention pays attention to details. Although this option is also suitable for beginners, with due diligence and following all the advice, you will definitely be able to achieve a positive result.
So, another way to draw easily and step by step beautiful dog in pencil:
At the first stage, the contours of the eyes, nose and mouth are drawn with smooth and soft movements. You shouldn’t press the pencil and highlight the lines too much, because if you fail, you’ll have to use an eraser, and thick lines are much more difficult to erase.

Painted dog
From the nose you should draw arched lines, which will later become part of the muzzle. Also, special attention is paid to drawing highlights on the eyes and nose, as well as highlighting the nostrils and mouth.
Afterwards, a rounded forehead and the lateral line of the head emerge. From them come the ears and the “main” lines of the muzzle, connecting with the arched lines.
Now is the time to move on to drawing the puppy's chest. It is depicted using a curved line, and then the paw is drawn on the left side.
The second leg is not drawn to the very end - a horizontal stick is placed at the bottom in the middle, and then you should carefully follow the actions in the picture below.

Drawing the body
Then the puppy’s paws appear, which are located under the tummy. At the same stage, the line of the back is drawn - it should not be perfectly straight, but, on the contrary, slightly rounded.
For greater realism, the nose is painted over with a dark pencil, and strokes are made on the body, reminiscent of disheveled wool.
The videos that you can watch below will also help you practice drawing and improve your skills.
As you can see, drawing a beautiful dog with a pencil step by step is quite easy. And while drawing, you shouldn’t hold back your imagination, because no one says that all drawings have to be the same - they should help a person open up and show all his imagination.
How to draw a dog if you are not very good at drawing yet? Try to draw a dog step by step, adding new details to the drawing step by step. I'll try to convince you that it's not difficult.
How to draw a dog step by step
Let's start the lesson how to draw a dog step by step with a pencil from the set geometric shapes. Look at the picture below and try to repeat it in your own picture. It doesn't look very nice, but it will help you draw the dog correctly.

After the base is ready (in in this case all these figures are the basis) you can add ears and a tail. Connect the paws and body with lines.

The two ovals that served as the basis for the dog’s body can be wiped off with an eraser. Next, we move on to the paws and also wipe away the extra lines with an eraser. We remove the lines on the dog's head - the line separating the ear and the dog's muzzle.

If at this stage of the lesson on how to draw a dog step by step you get the silhouette of a dog - great! Don't be upset if everything didn't turn out the way you wanted. Try to figure out where the error might be and fix it. There’s nothing wrong with mistakes—everyone makes them!
So, let's continue drawing. When the silhouette of the dog is ready, you need to work on making it smoother - wipe out the “fat” and rough lines with an eraser and replace them with smooth ones.
I will also remove the line dividing the head and neck, draw the nose and ears.

The dog silhouette is completely ready! Let's draw the eyes and you can draw the fur.

To draw fur, you can use short strokes. By drawing many of these strokes, you can easily imitate a dog's fur. Please note that in some places the wool needs to be darker.
Both children and adults love dogs. It’s not surprising, because dogs are very smart and loyal animals. Most people will be pleased to receive a painted dog as a gift. Such a drawing can give confidence and encouragement, or lift your spirits and make you smile.
How to draw a dog for kids
This cheerful spaniel is easy to draw. And at the same time he is so cheerful. which will please any child. It is better for beginners to start trying out the pen with this scheme.
Draw an open circle. Below it is an oval with a dent at the bottom (muzzle). In the center of the muzzle, symmetrically draw and shade 2 small circles. Place them in the center of slightly elongated ovals. Draw a heart shape for the nose in the middle of the large oval. Under the oval in the center, draw a small arc (mouth), mark the eyebrows.  On the left side of the muzzle draw wavy line letter C extended downwards (ear). Similarly, in a mirror image, draw the ear on the right side.
From the dog's head, draw 2 short parallel lines down, and under them draw an irregular circle, expanding towards the bottom (neck, torso).

Draw the dog's paws, first draw the front ones, then the back ones. Keep in mind that the hind legs are slightly larger than the front legs.
 Give your dog a fluffy look by drawing fur. The drawing is ready, you can paint it.
How to draw a dog step by step

Draw the outline of the muzzle in the form of 2 connected curly braces. The dog's head is tilted, so draw all its details at a slight angle.

Draw a right angle and connect its edges with an arc. Draw 2 more internal arcs. Inside the smallest of the arcs, draw white dot, and shade the rest of the space. The result is an eye. By analogy, draw a mirror image of the second eye.

Draw an oval in the center of the muzzle, erase its bottom in 2 places with an elastic band. Draw in the center of the nose white highlight, and paint over the rest of the surface. Define the eyebrows.

The mouth is drawn in the form of a seagull upside down in flight. Draw the line of the chin a little lower. Draw the ears; their shape is selected depending on the shape of the dog’s head.

Draw the collar by drawing 3 arcs, each subsequent one slightly smaller, and connect their edges with parallel lines.

Draw the back and hind paw sitting dog. From the collar, draw a smooth line with 2 bends. Below it, draw an upside down letter “C”.

Draw the tail, while maintaining the proportions. Draw the front paw, and then finalize the image of the dog's hind paw.
 On the left side, draw a smooth curved line – the dog’s chest and stomach.
  Now draw the second front paw. The remaining hind leg is drawn last.
  The dog is ready, you can paint it.
How to draw a dog video
(in the video we draw a Beagle dog)
How to draw a dog with a pencil

Draw a small horizontal oval (head), under it at an angle of 45 degrees. larger oval (torso). At their junction, draw no big circle(muzzle). Label the paws.

Start drawing the head by drawing lines of symmetry. Draw the nose and mouth, ears on the sides of the head. The eyes are the most expressive detail and set the mood for the entire drawing. Their shape is round, the pupils can be dilated or constricted. The location of the glare is determined by the angle of illumination of the dog.
 Draw an outline. Draw toes on the paws and add a tail.
  Erase the extra lines. You will get an image of a puppy.
You can stop there, or you can continue to make it more realistic. Imagine how the light falls, how the dog’s fur bristles, its texture and reflect this in the drawing.
How to draw a dog step by step with a pencil
Draw a square in thin lines with a pencil. Use a ruler to find the middle of the sides and divide the square into 4 parts.  Draw a circle (head). Most of it is located at the top of the square.
  At the top of the lower right square, draw a smaller circle (the muzzle).
  Mark the position of the ears. Right ear above the left one and located in the top right square.
  Sketch the eyes.
  Draw a circle (nose) on the muzzle.
Sketch the neck and torso. 
Connect the top points of the ears with a line. Draw lines parallel to it, connecting the upper and lower parts of the eyes, mouth, nose, nostrils.
Adjust the shape of the ears, eyes, and muzzle. In the nose draw 2 arcs (nostrils), under the nose draw the curve of the mouth.
Outline the neck and torso.
Drawing fur
Erase the auxiliary lines, leaving the mesh of the muzzle visible. The dog's fur is drawn with strokes of varying thickness and length and color saturation. Watch the direction of their bend.
 Apply fuzzy strokes around the perimeter of the head to indicate the texture of the fur.
  Add long strokes at the top of the dog's head.
  Give the ears some fluffiness around the edges.
  Cover the surface of the ears with wool. To add volume and depth, darken certain areas.
  Draw the area between the eyes with strokes that vary in shape and size. Draw the fur under the left ear. Shade the outline of the muzzle and chin.
 Draw fur on the sides of the nose, under the mouth. Watch the direction of the hairs. Shade the torso and neck.
Drawing eyes, nose
 Area 1 (highlight) is the lightest and brightest in eyeball. Area 2 (pupil) is the darkest part of the eye. Area 3 (iris) is the colored part of the eye. Area 4 (white) part of the eye is light, but not white. Area 5 (eyelid).
  Give the dog's eyes almond shape.
  Bottom part circle the eyes (eyelid).
  Draw in an arc inner corners eye (iris).
  Apply a highlight to your eyes.
  Inside each iris, draw the 1st circle (pupil).
  Draw the lines of the nose.
  Draw the nostrils.
  Draw curves under the nostrils.
  Add highlights to the nose.
  This is what you should get as a result.
Shading of eyes, nose
 Sketch the iris of the eyes. It is darker at the top and lighter at the bottom.
  Shade the eyelids so that there is a thin light stripe on them.
  Shade the squirrels with an HB pencil; usually in dogs they are always in the shade.
  Use a 2B pencil to shade the top of the iris and the outer edge of the eyelids. Lightly blend the iris and whites with cotton wool.
  Use a 6B pencil to darken the pupils.
  Blend your eyes towards the outer edge.
  Using an HB pencil, sketch out the nose in small spirals.
  Draw out the contour of the highlights on the nose and the areas under the nostrils with dots and small turns. Use a 2B pencil to shade the shadow areas of the nose. Draw the nostrils with a 4B pencil.
  Blend the nose, then re-lighten the highlights with an eraser.
Working out the details
You need to apply shadows to the fur. This will give volume to the pattern, highlight the light source and emphasize the structure of the wool. The light is coming from the top left, which means the darker fur will be on the bottom right.
 Shade the fur around the eyes, nose, mouth.
  Shade the areas under the eyes and around the eyes where the shadow falls. Fill in light areas with a 2H pencil, for dark areas use 2B, 4B pencils.
Draw a shadow under the dog's chin. Check the shading again various areas. If everything is in order, the drawing is ready.
It often happens that you want to draw not an abstract dog, but a representative of a certain breed. Below are several examples.
How to draw a Chihuahua dog
 Draw a large circle (head), make a grid on it, indicate the position of the ears. From the circle to the side, draw 2 parallel lines (neck), below a horizontal oval (torso), outline the position of the paws.
  Correct the shape of the ears, mark the position of the eyes and nose. On the feet, start drawing the toes.
  Draw the eyes, outline the nostrils on the nose, form the mouth and neck. Draw claws on the paws and outline the stomach.
  Add smooth lines to the ears. Draw eyebrows, refine the nose, draw pupils, teeth in the mouth. Draw lines on the chest and claws on the hind paw. Draw the tail.