How to remove red eyes in Photoshop. Import photos and the necessary tools for working in Photoshop. Cause of red eye effect
Red Eye Removal helps you remove red eyes with just one click. You don't need to carefully select eyes in photos; the program will do it for you and automatically remove red-eye.
The red-eye effect appears in photos when shooting with flash when the camera is pointed directly at the person's face. Reflecting off the back of the eye, the light from the flash returns back to the camera, exposing an area of the film. This effect can be easily avoided by using professional photo equipping
About the red eye effect
However, when shooting with many cameras, this effect can often ruin your footage. You can remove the effect of red eyes manually by carefully selecting each eye and adjusting its color and brightness. The result will depend on how careful you were, as well as on your skills in using graphic editors. The Red Eye Removal program will help remove red eyes from photos by automatically detecting the red area and adjusting image parameters. Just one click is needed!
Removing red eye in animals
Unlike other programs, Red Eye Removal allows you to remove red eyes from animal photographs. When using flash, animals' eyes may appear not only red, but also yellow, blue or green. Red Eye Removal detects distorted color and corrects it when you click on the eye area.
Easy to use
Red Eye Removal is very easy to use. You can drag and drop your photos into it and process them all at once. The program has Undo and Redo commands that allow you to undo unsuccessful conversions.
Have you ever had a situation where in group photos everyone turns out normal, but you have demonic red eyes? Why does this happen and what options exist to correct this problem?
The fact is that the fundus of the eye has a red color due to the capillaries that nourish retina. To get rid of red eye in a photograph, you must either to different parties separate the camera and flash so that the light does not fall directly on the eyeball, or sketch the finished photograph in graphics programs. Of course, there is another alternative - to take photos during daylight hours, but even this does not help if you do it in indoors. How to remove red eyes in Photoshop? After all, it is much easier to sketch imperfections on the face than to disconnect the point-and-shoot camera from its built-in flash.
Importing a photo and the necessary tools for working in Photoshop
Before you start working on changing eye color, you need to understand the simple details of the program and find out what Photoshop tools we need. For simple selection we need:
- Oval area (or keyboard hotkey "M"). It is located on the toolbar second from the top and looks like an oval drawn with a dotted line.
- Feather (or hotkey keyboard "P"). It is better to choose this tool not from the keyboard, because there are several options, such as a free pen, which we do not need.
To load a photo into the main working environment, we do not need Photoshop tools; it will be enough to simultaneously hold down the “Ctrl” and “O” buttons on the keyboard, after which the file path selection window will open. If you cannot press these keys at the same time, find “File” -> “Open” in the menu bar, then do the same steps. So, our photograph is safely loaded into Photoshop.

Ways to highlight the red eye area
There are several ways to highlight the area of the eyes in which you need to replace the color.
- The first and most common way is using the oval area tool. To select a circular area, you must additionally hold down the "Shift" keyboard key and drag with the left mouse button to the required diameter eyeball. Don't be discouraged if the selected area is slightly out of place in the photo. Using the keyboard arrows you can move it to any place in the working environment.
- If you have narrowed eyes in the photo, or for some reason the pupil is not round, but slightly covered by the eyelids, you need to use the pen tool. How to remove red eyes in Photoshop using this tool? Quite simple. One mouse click will leave one point. A boundary will be automatically drawn between the first and second such points. We outline the outline of the red eye. The first point must be connected to the last one to create a closed area. Now right-click to call up the parameters and select “Create selected area”.
Our area of the eye is highlighted. Now you can perform color replacement operations.
Working with layers
Removing red eye in Photoshop won't take much time if you work through layers. Why is this especially convenient for beginners? Because the first time the replacement fails, you won’t have to re-select the red area of the eye. It will be enough to switch to working with another ready-made area of the eye, selected and cut out onto a new layer. To copy the selected object to a new layer, you can simultaneously press the keyboard keys "Ctrl" and "J". In layers we will see how another layer has been added to the background layer. Pressing the hotkeys again will add another layer of the selected red eye. We can, by selecting one or another layer, edit any of them. In addition, each layer has its own blending parameters, which can also be changed. This makes it much easier to remove red eyes in Photoshop.

Step-by-step instructions for changing pupil color
We've sorted out importing the photo, selecting and copying the red part of the eye, now the main problem is changing the color. So we have come to a direct solution to the question of how to remove red eyes in Photoshop so that they are as believable as possible.
- Let's return to the menu bar. Don't forget to make sure that our red eye layer is selected and not the entire background. You need to follow the path: “Image” -> “Correction” -> “Desaturate”. This way we completely removed the redness of the eye, but the pupil turned out gray and unrealistic.
- Next, again go to the “Correction” item through “Image”. There we select "Levels". In the window that opens, you need to correct the numbers on the input values. We leave the first digit 0, then change 1 to a lower range, for example 0.10 or 0.15. This way our center of the pupil will become slightly convex thanks to the play of colors. We leave the last value as 255.
- The photograph is almost ready, although a few more changes would not hurt it. Click "Filter" on the menu bar. Select "Other" -> "Maximum". We select the radius. In our case, let it be equal to 3. We save and look at the result in the working part of the program. The photo is ready.
Saving a photo with the extension .jpg

We have successfully figured out how to remove red eyes in Photoshop. Now you need to save the photo in its original format. To do this, press the key combination “Ctrl+Shift+S”, select the JPEG or .jpg format, the path to the folder where we are going to place the finished photo, and press the “Ok” button. So in 10 minutes our eyes turned from demonic red to normal.
In this tutorial you will learn how to properly correct red eyes.
Despite the fact that the Red eye tool appeared in Photoshop, starting with version CS2, its performance leaves much to be desired. It makes all eyes equally gray and lifeless, and often works unpredictably. Therefore, if you want to learn how to perform high-quality retouching of portrait photographs, the method described below will be very useful to you, as it provides greater flexibility and complete control.
So let's get started.
Step 1. Open our image.
Let's copy it to a new layer by dragging it to the icon shown in the figure, or by pressing CTRL+J.

Select the Red eye tool.

We use the following settings: pupil size 50%, darkening value 70%
Step 2. Apply the Red eye tool on a copy of the layer.

A small detail: to limit the search area for red pixels, select the eye area and then use the tool.

This is the result.

We will use it as an auxiliary one.
Step 3. Change the blending mode of the top layer to Difference(Difference).


This is what we will see. This is the difference between the pixels of the layers.

Step 4. Make a copy of the flattened layers. To do this, press this long key combination CTRL+ALT+SHIFT+E.

Then we delete the copy of the layer on which we got rid of red eyes. To do this, drag the layer thumbnail onto the trash can icon.

Name upper layer Red eyes.

Step 5: Change the Blending Mode of the top layer to Difference(Difference).

We'll see an image where the red-eye effect is corrected, but not in the way we want.

Mark the Red Eyes layer with a color. To do this, right-click on the eye icon and select a color.

Step 6. Make the background layer invisible by turning off the eye icon and go to the Channels palette.


Activate the red channel by clicking on its thumbnail, then press CTRL+A to select it and CTRL+C to copy it to the clipboard. Next, click on the RGB channel thumbnail to activate all channels (A).


Then go to the layers palette (B).
Step 7. Make the background layer visible (A), delete the Red Eye layer (B), and create a new adjustment layer (C) Hue/Saturation.

Let's name the layer, say, Adjustment. Let's mark it in red.

Step 8. Click on the mask thumbnail while holding down the ALT key, then press CTRL+V to paste the image from the clipboard into the mask.
Step 9. Double-click on the adjustment layer's thumbnail to open its dialog box. Move the saturation and brightness sliders to the far left.
16.01.2014 27.01.2018
I'll tell you about three ways to remove red eyes in Photoshop.
It happens that the eyes in a photograph turn out red and this spoils the photograph. To fix this bug, you need to use Photoshop. Photoshop easily copes with the task of removing red eyes.
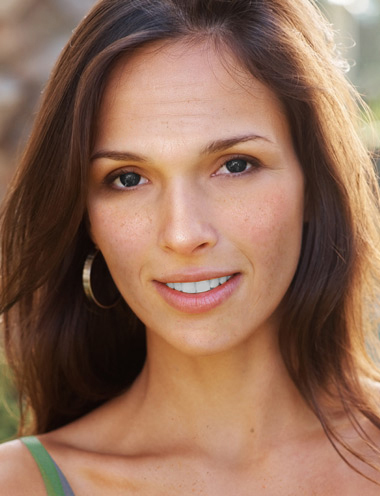
Let's take for example a photograph of a girl with exposed red eyes.
Method 1: Using the Red Eye Tool
This is the fastest and easy way remove red eyes. This tool Red Eye Tool is a standard tool in the Photoshop toolbox. But this method may not always cope well with the task.
Select it in the toolbar.

Just highlight the red area on the eye with it. To achieve a result, sometimes you have to carefully select several times, which proves the ineffectiveness of this tool in some photographs.
After using this tool I was able to remove red eyes.

Method 2. Working with Hue/Saturation (Hue/Saturation)
To start with, use Lasso Tool(Lasso) highlight the pupils in the photo.

Then use the function Image - Adjustments - Hue/Saturation (Image - Adjustments - Hue/Saturation)
Discolor your eyes Saturation (Color tone) - 0 and darken Lightness (Brightness) — 0
Note: if the eyes in the photo are of a different color, for example blue, then you will need to apply other settings. In particular, the Saturation will need to be made bright enough, the Hue will need to be set to blue, and the Lightness will also need to be adjusted.

This is the result. As you can see, we managed to defeat the overexposed eyes again.
Method 3. Using Channels
This is also a good way to change your eye color from red to normal.
First, highlight the eyes.
.jpg)
Open channels (Channels). Turn off all channels, leave only blue and switch to it. Click CTRL+C to copy the selected pupils.

Go to the red channel and click CTRL+V to paste what you copied.
.jpg)
Go to the green channel and paste too by clicking CTRL+V.
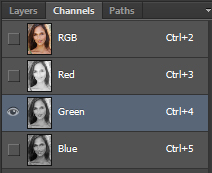
Turn on all other channels including RGB.

Result.

You need to choose the method in which you will remove red eyes from a photo based on the photo you will be working with. In some places you can work with standard Photoshop tools, but in others you will have to work more carefully and in more detail. These are the three simplest and most common methods.
Good day to you. Have you ever encountered in your life a stupid photographer, a bad camera, or worse, red eyes not only in photographs, but also in life? You can, of course, buy lenses, turn away during the flash, or simply not take pictures. But, I dare to tell you that this is not a solution. As always, in such difficult situations someone will come to our aid... no, you guessed right, it’s not Superman. This is our beloved Photoshop. In Photoshop, a tool was specially created for this problem, under the name, which is far removed from the essence of our problem, “Red Eye”. It's strange, I don't understand why they called it that. But today we will look at not only this subject, but also how to deal with this problem without this tool. So, let's go.
The red eye tool is located in, you guessed it, our toolbar. We've already covered the topic of red eye in previous lessons, so you should already know that this tool is in the same slot as the Spot Healing Brush, Healing Brush, and Patch tools. They are discussed in this lesson.
This tool is very easy to use. You just need to point at the red pupil and click on it with the left mouse button. The Red Eye tool has only two settings. These are "Pupil Size" and "Shade Amount". These settings are not important since the tool is well automated, but still experiment with them.

Now let’s proceed to the first method of getting rid of red eyes, so to speak, using improvised methods, without using the “Red Eye” tool. Selecting the “Brush” tool, select its size to match the size of your pupil. By first creating a new layer in the “Layers” window. If you do not have this window, then you can open it in the “Window” item, which is located at the very top. There you should check the box next to the word “Window”. Creating a new layer is simple. In the “Layers” window, you need to click on the small square that is located below and to the right in this window and which is called “Create a new layer”. Let me remind you that you can learn a little more about the button if you hover the mouse cursor over it and hold it for a while without pressing anything.

So, on a new layer we draw two circles in place of the pupils in black.

After which we should change the style of this layer to “Saturation” in the “Layers” window; this window is located at the top left.

Then we will connect the layers using the useful keyboard shortcut “Ctrl + E”. Hooray! We learned the first method.
Second way easier than the first. We should highlight the red pupils using any of the methods known to you. We went through many selection methods in previous lessons.

After successful selection, we must select the “Image” item in the top menu - it is third from the left. In the “Image” item, select the “Correction” item - it is second from the top. And in the “Correction” item we find and click “Desaturate” - this is the tenth action from the top.

Or, instead of going through all these steps after selecting, you can simply press the simple key combination “Shift + Ctrl + U”. After successfully changing the color of your lovely eyes, you should remove the selection using the “Ctrl + D” combination. All! The second method is over.
Well, the third method is simpler than all of the above. We will need the “Dimmer” tool; like all tools, it is located on the toolbar. But he does not live alone in his cell. The Burner tool shares its slot with its friends Dodge and Sponge.

This tool has only two settings: Range and Exposure. The “Range” setting indicates which areas the tool should work on: dark “Shadows”, all “Mid Tones”, or light “Highlights”. A The “Exposure” setting affects how hard the tool is pressed. That is: the higher the “Exposure”, the more our tool darkens. I'll say a little about the Dodge tool. The “Dodge” settings are not at all different from the “Dimmer” settings. Only this tool has the opposite effect, it does not darken, but brightens, this is clear from the name. And the stronger its Exposure setting, the more it brightens rather than darkens. That's all, we've sorted out the settings, let's get back, as they say, closer to the point. After we select the Burn tool, we simply move it over the pupils with the left mouse button held down, and our pupils gradually turn from red to black.

We are really great today, today we learned three ways to get rid of red eyes, and in addition to all this, we learned two tools. So we, with a sense of our own dignity, can go “goof around” today. Good luck and see you again!