We take photographs with a kit lens and an external flash. All about flash photography. Flash Techniques
So... what's the best way to use flash? What features of flash photography exist today? What are the secrets to shooting with built-in or external flash? Do you need additional flash accessories? What mistakes can you make when using “blitz” (another name for flash)?
When is the flash used? Not only in the dark! It happens that its use is necessary in backlight (when shooting against the sun) or if it is necessary to eliminate too saturated, deep shadows in too “hard” light.
First, let's look at using flash built into the camera. On some cameras, the flash must be opened and turned on before use... This is done either with your fingers or using the button located next to the flash. For example, on Canon DSLRs, a button next to the button is used for this, but on other cameras it may be different.
Flash operating modes. Settings, Their Selection and Use.
Many cameras have a built-in flash, There are several flash modes. And some other settings...
For example, you can adjust the flash power. If the objects in the photo are too bright, you can reduce the flash power. Its power is often adjusted separately from the overall exposure...
Another important setting: shutter speed when using the built-in flash. The fact is that using the built-in flash, you cannot use a shutter speed less than (shorter) than 1/200 or 1/250 of a second! Such are the technical limitations. And often the camera’s automation selects a very long shutter speed, so that the image is blurred when shooting. To prevent this from happening, many cameras have a function that allows you to fix the shutter speed at just 1/200 (or so), or leave the automation to work, but do not allow a shutter speed of more than 1/60 of a second (or so). But keep in mind that with these settings, the background of the photos may appear too dark in the photo, because a short shutter speed is not always enough to expose a dark night background. To minimize this effect, you should open (“increase”) the aperture as much as possible (for example, to a value of 3.5) and increase the sensitivity of the matrix (for example, set ISO 1600), although the effectiveness of such movements is often almost not felt :(
Keep in mind that when shooting with flash, the background may be too dark.
Synchronization on the first and second curtain (with long exposures)
Most DSLR cameras allow you to choose whether your flash will flash when the shutter is released, or at the end of the exposure (i.e. if the shutter speed is 3 seconds, the flash will fire 3 seconds after you press the shutter button). This matters if you use a slow shutter speed (longer than a second). The first option is most often used (“by the first curtain”), because otherwise, it will be difficult for you to guess at what moment the flash will occur... Photos taken when synchronizing with the second curtain turn out prettier, although they are more difficult to take IMHO :)

Manual mode of the built-in flash(not available on all cameras) can be useful if you want to achieve the effect of sparkle in the eyes (reflection of the flash in the eyes) or to suppress too hard shadows (for example, if you are photographing on a cloudless sunny day), then with a flash set to low power you can use during the day. But using manual mode requires a certain skill and experience. However, isn’t it time to gain this experience? ;)
I could also write about the flash mode with red-eye protection... but the main thing about it is to know that it exists and be able to activate it on your camera
Disadvantages of the built-in flash It can be attributed to the fact that it is small in size, and light from small sources most often turns out to be “hard”, giving deep shadows and not very beautiful highlights on the skin and very “hard” shadows behind the back of the subject! Keep this in mind when shooting with flash, no matter where you take pictures - outdoors or indoors, this is important! Sometimes, to get rid of glare, a fashion model can be asked to wipe the skin with a handkerchief to dry it, or use more powder in makeup.
Even external flashes “suffer” from the fact that their light produces too strong glare on human skin and too rough shadows behind the backs of fashion models. To eliminate these image defects (which, by the way, are extremely difficult to correct even in Photoshop), we use light diffusers that fit onto the flash. But they are mainly intended for external flashes, and not for built-in flashes, especially not for those built into a compact camera. If you have not yet chosen or purchased an external flash, then you can use a sheet of paper that is not too thick and can be held close to the flash as a diffuser. Or cut and put a ping pong ball on the flash. There are other ways to make a diffuser for a built-in flash with your own hands, but this is the topic of a separate article...
Working with an external flash
What is the difference between an external flash and a built-in flash? First of all, size and power. The second difference is that most external flashes can “flash” not only “in the forehead” of the model, but also turn in other directions, so that shooting in reflected light becomes possible - which is simply necessary, for example, for wedding photography.
Bounced flash light
You can point the flash, for example, at the ceiling - then its light reflected from the ceiling will seem natural (similar to the light falling from the sky during the day) and will not produce strong glare on the skin.
 Flash working head-on (on the left), and using reflected light (on the right).
Here the lines schematically represent the path of light rays.
Or you can point the flash at the wall - on the side of the model. Then in the picture we will get lighting coming from the side (light reflected by the wall), which can be mistaken for light from a window or the like. Sometimes reflected light works wonders, and a single flash on the camera gives an effect that is not always easy to achieve even in a photo studio!

During the shooting, only one flash was used; it was on the camera, but due to the fact that it was directed past the model, towards the reflector, its light fell on the model from the side and even slightly from behind.
Photographer: Karpin Anton. ©
External flashes also have more creative modes and other settings than their built-in flashes. For example, stroboscopic mode is almost never found in flashes built into the camera.
Strobe flash mode(or “multiple flash mode” on Nikon).
With a long exposure (more than a second), it allows you to get several translucent images of objects moving quickly in the frame. It is most impressive if these objects reflect light well and move against a dark background. When shooting in this mode, I recommend using a tripod.
 Some rights reserved by Stefanotshcki!
Exposure - 2 seconds. This is what the “stroboscopic” effect looks like.
An external flash allows you to control your power much more flexibly and quickly.
Flash synchronization at fast shutter speeds.
As mentioned above, the built-in flash does not always make it possible to use it at a shutter speed shorter than 1/200 or 1/250 seconds (or even more serious limitations). But most external flashes have a synchronization mode at low shutter speeds, which is extremely important in sunny weather, for suppressing too hard shadows on the faces of fashion models, and for adding shine to their eyes.
The use of several flashes will open up especially wide creative prospects: one master (on the camera) and several slaves. Then, even outdoors, you can create photographs with almost the same convenience and control over light as in the studio.
This part of photo tricks again covers the features of working with flash.
Flash power in manual mode
When using the flash in manual flash control mode (also indicated by the letter “M”), the flash is set to luminous flux power as a fraction of the maximum permissible flash power. You can experiment, on most central control centers it is possible to set the power of even the built-in flash in manual flash power control mode. So, a power of 1/4 means that the flash will work only at a quarter of full power, and 1/32, which is one thirty-second fraction of full power. 1\1 is full power. The larger the share, the more powerful the impulse will be. I often come across the fact that people think that the flash simply works with a given power and always gives the same “flash”. But this is not true, the flash controls its power, this is especially important in TTL flash modes.
Flash in M and TV (S) camera modes
Typically, built-in and external flash are used indoors in manual flash mode M. The camera is usually set to one of the modes. In modes S (TV - priority) and M (manual mode) it is very convenient to use the flash, since you can set a short shutter speed. In poor lighting conditions, such as indoors, when using priority mode, most cameras set the flash shutter speed to 1/60 seconds. This is not always convenient, since when shooting with a long lens, for example, with an 85mm prime, at 1/60 you can blur the background or moving objects due to normal movement in the frame of what you are shooting. But in S (TV) and M modes, you can set the desired shutter speed, and the automation or the photographer will adjust the flash impulse to the desired exposure. Yes, 1/60 is almost always the limit for automation when working with flash in dark conditions.
Important: for Nikon cameras you can only set longer ones, for example, 1/30 s when working with flash, but who needs them? For Canon cameras you can set the flash shutter speed to 1/200 s and forget about this inconvenience.
Important: There is no need to confuse the manual control mode of the flash power and the manual control mode of the camera “M”. And yet, 1/60 is such an inconvenience only in really poor lighting.
In fact, if you use both the camera and flash in manual mode, then the camera will receive the same amount of light at the same flash power at any normal shutter speed from 30s to 1\200s. In fact, if we shoot at 1/15s with the same flash power in dark conditions, the amount of light the camera will receive will be the same amount as if we shot at 1/160s with the same flash power. This effect is due to the fact that the impulse from the flash itself lasts a very, very short time, about 1\1000s. This is one of the main advantages of using both the camera and flash in manual mode. In mode S (TV, priority), the camera itself selects the value, and often this is the maximum allowable value for the lens, which is not always suitable for a given idea. To use flash at lower shutter speeds, you need to use .
Personal experience:
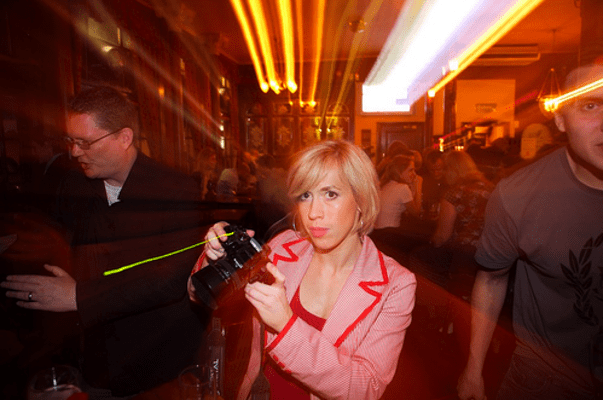
The problem of 1/60 seconds in priority is a really very inconvenient thing. At the same time, it is not a panacea, since the automation opens the aperture to the maximum. Only mode M remains; in mode M, with a given aperture, the camera adjusts the flash power so that it is normal (in this case, the flash must operate in automatic mode). I use this all the time when shooting in nightclubs, restaurants, etc. In general, playing with exposure is a very good training for a photographer, I advise you to take a look at the article.
Conclusions:
Working with flash is always a good workout for the brain. As always, I advise you to conduct your own experiments, especially with flash power in manual mode.
Thank you for your attention. Arkady Shapoval.
33021 Improving knowledge 1
In this lesson you will learn about the basics and main features of working with such an important photography accessory as a flash.
The main visual tool of a photographer is light, however, photographers have always strived to be independent from the vagaries of natural lighting. Today there are many possibilities. The most popular, of course, are electronic flashes. Although modern cameras usually have a built-in flash, it usually has limited capabilities. It is better for a photographer to have an electronic flash as a separate accessory; this immediately expands the range of operation of any camera.
The main characteristics of compact flashes are: guide number. The guide number expresses the product of the distance to the subject and the aperture value. That is, knowing the guide number of the flash (usually it is in the range from 10 to 60), which is necessarily indicated in the instructions for it, you can calculate the aperture value or the distance to the subject. Typically, the guide number is given based on a standard flash shutter speed of 1/30 second and a film speed of 100, as well as a lens with a focal length of 50 mm. For example, you have a flash with a guide number of 20, sensitivity (ISO) set to 100 units and a standard lens. You are filming a person at a distance of 2.5 meters. To find out the size of the required aperture, you need to divide the guide number by the distance: 20: 2.5 = 8. The aperture will be equal to 8.
The higher the guide number, the more powerful the flash, the greater the distance, if necessary, you can “pierce” the darkness. The color of the pulse of all flashes is balanced to the color of sunlight and does not require separate correction: the color temperature of the flash is 5500°K.
Another basic property of a photoflash is the angle of light emission, that is, the sector that is more or less evenly illuminated by the flash. In modern flashes, which are equipped with a zoom system, that is, the angle of light emission changes, its value is usually tied to the angle of view of the lens used and is expressed in millimeters of its focal length. In any case, this angle must be determined at least experimentally, so as not to end up with pictures in which the center of the frame is well lit, and the edges are “sunk” in the dark, especially when using wide-angle lenses.
Different manufacturers of photographic equipment may call automatic TTL (Through The Lens) flash modes differently: balanced, or fill, etc. This depends on the cameras, lenses and type of metering used, so it is always important to read the instructions and understand how settings and functions are switched. Let's see how you can improve a photographic image using flashes in practice; there are many techniques for this.
REFERENCE INFORMATION.Flash requirements upon purchase
The flash must be powerful;
. be sure to have a swivel head;
. several operating modes: A, TTL, manual;
. automatic zoom should track changes in the focal length of the lens;
. possibility of rear curtain synchronization;
. strobe mode (preferably);
. possibility of wireless control (to use several devices).
Flash to the forehead
This is the simplest and most primitive technique. The flash works in forced mode, and the camera does not see any light other than a short flash pulse. The pulse lasts about 1/1000 of a second, and the resulting photo is of faces, usually with red eyes, against a black background, and it doesn't matter at all that in reality there was a breathtaking evening landscape behind the model - and you wanted to capture it. People turn into red-eyed monsters due to the fact that the flash is very close to the optical axis of the lens. Reflected from the fundus of the eye with blood vessels like a mirror, the flash light returns to the camera tinted red. This is the typical operation of cheap cameras with built-in flashlights without the possibility of any settings. To avoid this, you must either use the red-eye reduction mode (if it has one), or, if the flash can be separated from the camera, you can move it slightly to the side of the lens axis. You can use a special cable and bracket.

When photographing people or interiors with conventional direct flash it is difficult to achieve good results, but if you have no other option, try to at least avoid mirrors, glass or flat polished surfaces directly in front of you or in the background. A reflected flash can not only enter the frame, but also change the automatic exposure of the frame with its bright spot of light. The worst option I've ever encountered when shooting with flash is a completely mirrored wall and ceiling, with alternating matte black panels.
Let's highlight the nature
There is a bright sun in the sky - it would seem that everything is fine, take pictures and rejoice! You won't think it's time to use the flash. And this is true. Strong sunlight is very harsh: the highlights are bright and the shadows are dark. You can set the flash to only lightly illuminate the motif without changing the overall light pattern. This backlighting technique is very useful when shooting portraits in bright sun or backlight, when you need to avoid high contrast or highlight deep black shadows.

The flash can be used for evening or night shots, such as at sunset, highlighting people without losing natural light. The subject is illuminated by fill flash, and slow shutter speeds allow the background to be processed so that both subject and background are properly exposed. To do this, you need to set the mode to A or TTL and adjust the flash compensation by 1-3 steps to minus. You can shoot handheld during the day, but in the evening be prepared to need a tripod. It is necessary so that the background does not turn out blurry. At dusk, the camera may take a long shutter speed, from fractions to several seconds, faces will be illuminated by the flash, and the background may be blurred due to camera movement during the long exposure.

Reflected light
The easiest way to improve the image when shooting with flash is to aim the flash light at the ceiling. In this case, instead of contrasting and flat “head-on” lighting, you will get soft, almost diffused light reflected from the ceiling, which will soften the shadows and give a natural light pattern. The disadvantage of such lighting may be small shadows falling on the face from the brow ridges and nose. Some flashes have the option of using a built-in diffuse white card that extends from the flash head. If you point the flash at the ceiling and at the same time give “backlight to the eyes” using such a card, then a sparkle will appear in the eyes - a reflection of the flash. If your flash does not have a built-in card, don’t worry, you can even replace it with a business card by attaching it to the flash in any convenient way.

When taking vertical photographs, it is convenient to point the flash at the wall. This is a very good method, if only the color of the ceiling and walls is white or soft colors. Reflecting from surfaces, the flash light itself takes on the colors of the wall or ceiling and changes the color of the image. Very often, photographers use special flash attachments to reduce the contrast of light. These can be small plastic diffuser caps. When shooting with attachments or when aiming the flash at the ceiling, some of the light is lost, so on the flash itself you need to set a correction of +0.3...1.0, the exact value of which depends on the height of the ceiling and the distance to people. Even cameras with accurate TTL metering can make mistakes. It's almost useless to point the flash upward if the ceilings are black or you're shooting in huge venues like sports complexes or indoor stadiums.
Setting up the camera when using flash
Quite often in a photographer’s practice there are situations when there is still natural (constant) light, but either its intensity or some other parameters do not make it possible to take a good, technically high-quality photograph. And in this case, the situation can be corrected (and sometimes even literally saved!) by adding a flash as an additional light source. However, simply installing it on the device and turning on the flash in this case is not enough. You've already tried it, haven't you? You still need to configure the device correctly.
Considering the practical aspects of using flash in this case, we, as always, will start with theory. Moreover, the theory will allow us to perceive the ongoing processes not as miracles or natural disasters, but as understandable and completely controllable phenomena.
So, the theory:
As you know, in standard mode, the flash emits the entire pulse of light almost instantly. The duration of the flash light pulse is typically 1/1000 - 1/10000 second. You could say almost instantly. Therefore, in the case of standard synchronization of the flash with the camera, the shutter speed is selected as short as possible, but not shorter than the shutter speed of the full opening of the frame window. We talked in more detail about coordinating the operation of the flash and shutter in the article on synchronization. For most modern digital SLR cameras, the shortest sync speed is 1/200 - 1/250 second.
What happens if the shutter speed is made noticeably longer? Say, instead of using a shutter speed of 1/250th of a second, use 1/60? Such a change in shutter speed will not affect the illumination created by the flash. And, if the flash was the only light source when shooting, then even a tenfold increase in the shutter speed (for example, up to 1/2 second) will not change the picture in the photo.

But if constant (natural) light falls on our subject, then the illumination created by it will be proportional to the time during which the matrix was exposed to light. And, if natural light is of low intensity (for example at dusk), then a short shutter speed of 1/250 second will not allow such light to create any noticeable image. But at a longer shutter speed, the matrix will already have time to collect the required amount of light to obtain an image of normal tonality. As a result, the objects in the picture will be illuminated not only by the flash, but also by constant light. At the same time, which is very nice, the roles of constant light and flash light will be different, and using shutter speed you can easily adjust their ratio. For example, a flash light will illuminate the foreground, while a steady light will illuminate the background.
Now let's move on to practice:
In any case, flash light is dosed by its own flash automation. It may be called differently - "E-TTL II", "ADI" or "i-TTL", depending on the name of your camera. But the results of her work are quite good in any case. Therefore, abandoning flash automation is a bad idea. Anyone who has ever tried to shoot a report with a non-automatic flash knows this well. When using a non-automatic flash, the likelihood of getting a correctly exposed frame in reportage shooting is low.
Exposure Modes
Now about the shutter speed and aperture control modes. The most understandable, predictable, but at the same time extremely slow method of matching constant and flash light is to use the manual (M) exposure mode.
We start shooting in “M” mode by setting the average photosensitivity and aperture values (ISO 250-400, aperture number - from 4 to 8). After that, we select the shutter speed, guided by the readings of the built-in exposure meter of your device. After that, turn on the flash, focus, finally frame and press the shutter button. The flash will illuminate the foreground, and the background will be developed thanks to a long shutter speed. Everything is fine!
Additionally, you can adjust the balance of natural and flash light by entering negative exposure compensation for the flash and changing the shutter speed value from that recommended by the built-in exposure meter (we do not set the “bunny” to “0”, but move it to “+” or “-”).
That's how the process works, in a nutshell. Naturally, we do not forget about the color parameters of our constant lighting. If it is daytime or evening light, it is not difficult to achieve normal, natural color rendition.
"Slow" synchronization
Most cameras can coordinate the operation of the flash and the use of constant light not only in manual mode, but also automatically. This mode is called "slow sync". With standard synchronization, the device’s automation, using the flash, considers it the only light source, not paying attention to the weak constant light. In the “slow sync” mode, the device, despite the use of a flash, does not forget about other sources of constant light. An example of the “slow sync” mode is the behavior of Canon EOS devices in Av mode with the flash on. In this mode, the device does not seem to “notice” that the flash is on, setting the shutter speed for normal exposure of the background with constant light. And the flash, in turn, illuminates the foreground. Naturally, using user functions, the device can be reconfigured to normal, “standard synchronization” (“shutter speed 1/200 in Av mode when working with flash”).
The “slow sync” mode works in roughly the same way in Nikon and Sony devices. However, we will not fully describe the entire process of setting up the camera. Do you have instructions on hand? Everything is written there in detail, and our article is by no means a replacement for instructions.
Synchronization on the first and second curtain
When synchronizing, the flash fires after the first curtain has already opened the frame window, but before the second one begins to close it. At short shutter speeds (1/200 - 1/250) this is actually the same moment. But at longer shutter speeds (that is, with slow synchronization), the second curtain begins to cover the frame window with a noticeable delay proportional to the exposure time. And here the difference will be very noticeable when the flash fires - at the very beginning of exposure of the frame, as soon as the first curtain frees the matrix for light access. Or at the very end of the process - before the second curtain begins to cover the frame window.
Accordingly, these two options are called “first curtain” and “second curtain” synchronization. Since both of these options are varieties of “slow” sync, slow sync on the first curtain is referred to as “slow”, and sync on the second curtain is referred to as “slow rear” (Nikon) or simply “rear” (Sony).

Let's take a closer look at both of these options in the case when the subject is moving and if there are any other sources of constant light in the frame. With normal synchronization, that is, “first curtain,” the flash is fired as soon as the first curtain opens the frame. A sharp, clear outline of the subject located in the foreground will be “drawn” at the very beginning of the frame exposure process, and therefore in the initial phase of the object’s movement. Further, while moving, the object is illuminated only by constant light sources. And, since the shutter speed in the case of slow synchronization is quite long, the image of the subject created by constant light will be at least blurry. Or it can even turn into a translucent "track". Accordingly, the final picture will consist of a combination of a clear, sharp image and a blurry “track”. Moreover, the track will be located immediately after the sharp contour in the direction of the object’s movement.
With second-curtain sync, the flash is fired at the very end of the exposure process. That is, the flash creates a clear, sharp image of the subject at the last moment of its movement. This means that when switching synchronization from the “first” to the “second curtain”, the sharp contour and the blurred track will change places.
Now - the most important question. Which synchronization option - first or second curtain - is the best, the most professional? Oddly enough, both of these options are approximately equally applicable. It is only important to understand in which case, when synchronizing using the first or second curtain, the transmission of movement in the picture will be the most natural.
When using flash, the following rules must be observed:
- Only install flash units on your camera that are recommended by the manufacturer. Do not install Soviet flashes on modern cameras. Use unfamiliar or unsuitable flashes for this camera using light synchronizers.
- Do not disassemble the flash yourself as it contains very high voltage sources.
- Make sure the contacts on both the power supply and the sync connector are clean and secure. If the flash does not indicate readiness for more than 30 seconds, the batteries must be replaced.
- Please note that the flash charge indicator may not show the true charge of the flash capacitor and therefore output power may be reduced by up to a third. Therefore, it is better to wait a few seconds after the indicator lights up. This is especially true for flashes with autonomous power sources.
- A decrease in flash power may occur due to the fact that it has not been used for more than a month and the capacitor capacity has decreased. Over time, it will recover, but it is better to charge the flash once every two to three weeks and turn it on several times in test mode.
PRACTICAL TASK:
1) Take 4 pictures of the same subject in low light (in the evening), without using flash, raising the ISO value and lengthening the shutter speed.
2) Take 4 pictures: a portrait at sunset and 4 pictures of a landscape in backlight with a backlit foreground.
3) Take 3 pictures of any object (small figurine, jewelry, decorative elements) using the flash (on the shoe) and pointing it at the object: at an angle of 45 degrees, vertically, vertically using the built-in reflector.
The results of the assignment and questions on the topic of the lesson can be posted on the site forum.
The main visual tool of a photographer is light, however, photographers have always strived to be independent from the vagaries of natural lighting. Today there are many possibilities. In addition to the common electronic flashes, there are studio flashes with modeling light, cooling and many accessories. There are photographic halogen lamps that are very simple and easy to use, for example for shooting interiors: they are compact, and when working with them you can always see the light pattern. A skilled photographer can even use ordinary incandescent lamps or local local light sources. You just need to remember and take into account when shooting that all artificial sources have their own color temperature.
The most popular, of course, are electronic flashes. Although modern cameras usually have a built-in flash, it usually has limited capabilities. It is better for a photographer to have an electronic flash as a separate accessory; this immediately expands the range of operation of any camera.
When purchasing an additional flash, find out what it can do. Least:
- the flash must be powerful;
- be sure to have a swivel head;
- several operating modes: A, TTL, manual;
- automatic zoom should track changes in the focal length of the lens;
- possibility of rear curtain synchronization;
- strobe mode (preferably);
- possibility of wireless control (to use several devices).
When shooting with halogen lamps or other constant sources, the photographer can always see the nature of the lighting and arrange the light sources in accordance with his creative vision; exposure metering is also not particularly difficult. Working with flashes is another matter, especially if there are several of them. You must mentally imagine how the light will fall, where the shadows will fall and the nature of the shadows themselves, as well as how the space will be illuminated.
Exposure measurement when working with studio flashes is carried out with a special device - a flash meter. The flash meter works like an exposure meter: it measures the flash impulse and produces exposure pairs - shutter speed and aperture. When there are several flashes and they are used with lightbox diffusers or with various attachments, the photographer’s experience comes first, his ability to correctly set the light not only in the studio, but in any interior, for any most unpredictable situation.
The main characteristic of compact flashes is the guide number. The higher it is, the more powerful the flash, the greater the distance, if necessary, you can “break through” the darkness. The color of the pulse of all flashes is balanced to the color of sunlight and does not require separate correction: the color temperature of the flash is 5500°K. Modern compact electronic flashes always work in harmony with the camera.
Different manufacturers of photographic equipment may call automatic TTL (Through The Lens) flash modes differently: balanced, or fill, etc. This depends on the cameras, lenses and type of metering used, so it is always important to read the instructions and understand how settings and functions are switched. Let's see how you can improve a photographic image using flashes in practice; there are many techniques for this.
Flash to the forehead
This is the simplest and most primitive technique. The flash works in forced mode, and the camera does not see any light other than a short flash pulse. The pulse lasts about 1/1000 of a second, and the resulting photo is of faces, usually with red eyes, against a black background, and it doesn't matter at all that in reality there was a breathtaking evening landscape behind the model - and you wanted to capture it. People turn into red-eyed monsters due to the fact that the flash is very close to the optical axis of the lens. Reflected from the fundus of the eye with blood vessels like a mirror, the flash light returns to the camera tinted red. This is the typical operation of cheap cameras with built-in flashlights without the possibility of any settings. To avoid this, you must either use the red-eye reduction mode (if it has one), or, if the flash can be separated from the camera, you can move it slightly to the side of the lens axis. You can use a special cable and bracket.
When photographing people or interiors with conventional direct flash it is difficult to achieve good results, but if you have no other option, try to at least avoid mirrors, glass or flat polished surfaces directly in front of you or in the background. A reflected flash can not only enter the frame, but also change the automatic exposure of the frame with its bright spot of light. The worst option I've ever seen when shooting with flash is a completely mirrored wall and ceiling, with alternating matte black panels.
Let's highlight the nature
There is a bright sun in the sky - it would seem that everything is fine, take pictures and rejoice! You won't think it's time to use the flash. And this is true. Strong sunlight is very harsh: the highlights are bright and the shadows are dark. You can set the flash to only lightly illuminate the motif without changing the overall light pattern. This backlighting technique is very useful when shooting portraits in bright sun or backlight, when you need to avoid high contrast or highlight deep black shadows.
The flash can be used for evening or night shots, such as at sunset, highlighting people without losing natural light. The subject is illuminated by fill flash, and slow shutter speeds allow the background to be processed so that both subject and background are properly exposed. To do this, you need to set the mode to A or TTL and adjust the flash compensation by 1-3 steps to minus. You can shoot handheld during the day, but in the evening be prepared to need a tripod. It is necessary so that the background does not turn out blurry. At dusk, the camera may take a long shutter speed, from fractions to several seconds, faces will be illuminated by the flash, and the background may be blurred due to camera movement during the long exposure.
Flash to the ceiling
The easiest way to improve the image when shooting with flash is to aim the flash light at the ceiling. In this case, instead of contrasting and flat “head-on” lighting, you will get soft, almost diffused light reflected from the ceiling, which will soften the shadows and give a natural light pattern. The disadvantage of such lighting may be small shadows falling on the face from the brow ridges and nose. Some flashes, such as the Nikon Speedlight SB-800DX, have the option of using a built-in diffuser card that extends from the flash head. If you point the flash at the ceiling and at the same time give “backlight to the eyes” using such a card, then a sparkle will appear in the eyes - a reflection of the flash. If your flash does not have a built-in card, don’t worry, you can even replace it with a business card by attaching it to the flash in any convenient way.
When taking vertical photographs, it is convenient to point the flash at the wall. This is a very good method, if only the color of the ceiling and walls is white or soft colors. Reflecting from surfaces, the flash light itself takes on the colors of the wall or ceiling and changes the color of the image. Very often, photographers use special flash attachments to reduce the contrast of light. These can be small plastic diffuser caps such as Nikon Diffusion Dome (each manufacturer calls them differently) or inflatable or folding Photoflex or Lumiquest nozzles. When shooting with attachments or when aiming the flash at the ceiling, some of the light is lost, so on the flash itself you need to set a correction of +0.3...1.0, the exact value of which depends on the height of the ceiling and the distance to people. Even cameras with accurate TTL metering can make mistakes. It's almost useless to point the flash upward if the ceilings are black or you're shooting in huge venues like sports complexes or indoor stadiums.
Camera, cable, flash
Sometimes it is convenient to move the flash slightly away from the camera. For example, when shooting reproductions through glass or framed pictures, it is better to light objects from the side to avoid reflections. When shooting fashion shows, or ballroom dancing, or portraits, in general, wherever a vertical frame format is often used, it is also more convenient to place the flash so that it is located above the camera. If the flash takes its usual place, then when you turn the camera to a vertical format, unpleasant sharp shadow contours appear from it. In all of these or similar cases, it is very convenient to use a TTL cable connecting the camera and your flash.
An extension cable with preservation of automation and TTL modes is a separate and quite expensive, but very convenient accessory. You can carry the flash as far as the cord's length in any direction and shine on objects or people from above, to the side or below. The only question is, who will hold your flash and cable while you shoot? You can, of course, use a special stand or invite an assistant or assistant.
Shooting with an umbrella
If you like to take portraits and often do it outside the studio, then you can’t think of a better set than a flash and a photographic reflective white (silver-plated, gold) umbrella. Firstly, this set does not take up much space, it is light, compact and can be quickly installed in almost any interior and even outdoors. The light from the flash, reflected by the umbrella, becomes diffused and soft, the shadows lose their harshness, and the overall light pattern improves. You just need to have an additional separate flash that is not built into the camera and shine it with light reflected from the umbrella or into the light.
The minimum set consists of:
- racks;
- a bracket connecting the umbrella, flash and stand;
- photographic umbrella;
- flashes on the umbrella.
Place the stand, attach the bracket, an umbrella, a separate electronic flash - and the stand-alone kit is ready. Let's call the flash in the standalone kit the slave, and the flash on the camera the master or main one. Turn on manual mode on the slave flash (on the umbrella), select the pulse power (1/2, 1/4, 1/8, etc.) and wireless control mode (triggered by pulse). “Set fire” to the stand-alone kit with an umbrella using the main flash from the camera. Sometimes you can use your own built-in camera flash as the main flash. In this case, the main flash on the camera should work at minus, without spoiling the soft light from the umbrella.
It is very important to mentally evaluate the future light pattern and correctly position the umbrella with the flash. Before shooting, the total light impulse is measured with a flash meter, and the desired aperture is set on the camera, the shutter speed is selected based on the available ambient light and the goal you are pursuing. Short shutter speeds cut off ambient light, long shutter speeds use it. It is more convenient to turn the camera into manual mode. While shooting, try to keep away other fellow photographers or active amateurs who, with their flashes, can “set fire” to your system regardless of you, unless your flash is programmed against this.
Before an important shoot, they usually do a test shoot, determining how the devices work and how the light falls. If the photographer does not have a flash meter, then test shooting on a digital camera (by trial method) can conditionally determine the aperture.
If you only have one, but separate flash, it can also be used with an umbrella by connecting it to the camera via a TTL cable.
Some digital SLR cameras do not see “extraneous” flashes in TTL mode; in this case, you must use manual or automatic mode A. Many modern flashes allow you to set the Master (master) and Slave (slave) modes, and in this case you can assemble a set of several sources that will work together in TTL mode. In any case, if your flash photos aren't good enough, read the instructions...
Open flash
This is a special working technique that allows you to shoot in dark and very dark conditions with only one lighting device - flash, while illuminating everything that is needed. This method is most convenient to use when shooting virtually unlit and very large interiors.
A method that became popular a couple of decades ago, when automatic and TTL flashes first appeared. Suppose you need to shoot a dynamic scene - movement, dancing, and low lighting does not allow you to set a short shutter speed, so without a flash all the pictures come out blurry. You can, of course, blitz “in the forehead” or at the ceiling and freeze the movement, but you can go the other way. The essence of the method is slow flash synchronization, that is, a long shutter speed and flash before closing the shutter.
Many good cameras have a mode called Slow (slow sync), which also requires long shutter speeds when working with flash and is, in general, convenient. However, what automation cannot do is evaluate the speed of movement and set exactly the right shutter speed that suits your subject - which is why sometimes manual modes are preferable to automatic ones.
We set the camera to manual mode and select the exposure (that is, the “shutter speed and aperture” pair) so that the image is underexposed, that is, it goes into minus by a stop or one and a half. We set the shutter speed somewhere from 1/2 to 1/30 second (the correct value depends on the speed of the subject's movements, the general illumination and your ability to hold the camera tightly). The aperture is whatever you get for your minus exposure and the selected shutter speed. Better somewhere from 4.0 to 8.0. On the flash, set mode A or TTL and rear curtain sync (on a flash or camera it can be designated as Rear or sometimes Slow Rear). When shooting subjects moving in the dark with a long shutter speed and flash, you will get a slightly dark and blurry background and a sharp image of the main subject in the foreground breaking out of the blurred background. The picture can turn out with dynamics, movement and expression. It is only important to focus correctly in the dark and do more takes, because it is only possible to really evaluate the result after shooting.
Synchronization with the rear curtain (before closing the camera shutter) is very important, otherwise the flash will “freeze” not the final phase of the movement, but the first, and the image will not be complete. It is recommended to remove all attachments and diffusers attached to the flash.
When shooting with slow flash in manual mode at discos or clubs, you can even include light sources in the frame or make camera movements during a long exposure in the dark of the hall. It is important that the selected shutter speed is long enough to move the camera, and that the overall exposure gives an underexposure of 1.5–2 stops. Only light and colored light sources will appear in the picture as multi-colored stripes, and the main objects will be illuminated by flash against a dark background. A little training and patience - and you will successfully take unusual photographs.
Shooting and working with two flashes
Suppose you want to get a high-quality and unusual image not only in the studio, but in any conditions and with minimal means. In this case, you can purchase a second and third electronic flash. With such a compact set of lighting fixtures, you can cope with most tasks. Just like when using an umbrella, we consider one flash on the camera to be the main flash, and the others as slaves, mentally imagine the future light pattern and place the flashes on stands in different places of the scene being filmed.
For more detailed instructions on using multiple flash units, please refer to the instruction manuals supplied with the units. Different flash manufacturers may configure how they work together in different ways.
Strobe mode on flash
Not every flash has a strobe mode (which allows you to shoot a series of short pulses over a certain period of time), but if your flash has such a mode, you can easily take very unusual pictures. It is enough to have a dark background without strong lighting behind the subject or very weak general lighting. Then you need to mentally calculate the number of flashes and their frequency in accordance with your task and program the flash for this number. Then set a shutter speed on the camera long enough so that all the flashes emitted by the strobe “fit” into it. (From a physics course: frequency 1 hertz = 1 flash per second, and, for example, 10 hertz = 10 flashes per second, etc.) You can put the camera on a tripod if the object is moving; but you can move the camera during the exposure if the subject is stationary. Take the time to look at the numbers on the back of the flash and do some basic math in your head.
Making a generalization, I will say: any shooting with flashes, especially with several, requires calculations and a certain imagination. No books or manuals will teach you how the light will fall correctly, how the shadows will be positioned, etc. Only practice, trial and error comprehension will help you feel confident in any situation. And one more important addition: wherever you use electronic flashes, one or more, with any accessories, it is important that its use is neat and not noticeable in the photo. Let the light from the blitz serve not the technical, but the creative side of photography.
You can read other lessons from Alexander Belenky in his book “Photography. School of Excellence."
The main visual tool of a photographer is light However, photographers have always strived to be independent of the vagaries of natural light.
Today there are many possibilities for creating the necessary lighting. In addition to the common electronic flashes, There is studio strobes with modeling light, cooling and many accessories. There are photographic halogen lamps, very simple and easy to use, for example, for shooting interiors: they are compact, and when working with them you can always see the light pattern. A skilled photographer can even use ordinary incandescent lamps or local local light sources. You just need to remember and take into account when shooting that all artificial sources have their own color temperature.
The most popular, of course, are electronic flashes. Although modern cameras usually have a built-in flash, it usually has limited capabilities. It is better for a photographer to have an electronic flash as a separate accessory; this immediately expands the range of operation of any camera.
When purchasing an additional flash, find out what it can do.
Least:
- the flash must be powerful;
- be sure to have a swivel head;
- several operating modes: A, TTL, manual;
- automatic zoom should track changes in the focal length of the lens;
- possibility of rear curtain synchronization;
- strobe mode (preferably);
- possibility of wireless control (to use several devices).
When shooting with halogen lamps or other constant sources, the photographer can always see the nature of the lighting and arrange the light sources in accordance with his creative vision; exposure metering is also not particularly difficult. Working with flashes is another matter, especially if there are several of them. You must mentally imagine how the light will fall, where the shadows will fall and the nature of the shadows themselves, as well as how the space will be illuminated.
Exposure measurement when working with studio flashes is carried out with a special device - a flash meter. The flash meter works like an exposure meter: it measures the flash impulse and produces exposure pairs - shutter speed and aperture. When there are several flashes and they are used with lightbox diffusers or with various attachments, the photographer’s experience comes first, his ability to correctly set the light not only in the studio, but in any interior, for any most unpredictable situation.
The main characteristics of compact flashes are: guide number. The higher it is, the more powerful the flash, the greater the distance, if necessary, you can “break through” the darkness. The pulse color of all flashes is balanced to the color of sunlight and does not require separate correction: flash color temperature 5500°K. Modern compact electronic flashes always work in harmony with the camera.
Different manufacturers of photographic equipment may call automatic TTL (Through The Lens) flash modes differently: balanced, or fill, etc. This depends on the cameras, lenses and type of metering used, so it is always important to read the instructions and understand how settings and functions are switched. Let's see how you can improve a photographic image using flashes in practice; there are many techniques for this.
Flash to the forehead
This is the simplest and most primitive technique. The flash works in forced mode, and the camera does not see any light other than a short flash pulse. The pulse lasts about 1/1000 of a second, and the resulting photo is of faces, usually with red eyes, against a black background, and it doesn't matter at all that in reality there was a breathtaking evening landscape behind the model - and you wanted to capture it. People turn into red-eyed monsters due to the fact that the flash is very close to the optical axis of the lens. Reflected from the fundus of the eye with blood vessels like a mirror, the flash light returns to the camera tinted red. This is the typical operation of cheap cameras with built-in flashlights without the possibility of any settings. To avoid this, you must either use the red-eye reduction mode (if it has one), or, if the flash can be separated from the camera, you can move it slightly to the side of the lens axis. You can use a special cable and bracket.
When photographing people or interiors with conventional direct flash it is difficult to achieve good results, but if you have no other option, try to at least avoid mirrors, glass or flat polished surfaces directly in front of you or in the background. A reflected flash can not only enter the frame, but also change the automatic exposure of the frame with its bright spot of light. The worst option I've ever encountered when shooting with flash is a completely mirrored wall and ceiling, with alternating matte black panels.
Let's highlight the nature
There is a bright sun in the sky - it would seem that everything is fine, take pictures and rejoice! You won't think it's time to use the flash. And this is true. Strong sunlight is very harsh: the highlights are bright and the shadows are dark. You can set the flash to only lightly illuminate the motif without changing the overall light pattern. This backlighting technique is very useful when shooting portraits in bright sun or backlight, when you need to avoid high contrast or highlight deep black shadows.
The flash can be used for evening or night shots, such as at sunset, highlighting people without losing natural light. The subject is illuminated by fill flash, and slow shutter speeds allow the background to be processed so that both subject and background are properly exposed. To do this, you need to set the mode to A or TTL and adjust the flash compensation by 1-3 steps to minus. You can shoot handheld during the day, but in the evening be prepared to need a tripod. It is necessary so that the background does not turn out blurry. At dusk, the camera may take a long shutter speed, from fractions to several seconds, faces will be illuminated by the flash, and the background may be blurred due to camera movement during the long exposure.
Reflected light. “I walked in and there was a flash in the ceiling...”
The easiest way to improve your image when shooting with flash is to direct the flash light into the ceiling j. In this case, instead of contrasting and flat “head-on” lighting, you will get soft, almost diffused light reflected from the ceiling, which will soften the shadows and give a natural light pattern. The disadvantage of such lighting may be small shadows falling on the face from the brow ridges and nose. Some flashes, such as the Nikon Speedlight SB-800DX, have the option of using a built-in diffuser card that extends from the flash head. If you point the flash at the ceiling and at the same time give “backlight to the eyes” using such a card, then a sparkle will appear in the eyes - a reflection of the flash. If your flash does not have a built-in card, don’t worry, you can even replace it with a business card by attaching it to the flash in any convenient way.
When taking vertical photographs, it is convenient to point the flash at the wall. This is a very good method, if only the color of the ceiling and walls is white or soft colors. Reflecting from surfaces, the flash light itself takes on the colors of the wall or ceiling and changes the color of the image. Very often, photographers use special flash attachments to reduce the contrast of light. These can be small plastic diffuser caps such as Nikon Diffusion Dome (each manufacturer calls them differently) or inflatable or folding Photoflex or Lumiquest nozzles. When shooting with attachments or when aiming the flash at the ceiling, some of the light is lost, so on the flash itself you need to set a correction of +0.3...1.0, the exact value of which depends on the height of the ceiling and the distance to people. Even cameras with accurate TTL metering can make mistakes. It's almost useless to point the flash upward if the ceilings are black or you're shooting in huge venues like sports complexes or indoor stadiums.
Camera, cable, flash
Sometimes it's convenient move the flash slightly away from the camera. For example, when shooting reproductions through glass or framed pictures, it is better to light objects from the side to avoid reflections. When shooting fashion shows, or ballroom dancing, or portraits, in general, wherever a vertical frame format is often used, it is also more convenient to place the flash so that it is located above the camera. If the flash takes its usual place, then when you turn the camera to a vertical format, unpleasant sharp shadow contours appear from it. In all of these or similar cases, it is very convenient to use a TTL cable connecting the camera and your flash.
An extension cable with automatic and TTL modes is a separate and quite expensive, but very convenient accessory. You can carry the flash as far as the cord's length in any direction and shine on objects or people from above, to the side or below. The only question is, who will hold your flash and cable while you shoot? You can, of course, use a special stand or invite an assistant or assistant.

© strobist

© rickydiver78
Opening an umbrella
If you like to take portraits and often do it outside the studio, then you can’t think of a better set than a flash and a photographic reflective white (silver-plated, gold) umbrella. Firstly, this set does not take up much space, it is light, compact and can be quickly installed in almost any interior and even outdoors. The light from the flash, reflected by the umbrella, becomes diffused and soft, the shadows lose their harshness, and the overall light pattern improves. You just need to have an additional separate flash that is not built into the camera and shine it with light reflected from the umbrella or into the light.
The minimum set consists of:
- racks;
- a bracket connecting the umbrella, flash and stand;
- photographic umbrella;
- flashes on the umbrella.
Place the stand, attach the bracket, an umbrella, a separate electronic flash - and the stand-alone kit is ready. Let's call the flash in the standalone kit the slave, and the flash on the camera the master or main one. Turn on manual mode on the slave flash (on the umbrella), select the pulse power (1/2, 1/4, 1/8, etc.) and wireless control mode (triggered by pulse). “Set fire” to the stand-alone kit with an umbrella using the main flash from the camera. Sometimes you can use your own built-in camera flash as the main flash. In this case, the main flash on the camera should work at minus, without spoiling the soft light from the umbrella.

© BURIBLUE
It is very important to mentally evaluate the future light pattern and correctly position the umbrella with the flash. Before shooting, the total light impulse is measured with a flash meter, and the desired aperture is set on the camera, the shutter speed is selected based on the available ambient light and the goal you are pursuing. Short shutter speeds cut out ambient light, long shutter speeds use it. It is more convenient to turn the camera into manual mode. While shooting, try to keep away other fellow photographers or active amateurs who, with their flashes, can “set fire” to your system regardless of you, unless your flash is programmed against this. Before an important shoot, they usually do a test shoot, determining how the devices work and how the light falls. If the photographer does not have a flash meter, then test shooting on a digital camera (by trial method) can conditionally determine the aperture.
If you only have one, but separate flash, it can also be used with an umbrella by connecting it to the camera via a TTL cable. Some digital SLR cameras do not see “extraneous” flashes in TTL mode; in this case, you must use manual or automatic mode A. Many modern flashes allow you to set the Master (master) and Slave (slave) modes, and in this case you can assemble a set of several sources that will work together in TTL mode. In any case, if your flash photos aren't good enough, read the instructions...
Open flash
This is a special working technique that allows you to shoot in dark and very dark conditions with only one lighting device - flash, while illuminating everything that is needed. This method is most convenient to use when shooting virtually unlit and very large interiors.
Slow flash
A method that became popular a couple of decades ago, when automatic and TTL flashes first appeared. Suppose you need to shoot a dynamic scene - movement, dancing, and low lighting does not allow you to set a short shutter speed, so without a flash all the pictures come out blurry. You can, of course, blitz “in the forehead” or at the ceiling and freeze the movement, but you can go the other way. The essence of the method is slow flash synchronization, that is, a long shutter speed and flash before closing the shutter.
Many good cameras have a mode called Slow (slow sync), which also requires long shutter speeds when working with flash and is, in general, convenient. However, what automation cannot do is evaluate the speed of movement and set exactly the right shutter speed that suits your subject - which is why sometimes manual modes are preferable to automatic ones.
We set the camera to manual mode and select the exposure (that is, the “shutter speed and aperture” pair) so that the image is underexposed, that is, it goes into minus by a stop or one and a half. We set the shutter speed somewhere from 1/2 to 1/30 second (the correct value depends on the speed of the subject's movements, the general illumination and your ability to hold the camera tightly). The aperture is whatever you get for your minus exposure and the selected shutter speed. Better somewhere from 4.0 to 8.0. On the flash, set mode A or TTL and rear curtain sync (on a flash or camera it can be designated as Rear or sometimes Slow Rear). When shooting subjects moving in the dark with a long shutter speed and flash, you will get a slightly dark and blurry background and a sharp image of the main subject in the foreground breaking out of the blurred background. The picture can turn out with dynamics, movement and expression. It is only important to focus correctly in the dark and do more takes, because it is only possible to really evaluate the result after shooting.
Synchronization with the rear curtain (before closing the camera shutter) is very important, otherwise the flash will “freeze” not the final phase of the movement, but the first, and the image will not be complete. It is recommended to remove all attachments and diffusers attached to the flash.
When shooting with slow flash in manual mode at discos or clubs, you can even include light sources in the frame or make camera movements during a long exposure in the dark of the hall. It is important that the selected shutter speed is long enough to move the camera, and that the overall exposure gives an underexposure of 1.5-2 stops. Only light and colored light sources will appear in the picture as multi-colored stripes, and the main objects will be illuminated by flash against a dark background. A little training and patience - and you will successfully take unusual photos.
Working with two or more flashes
Suppose you want to get a high-quality and unusual image not only in the studio, but in any conditions and with minimal means. In this case, you can purchase a second and third electronic flash. With such a compact set of lighting fixtures, you can cope with most tasks. Just like when using an umbrella, we consider one flash on the camera to be the main flash, and the others as slaves, mentally imagine the future light pattern and place the flashes on stands in different places of the scene being filmed.
For more detailed instructions on using multiple flash units, please refer to the instruction manuals supplied with the units. Different flash manufacturers may configure how they work together in different ways.
© pixelstate
Strobe
Not every flash has a strobe mode (which allows you to shoot a series of short pulses over a certain period of time), but if your flash has such a mode, you can easily take very unusual pictures. It is enough to have a dark background without strong lighting behind the subject or very weak general lighting. Then you need to mentally calculate the number of flashes and their frequency in accordance with your task and program the flash for this number. Then set a shutter speed on the camera long enough so that all the flashes emitted by the strobe “fit” into it. (From a physics course: frequency 1 hertz = 1 flash per second, and, for example, 10 hertz = 10 flashes per second, etc.) You can put the camera on a tripod if the object is moving; but you can move the camera during the exposure if the subject is stationary. Take the time to look at the numbers on the back of the flash and do some basic math in your head.

© 50 mm
Making a generalization, I will say: any shooting with flashes, especially with several, requires calculations and a certain imagination. No books or manuals will teach you how the light will fall correctly, how the shadows will be positioned, etc. Only practice, trial and error comprehension will help you feel confident in any situation. And one more important addition: wherever you use electronic flashes, one or more, with any accessories, it is important that its use is neat and not noticeable in the photo. Let the light from the blitz serve not the technical, but the creative side of photography.
You can read other lessons from Alexander Belenky in his book “Photography. School of Excellence."