How to make the background blurry in Photoshop. How to blur the background of a photo
Unfortunately, ordinary compacts and smartphones most often do not know how to create beautiful bokeh. This is explained by the fact that such devices have a smaller matrix built in. What should owners of budget cameras do? We can recommend that they use Photoshop, where making a blurred background is not difficult. All you need is appropriate practice, which you will now receive.
How to blur the background in Photoshop?
First, you need to clarify that not every photo is suitable for blurring the background. It is best to choose a photo in which the person’s legs are not visible, as are nearby objects. In our case, the person is standing against the background of the forest; this frame is ideal for processing. If there was also a bush or tree in the foreground of the photograph, then great difficulties would arise.
You should immediately remember that the desired effect is achieved using the Gaussian Blur function. If you apply it to any photo, you will get the impression that the photographer forgot to focus his camera. But we need to understand how to blur the background in Photoshop, not the entire image. Therefore, you should initially select the object that remains in the sharpness zone. There are several ways to do this. The easiest one is to use the Magnetic Lasso tool. If you already know how to use it (in one of the previous lessons we talked in detail about its work) - this is very good. If you don’t have enough skills, you’ll have to work hard. But in this lesson we will only briefly touch on this method. First of all, it’s worth talking about how you can get a blurred background using a mask. This is difficult for a beginner, but the result is impressive. It may take you 15-20 minutes to process one photo.
Blurred background in Photoshop CS5
First you need to create a copy of the existing layer. This is done in the Layers panel. Just open this palette and press Ctrl+J. You can also drag the “Background” layer onto the “Create New Layer” button. This will also cause a copy of it to appear. 
The new layer needs to be blurred. As mentioned above, the Gaussian Blur filter is used for this. It is located along the path “Filter-Blur-Gaussian Blur”. The filter is adjusted by dragging the slider, which affects the blur radius. Focus on the background at this moment. It should be blurred as if you were taking the photo with a DSLR camera at a wide aperture. Do not overdo it, otherwise the picture will not look realistic. If the changes in the photo are not displayed, then check the box next to the “View” item. This is how a blurred background is created in Photoshop CS5 later versions. 
When you are satisfied with the degree of blur, click the “OK” button. Now you need to apply a layer mask to this layer. To do this, follow the path “Layers - Layer Mask - Show All”. You will not notice any external changes after clicking on this item. But in the Layers panel you will see a white rectangle. 
And now the hardest part begins. Masks in Photoshop allow you to remove the effect of an applied filter from specified areas. Therefore, you need to tell the program that the person in the photo should remain sharp. To do this you will have to paint it completely black. This is difficult, so zoom in to 100%.
Select black color and then go to the Brush tool. Set the hardness to 20%. The diameter depends on the resolution of your photo and the size of the person. When the diameter suits you, start painting in black over the subject. 
Make a blurry background in Photoshop
Gradually you need to make the entire figure of a person sharp. It's okay if you go slightly beyond its edges. At any time you can press the Latin key X. This will change the color from black to white. Now all that remains is to brush over those places that accidentally became sharp. The filter action will be applied to them immediately. 
Paint white along the outline of the person. You must ensure that even a piece of the background is not sharp. For accuracy, you can reduce the brush size and increase the image scale to 200-300%.
Most of the work is ready: we have already succeeded in making a blurred background in Photoshop. But there is now a kind of halo around a person with its blurred outline. You need to get rid of him. To do this, use the Stamp tool.
Merge both layers into one. To do this, follow the path “Layers - Flatten”. The background layer needs to be unlocked. To do this, double-click on it in the Layers panel and give it a name. Next, use the Stamp tool. Set the pressure to 10%. All that remains is to remove all existing artifacts. You should already know how to use this tool. If this is not the case, then Photoshop will explain everything to you. In short, this tool copies one area of the image to another location. The area to be copied is selected by pressing the Alt key and the left mouse button. Then click next to the outline of the person so that a stamp appears on it in the form of a copied circle. Don't forget to adjust the diameter of the brush, otherwise you risk getting too much on the person's figure or taking too long.
The end result is a pretty good image. Some may have the impression that it was obtained using a good lens and a DSLR camera. But in fact, all you have to do is look closely and some artifacts will become noticeable. Only very painstaking photo processing, which sometimes takes an hour, will help you get rid of them. This is why experienced photographers use high-quality, fast optics. It is better to spend a decent amount, but then save a lot of time. 
How to blur the background in Photoshop CS6?
As for the second method of blurring the background in Photoshop, it is very similar to the first. A copy of the background layer is also created, and the unlocked background layer is blurred using the above method. Then you should go to the top layer and select the person in any way convenient. The most commonly used tool for this is the Magnetic Lasso tool. Then all that remains is to invert the selection and enjoy the result. This is also how you can blur the background in Photoshop CS6 and later versions of the graphics editor.
This concludes our lesson. Today you've learned another useful skill that you can then apply to almost any portrait shot. Now you know how to blur the background in Photoshop, which should only make your photos better.
I don’t want to read detailed instructions, but I want to blur the background quickly
To properly blur the background (as if your camera lens did it), select the objects that are in the foreground, i.e. which do not need to be washed out. To do this, it is convenient to use the tool Quick selection (Quick Selection). You can leave small areas around the edge unselected, we will work on this problem later. Now using the tool Refine Edge(or simply Feather in older versions of the program) set the edge blur within 1-1.5 pixels.
Then select the menu item Select (Selection) - Inverse (Invert selection). Or press the keyboard shortcut Ctrl-Shift-I. The selection now covers the entire background except the main subject.

After that, copy the selected area to a new layer ( Ctrl-J). Make sure the new background layer is active. Now apply a filter to it Gaussian blur: Filters - Blur - Gaussian Blur.
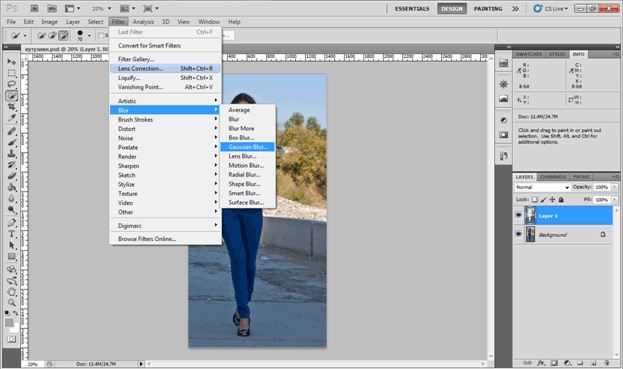
In the window that appears, enter a blur radius value in the range of 2-15 pixels, depending on the size and quality of the image, as well as the desired result. The background should be softly blurred, but retain the outlines of objects.

Now let’s deal with the areas that turned out to be “blurred” along the edges of the main object. For example, this often happens with hair, complex edges of clothes, etc. Everything is fixed very simply. Choosing a tool Eraser(Rubber, Eraser Tool), select a brush template with soft edges, select the appropriate size. Set the opacity ( Opacity) on 50% . Now we begin to carefully erase that part of the blurred layer that falls on the main object. This way, you return sharpness to the desired area of the image, leaving the background to smoothly fade into blur. Don't overdo it - try not to go beyond the boundaries of the main object.
Hello to all those who visited my blog. The weather is so cool today. It finally feels like spring. And with such a spring mood, I would like to tell you about one thing. Nowadays, many people already have cameras with which we can take beautiful portrait photographs with a clear display of the main characters and blurred backgrounds.
But still, not every camera has such a function (mostly only SLR cameras), and most people use smartphones, which also cannot take pictures with a blurred background, but you still want a beautiful photo. Am I right? As usual, there is a way out, and today I will tell you how to make a blurred background in Photoshop. It's not difficult at all.
The easiest way to do this is to use the familiar one. But first, let's open the image in Photoshop where we want to blur the background. I chose a photo of a girl on Red Square.

Do it carefully. If you suddenly hit too much, then always. But don't do everything in one click. It’s better to release the mouse periodically so that in case of an error you don’t have to go back to the beginning.
Well, that seems to be all. It looks beautiful. But let's look at a couple of other ways to broaden your horizons.
Eraser
In principle, everything here is the same as in the previous example, but with a small exception.

Many people prefer to use a layer mask in these cases, although in such cases I do without it. But just in case, I’ll show you anyway. It won't take much time.
Layer mask

That seems to be all. no matter which method you choose, the result will be the same: Our friend is depicted with normal clarity, but the background is blurred. That is, it immediately becomes more beautiful and effective. see for yourself. By the way, which method did you like best? Write, otherwise I’m interested.

No, Photoshop is still a wonderful tool for working with images. I am still amazed at what a powerful, convenient and interesting editor it is. And at least knowing the basics will always be useful in everyday life.
By the way, if you want to learn Adobe Photoshop in the shortest possible time, then be sure to take a look this wonderful video course. All lessons are built in order, no unnecessary water, everything is on the shelves. And the main thing is that everything is shown with live examples and told in human language. It will be understandable to any level of user.
Well, that’s where I end today’s lesson. I really hope that you found it interesting and useful. Therefore, I recommend that you subscribe to blog updates to keep abreast of everything interesting. Well, I’ll say goodbye to you for today, I’ll see you in other articles. Bye bye!
Best regards, Dmitry Kostin
If you want to get beautiful photos with a blurred background, which is done by expensive optics for professional photographers, then it is better to use Photoshop. This article will introduce two ways to make a beautiful blurred background in a photo using this program.
How to blur the background in Photoshop: method one
The first method will be much simpler than the second, but it looks less quality and is suitable for large objects and clear lines. If the model's hair is flying in the photo, then it will be difficult to bring this plan to life.
To make blur look natural, you need to remember some focal plane principles:
- The main subject in the frame always remains clear and sharp;
- Objects blur more when they are further away from the subject. All elements near the subject are blurred less.
Go to Photoshop and open the photo. You will now be working with the tools in the left panel.
Find the “Blur” or “Blur Tool”. It is presented almost in the middle of the panel and is indicated by a droplet.

You need to adjust the size and intensity of the tool. At the top you will see the line “Strength”, set the slider in it to about 70-80%. Set the size yourself, depending on your photo.


Start drawing with the tool around the main object, try not to touch the model. If necessary, enlarge the image and work carefully.
As a result, you will get a soft blur that does not affect the main subject.


How to blur the background in Photoshop: method two
With the first method of execution, you cannot set the direction of the blur, and if you are still poorly equipped with the tool, then the work may turn out to be sloppy. To make things look more professional, try using the Pen tool.
Pay attention to the left side of the toolbar, click on “Pen”.


This tool is quite easy to use, you just need a little practice. You have to put points and then bend lines from them. In this way, outline your entire model in the frame.


Once you finish and close the circuit, right-click on the circuit. In the pop-up window, select the line “Make Selection” or “Selection”.


In the window that opens, set the value to “0” and click “Ok”.


Now look at the right side of the program. You need to remove the padlock icon from your layer. Just click on the icon once.


After that, grab the other tool on the left side of the screen. It's called "Selection". Right-click on the outline again and click on the “Layer Via Cut” line.

You will immediately see a second layer on the right side of the window, go to the bottom one by simply clicking on it with the mouse.

Then click on the “Filter” or “Filter” menu, in the drop-down list click “Blur” or “Blur”. Now you have to choose the blur type. They differ in direction, for example, you can make a slight blur of the background in an upward or sideways motion, which will add dynamics to the frame; regular blur without any movement is also available - it is called “Gaussian Blur” or “Gaussian Blur”.
In the same example, “Radial Blur” or “Circle Blur” will be applied so that the edges of the photo curl nicely around the model.

Set the blur value to 1-4, depending on your goals. If you want a soft blur, then 1 or 2 is fine.


Take a closer look at how the background on the sides is now twisted into a ring. All you have to do is adjust the photo.


Finish editing with color correction and any artistic effects. To make the blur look more natural, you can take the History Brush tool and bring back some of the elements around the model to a sharper look.


16.02.2015 27.01.2018
Open the photo in Photoshop. I'll show you how to blur the background behind this girl, not all of it, but in some places, to get a beautiful effect. You can blur your own photo using the same method. The main thing is to highlight an object that remains sharp. And allocate it conscientiously.
Using the Polygonal Lasso Tool, select the object.
.jpg)
Press CTRL+J - this action will automatically cut out what you selected and place it on a separate new layer. It will be a girl.
Go back to the photo layer and make a copy of it by pressing CTRL+J.
.jpg)
To this copy apply Filter – Blur – Tilt-Shift (Filter – Blur – Tilt-Shift).
Here you can configure the settings as you wish. Where there is a circle, that place remains sharp. The lines indicate the scope of the background blur; you can move them as you like and even tilt them. You can also adjust the blur strength - for this there is a control bar in the circle.
.jpg)
Click OK when done and the background will be blurred.
.jpg)
What is the problem here? If you look closely, you will see that the outline around the girl is nothing more than a blurred girl behind. It is clear that this does not happen in life, and from this it is clear that Photoshop was used as a processing tool in the photograph. Our task is to get rid of this jamb.

How this problem is solved in one of the possible ways.
Delete this blurred background layer - we won't need it. You should have two layers - one with the girl, the other - the whole photo. CTRL-click on the layer with the girl - this way you will get a selection.
.jpg)
Go to the layer with the photo, and turn off the layer with the girl from visibility for now (click on the eye opposite the layer with the girl).
The selection will remain. Press DEL on your keyboard to delete the selected area from the photo. Press CTRL+D to deselect. We removed the girl, so in her place there will be an empty image - a white background.
.jpg)
Our task is to paint over this place. To do this I used the Clone Tool. I tried to paint as if the girl was not in the photo, although you don’t have to try very hard, the main thing is that the shades of the colors in the area being painted match those lying next to it - that’s the whole point.
.jpg)
Now turn on the visibility of the layer with the girl, and blur the background with the same filter as we did earlier. Now the result is completely different. In this case, only the background behind is blurred, and not the background along with the girl. This makes it much more pleasant to look at and the work looks much better.
.jpg)
In this photo I will show an example of a completely blurred background. Just apply the Gaussian Blur filter. This effect is also in fashion now, because it looks gorgeous. The technique is the same, only a different filter is used.
.jpg)
The only problem that may arise here is how to highlight such complex parts of the image as hair. For this I have a special free video course -.
This blurred background is perfect for lettering.
.jpg)