How to quickly and professionally crop a photo to the desired size in Photoshop. How to crop an image in Photoshop? Tips and tricks
One of the most popular functions when working with images is cropping. It helps out in many cases: when there are unnecessary objects in the photo, when you need to make the image suitable in size, and also when you need to move an object from one photo to another. In general, pruning is used in a variety of situations. That is why it will be useful for every user to perfectly master the skills of using this useful function. In this article, we'll figure out how to crop a photo in Photoshop. Let's get started. Go!
We will tell you how to cut out a specific part of an image
Let's start with the most typical case, when you need to crop a photo to the desired size. It's done like this. First, upload a photo. Open the File menu and select Open. After that, go to the toolbar and click on the icon corresponding to the Crop tool. You can select the desired area using the mouse by stretching the selection rectangle to a suitable size. If you have marked it in the wrong place, you can move it by placing the mouse cursor in the center of the selection. To change the size of the frame, place the cursor in its corner and hold down the left mouse button, now you can freely transform the selection frame. In case you want to cut out a part of an image of a specific size, in the tool options bar at the top you will find two cells in which you can set the width and height values in pixels. In this case, the selection rectangle will always maintain the specified proportion. After that, press Enter on your keyboard, or double-click the left mouse button to crop the photo.

Choose the mode that suits you best
Next, you can set the required dimensions for the already cropped photo. Go to the Image menu and click on Canvas Size. In the window that opens, set new width and height values. On the right you can select the most convenient unit of measurement.

When adjusting the length and width of the canvas, the scale of objects in the image remains unchanged
Now let's figure out how to crop a photo along its contour in Photospop. This will come in handy if you want to cut out an object from one picture and paste it into another. Go to the Tools panel and select the Pen tool. Then, in the Attributes panel, set the mode to Outlines. This mode allows you to select contours with maximum accuracy and detail. Enlarge the required portion of the photo for greater convenience. Carefully, slowly, place dots along the contour of the object. This tool allows you to select a bend line. To do this, you need to place the cursor on a point, hold down the left mouse button and move the point to achieve the desired effect. Once you've finished setting the points, click on the very first one to close the chain. Right-click and click "Create Selection" in the dialog box that appears. Set the feather radius to two pixels. Also, don’t forget to check the “Smoothing” checkbox. Click OK.

In this article, we'll look at how you can easily crop a photo to the size you need. We will be dealing with image resizing. Let's look at how to get standard size photos: 5 by 7, 8 by 10, or 11 by 14 without distortion and making everything appear elongated and thin or squashed and thick.
Here's an example of the problem. I get many of my photos from my Canon Digital Rebel XT, which has 8 megapixels. Here's a photo I took of it last winter:
Original photo
Now, let's say I want to print 8 by 10 photos. Since the photo was taken with an 8 megapixel camera, printing an 8 by 10 photo with professional-grade quality shouldn't be a problem. Let's look at the length and width of this image in pixels so we can calculate what its overall size is.
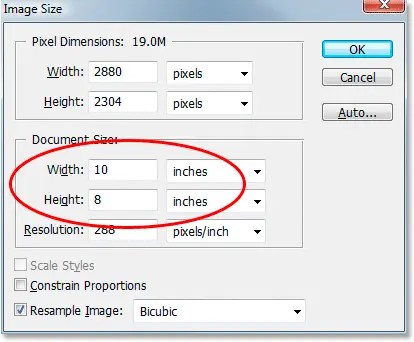
I open the " Image Size" by selecting it from the " Image" menu. If we look at the section " Dimensions in pixels" at the top of the window, we will see that my photo, as I transferred it from the camera, has a width of 3456 pixels and a height of 2304 pixels:

Photoshop's Image Size dialog box showing the photo's pixel dimensions
Pixel size can tell us how many pixels our image is made up of, but it has nothing to do with the print size of the image. To view or resize a photo on print, we must refer to the section " Document Size».
Currently, the specified document length and width indicate that at 240 pixels per inch, which is the standard resolution for professional print quality, my photo will print at 14.4 by 9.6 inches. It's certainly a decent size photo, but I probably won't be able to find a paper size that fits those dimensions.
Let's see what happens if I use the dialog box " Image Size“I’ll try to change the print size of the photo to 8 by 10. As a rule, this is the format we use when printing. Since my photo is in landscape orientation ( those. width is greater than height), I actually want a 10 x 8 photo.
So I change the width value in the " Document Size" by 10 inches. I want to make sure that when resizing the image's proportions are not distorted. So I select the option " Maintain proportions" at the bottom of the dialog box. Here I changed the width value to 10 inches:

Change the print size of an image in the Document Size section
After I changed the width of my photos to 10 inches, since the option " Maintain proportions" was turned on, we can see in the picture that Photoshop itself changed the height of my photos to... 6.667 inches? It is not right. We need a 10 by 8 format, not 10 by 6.667. Hmm... I guess I just need to change the height to 8 inches:

Change the image height in the Manual Document Size section
Well done. I changed the height of the photo to 8 inches, and now in the " Document Size"I see that my photo is in the format... 12 by 8?! Hey what's going on? All I want to do is change the print size to 10 by 8. But if I change the width value then the height is not right for me and if I change the height the width is not right! How do I resize a photo to 10 by 8?
Answer: None. At least through the window " Image Size" The original dimensions of the photo will not allow you to change it to 10 by 8 without distorting the image. So what should we do? It's simple! We forget about the dialog box " Image Size».
Instead, we'll crop the photo to the sizes we need! To do this, we use Photoshop's Crop tool!
Step 1: Select the Crop Tool
The first thing to do is select “Crop” in the toolbar or press the letter C on the keyboard:
Selecting the “Crop” tool
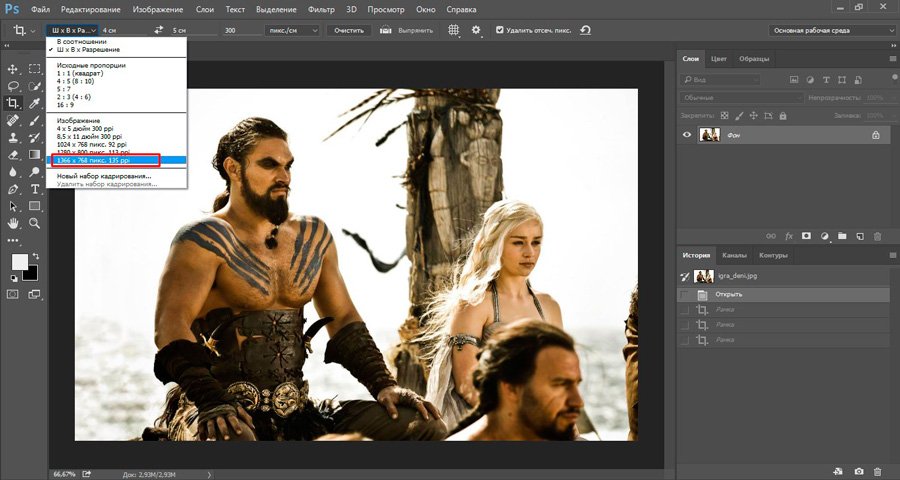
Step 2: Enter the exact print dimensions you need in the Options Bar
If you look at the options bar at the top of the screen, with the Crop tool selected, you will see an option for Width and Height. Here you can enter the exact width and height values you need.
And also units of measurement ( inches, centimeters, pixels, etc.). Since I want to crop my image to 10 by 8, I enter 10 in the width field, followed by “in”, which means “inches”. After that I enter 8 in the height field and then "in" again:
Entering exact width and height values in the Options Bar
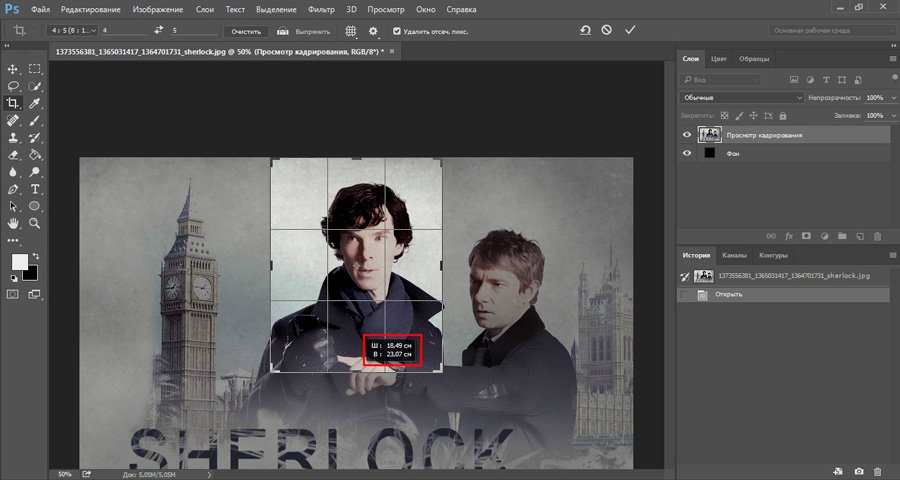
Step 3: Drag the Crop Frame
Once you've entered the exact dimensions, simply click inside the image and set the crop frame. The area of the photo inside the frame will remain, and everything else that is now slightly darkened will be cropped out. You will notice how when you stretch the borders of the frame, the sides change proportionally, since we set the exact parameters.
The only thing we can do is adjust the overall size of the border with the same aspect ratio. To do this, you need to pull one of the corners of the frame. You can also move the cropping frame within the image. To do this, move the cursor inside the frame ( it will take the form of a black arrow), and then click and hold down the mouse button and drag the frame:

Move a crop frame using the Crop tool
Step 4: Press Enter/Return to crop the image
Once you have the crop box dimensions and position set to your desired size, simply press Enter ( Win) / Return ( Mac) to crop the image:

Press Enter (Win) / Return (Mac) to crop the image
This is how I cropped my 10 by 8 image without distorting it. If we return to the Image Size dialog box, we can see that it now lists the document dimensions as 10 inches wide by 8 inches high:
The image can be printed in 10 by 8 format
That's all! This is how you can easily crop an image to any size!
Translation of the article " Cropping Photos To Specific Frame Sizes In Photoshop» was prepared by the friendly project team
Good day, dear readers. Today I will tell you how to crop a photo in Photoshop. We will look at not only the usual functions, but also touch on some very interesting techniques that you will definitely need in your work. So, without further ado, let's get started right away.
The easy way. What to do when you need to remove some elements

If you make it smaller, the margins that will be cropped will not be as bright as the area selected for cropping.

If you make the photo larger, additional fields appear. Sometimes they are displayed with a checker(), and sometimes they are filled with color, as in my case. In the end they will still be transparent. You can fill it with your own color if necessary.

Press Enter from the keyboard and you're done. The picture is cropped.
Create an even square from any photo in seconds
There is nothing easier than turning a rectangular photo into a square one. Select the frame again.

Hold down Shift on the keyboard and at the same time draw a shape in the picture using the mouse. Naturally, we hold down its left button to do this. In fact, we act as usual, just hold down Shift.

Release the mouse button and get this result. If you need to increase or decrease the square, drag these selected things, remembering to hold Shift. You can also move the photo itself, tugging on the soft edges to adjust the area you want to crop.

Ready. Press Enter.

Make a photo round in 5 minutes
You can also cut a photo in a circle using shift. How exactly? The first step is to make a duplicate layer. We find the option in the layers menu.

Now select the ellipse.

If you can’t find it, then maybe you just have another tool and it’s hiding it. Press each button for a couple of seconds and release. An additional menu will appear.

It's best to remove the fill right away so you can see what you're cutting out. But be sure to leave the outline.

Start drawing an ellipse and hold down shift, then it will turn into an even figure. You can remove the selection after you have drawn.

Select movement.

We move the circle so that the area we need is in the center. Then we will cut it out from the overall picture.

Hold Ctrl and click on the center of the layer thumbnail, as shown in my screenshot. The miracle does not work anywhere else.

Select selection – inverse.


Del on the keyboard. Do you see how the background has changed to checkered? This means that part of the picture has become transparent.

Remove the “eye” icons from the other two layers, leaving only the one you need visible, with transparency.

This is the result you should get.

To deselect, hold down Ctrl and D at the same time.

Using the frame you can cut off the excess.

You already know how to do this. Don't be put off by the color black if you get it. The situation will change as soon as you click on Enter.


If you are going to use a photo on your website or somewhere else, you need to choose PNG to leave a transparent background. In any other case (jpeg, etc.) the transparent color will be replaced with white.

If you use png, then the picture can be superimposed on any background.

Save it as a jpeg and you will most likely not be pleased with the result.

By the way, if you liked this lesson, you can learn how to cut various shapes in other ways. It's already on the blog.
Cut to size. Correlation and correct approach to working with websites
First, let's understand the ratios. Let's say you need to make a photo from a picture for a website. Some photos will be 2 x 4 cm, others 20 x 40. You can do without Photoshop, the engine itself can adjust pictures to a certain size, you just need to upload a large image to the database. This must be done, because otherwise the database will store 12,000 identical images of different sizes. This will negatively affect the attitude of search engines towards the portal.
I have already written about all this, so if this is your case, pay attention to this article on my blog.
So, open the photo and select a frame. We choose, for example, 4 x 5. You can put 3x4 - it doesn’t matter. It all depends on your desire and design.

Now, we determine the desired area that we will cut to size. You see, in cm it is much larger.
Pressed enter and cut it out. Ready.

Cut the picture to size. For example, for a passport
Now you can deal with cm. Select “Width x height x pixels”.


Without paying attention to the centimeter indicators, you can reduce it or increase it; the program will then cut everything to the size you need. When finished, click Enter.

Ready. The photo has become smaller.

Pixels
When it comes to websites, pixels are the most important. This is especially true for the design of home pages and so on. Select any of the proposed options from the list.
Replace the indicators with the required values.

Naturally, the frame can be rotated as desired.

After pressing Enter, everything will fall into place.

If you like working in Photoshop, but you don’t yet have all the information, I recommend you Zinaida Lukyanova’s courses, there is a lot of useful information here - Photoshop-master.org/education.php , quite quickly you can learn everything you need to work well in this program. This will give you serious benefits, you will no longer have to waste time searching for articles related to this program.
Even if you, like me, have Photoshop CC, then video will still suit you “ From A to Z » for version CS 5. The differences in the basic structures are small.

You can also find free lessons on YouTube or torrents, but in this case you will not have a clear picture and knowledge of the program. You will snatch information about one thing or another.
You decide. With this, I say goodbye to you, if this article was useful to you, subscribe to my blog and learn more useful information that will definitely be useful to you. See you again and good luck in your endeavors.
Did you like a picture from the Internet and want to add it to a page on a social network, but the image is clearly not suitable for publication due to its size? Or did you take a beautiful photo, the main subject of which does not follow the principles of composition? Such problems can be easily solved using such a useful function as image cropping. It is provided in almost every photo editor, however, today we will talk in detail about using the most popular program for working with images today - Photoshop, because this program provides several cropping options at once.
Editing “on the path”
There can be many reasons for cropping an image. For example, you want to upload an image to the profile of some database or site (say, in a resume on a job search site), where the maximum photo resolution is clearly defined. Or maybe there are unnecessary objects in the edge of the photo that attract the viewer’s attention, or you forgot to turn off the date and time display on the camera, and now completely unnecessary information flashes across your photo. The “Quick Crop” feature can handle these problems brilliantly, but note that Photoshop also has the ability to make more detailed crops. This can be called, for example, selective cropping, which automatically takes into account elements of the composition and does not include them in the selection area. There are also functions that allow you to cut out any specific details from the overall composition, for example, a circular cutout or wrapping around the edges of an object. Their effectiveness will largely depend on the number of objects in the picture, the color scheme and the complexity of the composition. In the case when you need to remove an object from a photo, you can simply cut it out using the “Pen”, “Magic Wand” or “Quick Selection”.
Using the Frame
A tool with this name will help you crop part of an image without difficulty or time. Using the “Frame” function, you can also edit the size of the photo. To use the tool, find the Quick Access Toolbar on the screen. On it you will see an icon with a small square inside. By activating “Frame”, you will see how your picture is divided into small squares by horizontal and vertical lines. By dragging any edge of the image, you will see how it transforms. This is how you can change the picture parameters. However, please note that morphing (stretching or shrinking the entire image, with the ability to maintain or change the proportions) will not be an option if an edge of the image needs to be removed. In this case, you need to use another “Frames” function: select the required part of the picture that should remain in the end, and confirm the changes by clicking on the corresponding icon with the left button of the computer mouse. To save the image, click on the “File” tab - “Save as...”. Next, write the desired name for the file and select a folder to save it.

Local selection
As a true professional photo editor, Photoshop has the ability to do more than just regular cropping. The program is equipped with a tool that crops photos, dividing the process into two stages. The local selection feature will give you the ability to make changes only to the desired area without affecting the image as a whole. The toolbar provides us with three options for working in this direction:
- Using geometric shapes to highlight a specific area (the most common are oval, square and rectangle). You can perform this action by selecting the desired area and using the keyboard shortcut. The Del key (Delete) will remove the selection area, and the combinations Ctrl + C and Ctrl + V will create an additional layer and place the selected object on it. You can do various manipulations with the new layer, and delete the old one by going to the layer management menu.
- Using the lasso. You can also select an area using a rectangular or magnetic lasso. The cursor will be used to form the selection area. Hold down the left mouse button and move the cursor to the side until the entire required area is selected, and then release. You will have a selected area, which you can work with in the same way as in the first case.
- Color highlighting. This action can be done using a tool such as the Magic Wand or using the Quick Selection function. This method is used mainly when editing vector images, since a raster image has many different shades, which can make the selection sloppy. The “Magic Wand” is often used to highlight monochromatic text, as well as small elements, since other functions cannot cope with this task so quickly and efficiently. The essence of the “Quick Selection” function is to select segments of one (pre-selected) color, as well as areas whose tonality is similar to the selected one.

Using “Pen”
Photographers and retouchers love to use this tool when processing difficult areas of photographs. “Pen” will allow you to create a closed selection, the outline of which you can adjust using special points located along the entire perimeter. The context menu will help you select the resulting area and line up its edges correctly.
Apply “Layer Mask”
“Layer mask” is a more complex way of cropping an image, which allows you to overlay the cropped fragment on another photo. Thus we get something like a collage. It will not be so difficult to do it if you understand the logic of the actions.
- So, first, select a photo with the object that we will cut out and upload it.
- Now you can start working with the “Layer Mask”. Below the image you will see a panel with layers reflected. For example, “Layer-1”, “Layer-2”, etc. Since you only have one image loaded, the program will automatically name it “Layer-0”. How can we make a mask of this layer? Below, under this panel there is a row of icons. You can find what we need to the left of the “fx” icon. Click on this rectangular icon with an empty circle inside and get a copy of the original layer.
- The copy is the same mask, and if you try to draw on it with black, you will see that it erases the picture like an eraser. White, on the contrary, restores.
- Select a brush and set it to a large diameter. Erase the background around the subject, getting as close to it as possible.
- Let's move on to more painstaking work. In order for your subject to look as natural as possible against the new background, we must completely get rid of the appearance of the old background on the collage. To do this, let’s zoom in on the area of the photo where we need to erase the remnants of the old background, hold down the Shift button and put several main points in the line that needs to be cleared.
- After clearing one part, move on to the next, moving the points to new places. You will see how the space between them will be cleaned in a straight line, saving you from painstaking work with an eraser and “torn edges”.
- Create a background by loading a new image into an additional layer. Now you see that your object, cut out from the previous picture, has appeared in a new environment.
- To prevent the difference in shades of two images from being too noticeable, use the color correction function by choosing the right tones to match the background and the overlay. If desired, you can also add some effect, it will smooth out the tones even more, and the cut out image will become part of the new composition.
- New image is ready! All that remains is to save it. This can be done according to the standard scheme we have studied: “File” - “Save as...”.
Removing “noise”
All kinds of changes in photo parameters and the use of various effects can significantly affect the quality of the photo. It is quite possible that after all the changes the picture will become “grainy”, that is, it will lose its former clarity. The pixels in such an image will be more noticeable than before, and in most cases, “noise” will also appear, violating the integrity of the image.

Unfortunately, Photoshop does not have tools that can effectively solve this problem, however, you can use other programs and give the photo its former beauty. The Ximagic Denoiser platform is very popular.
- - Make a copy of the layer with the loaded image. All manipulations will be carried out with it.
-Turn on XiDenoiser. Set the desired settings (Std denoise).
- Learn radius/Compare radius. When setting these parameters, do not set the values too high. The maximum value for the first is nine, and for the second - three.
- Create a duplicate layer. We put the new copy in first place and open XiDenoiser again, changing the value of the Spatial sigma parameter to a number twice the previous one.
Online Photoshop
The online service “EDITOR” has received a well-deserved reputation as the second Photoshop. Working in it is as convenient and simple as in the original version, but the platform simplifies your work and does not require downloading the program, unlike the previous version.
- To start editing, open the website and click on the “Upload image from computer” panel. Next, select the desired file and click “Upload”. Since this service is an analogue of a real Photoshop editor, editing here follows a similar pattern. On the toolbar located on the left side, you will need to find the already familiar “Frame” icon.
- Then place the cursor at the upper left edge of the intended selection area and, holding the left mouse button, draw the arrow to the lower right corner. Please note: everything that remains outside the selection area will be cut off. To get the most accurate result, you can perform corrective manipulations with the selected area, for example, moving the frame or changing its size. When all the adjustments have been made, double-click the photo to crop it.
- Then you can perform other manipulations with the image, for example, increase sharpness/brightness or apply some kind of effect.
As you can see, the photo editing process is quite simple and offers us a lot of different options to choose from. Don’t be afraid to use such a multifunctional program as “Photoshop”: practice working in it several times, study the interface and settings, and after just a few practical exercises you will see that the process of easily correcting a photo takes only ten to fifteen minutes. Pay attention to useful online services with a lightweight interface, which can also be very useful to you.
Today we will talk about how to crop a photo in Photoshop cs5 with the “Frame” tool. Don't be confused! It is to crop the image, and not to cut out the part and not to reduce the size by changing the scale. This has been discussed in other articles.
We have a picture in which we are interested in only one area, for example, with a dog. We want to remove the rest. And it doesn’t matter to us that the size of the photo will decrease. Please note that now the size is 1600x1200px.
If trimming needs to be done strictly along certain boundaries, we set or set the values. If it is enough to capture any arbitrary area, you don’t have to do this.
Use the Frame tool on the toolbar. We activate it by clicking on the icon, or by pressing the C key on the keyboard.
Cropping without reference to size
Let’s say you want to crop a photo arbitrarily and it doesn’t matter what format it turns out to be.
We hold the mouse in the upper left corner of the selected area and, without releasing it, drag it diagonally. In the lower right corner, release the mouse. In the default settings, the designated part of the photo remains visible, and the rest of the field is darkened.

By moving the cursor to a visible part, you can move it, choosing the best position. When you are satisfied with the result, press Enter on the keyboard, or double-click inside the selected area, or click the checkbox in the options bar. The circle icon next to the check mark or pressing the Esc key resets the selection.
To crop the photo to the required size, set the values in Photoshop or align the borders along the guides.
To set the values, let's look at the settings.
Frame tool settings
When the tool is active but no selection has been made, the options bar looks like this:
Width and height
To define the cropping area arbitrarily, leave the “Width” and “Height” boxes empty. When we know the required ratio of parameters, we enter the corresponding values there in numbers. That is, if you specify a width of 20 and a height of 10, then the rectangle will stretch in the same ratio - the width is 2 times the height.
Clicking on the arrows between them will swap the numbers.
When a value is set, you can select the scale gradation (cm, inches, mm, etc.). The numbers will be converted in relation to the new units of measurement and you can simply replace them with the ones you need.
 Initially, the units of measurement are set to the same as in the gradation of the Ruler scale. How to change them by default is described in .
Extension
Let's not talk about expansion concepts - that's a separate topic.
The “Extension” window can be left empty. In this case, when trimming, the extension will be preserved Images with whom we work. For an image that will be posted on the site, a value of 72 pixels/inch is sufficient. If it is being prepared for printed products, you need to know the requirements of the printing house. More often it is 300 pixels/inch.
Saving settings
If you often have to set the same dimensions, it is better to keep them for convenience. To do this, enter them into the boxes, then open the set of parameters for the Frame tool by clicking on the arrow next to it (1). A window will open in which we click the arrow in the circle (2). A new window opens in which we select “New set of parameters for the tool” (3). The next window that pops up already contains the name of the parameter, which you can change at your discretion. Click OK.
 The parameter appears in the set.
 Now, when you need to set such numbers, we simply select this parameter from the set and its values will fit into the windows.
The “Image” button inserts the full size of the open file into the windows, and the “Delete” button, accordingly, deletes all entries in the size and extension windows.
Other settings
When the crop area has already been defined, the options panel looks like this:
"Delete" and "Hide"
The “Delete” and “Hide” buttons work only if there are other layers besides the locked background layer, or if the background layer is not pinned, that is, the lock is removed.

To crop a photo in Photoshop, select Delete.
Set the value to Hide when you want to make the outer area invisible, rather than delete it.
In this case, the “Perspective” parameter is inactive.
Frame overlay type
 The 1/3 Rule function divides the designated area into 3 parts horizontally and vertically. This division helps to correctly arrange the details for the correct visual perception of the picture.
- The "Grid" has the same purpose as the "1/3 Rule", but with a finer scale of divisions.
- When the "None" option is active, the divisions are not reflected.
Screen color
If you check the “Screen” checkbox, the outer area will not be darkened. When Screen is not selected, next to it you can define the shade color and its opacity as you wish.
Resize, rotate, perspective
We increase the scale and check the binding of the borders to the guides. They usually do not require adjustments. But if you need to edit or resize, move the cursor to the border, and when it takes the form of a straight double-sided arrow, hold down the mouse and drag in the desired direction. This edge is moving.
To stretch or narrow all sides at once, move the cursor to one of the corners and drag it.
When the arrow takes on a curved appearance, the frame can be rotated. While holding down the Shift key, rotation is performed in steps - from strictly horizontal to strictly vertical position - 6 steps.
The center of rotation is indicated inside the frame. You can move it to any point by simply dragging the mouse or, while holding down the Alt key, click on the place where you want to set the center of rotation. The image will rotate around this point.
If you check the “Perspective” function, you can adjust the perspective by stretching or narrowing the corners of the frame with the mouse.
Let us repeat once again how to crop an image: by pressing the Enter key, or by double-clicking inside the designated area, or by clicking the checkmark in the options bar.
Read about how to crop a photo in Photoshop using the selection tools and the Crop function.
For even more useful information about the frame Framing the CS6 version, watch the video: