How to make a blurred background in Photoshop cs6. How to blur the edges of an image in Photoshop
30/05 6917
Photosearch wants to spend some time today Photoshop CS6. This version has been in the top download positions for more than three years. It is convenient, fulfills all the tasks and desires of the master. If you do not want to take training courses, you can master the program while sitting at home online. What capabilities does it have and why do photographers love this editor?
Blur filter and three types of blur
The program provides many functions for photo processing. The most favorite filter among photographers is “Blur”. It allows you to focus the viewer's attention on one element. The subject is highlighted and the rest of the background becomes blurred. All the work consists of changing filters. They have a good control system, so repeating the effect outside of filters will be quite difficult and time-consuming.
Photoshop CS6 has three types of filters. The first of them " Field Blur"("Blurring area"). You might think that you won't get anything more than the usual blurriness. But this is wrong.
The developers have made the filter much more interesting:
. You can create multiple blur points, and each one can have its own parameters.
. You can fully adjust the boundaries of the blur, connect them and create the most natural and beautiful result.
. In any photo, you can turn on the mask by pressing “M” and see those elements that are most blurred. As you can see in the photo below, the man with the spray can is in the center, so they were not affected by the treatment in any way. The woman on the right is slightly blurred, but the area at the top left is blurred with a soft transition.


Thus, it seems that you initially set a shallow depth of field. And to make the work even easier, there are hotkeys: by pressing “P” you can view the source, and “H” allows you to view the result without unnecessary icons.
The second type is " Iris Blur"("Imitation of focus"). You get an oval area that makes the subject sharp and the rest of the background blurry. This shape can be changed to be more round or oval, depending on the subject being photographed. You can also change it to a rectangle using the square in the upper right part. Additional control over four points. They track the blur gradient to ensure the transition is clear or blurry.


And the last type of filters is “ Tilt-Shift"("Tilt-Shift Lens Simulation"). This blurriness replicates the "side effect" of the optical axis, where the depth of field of distant objects remains shallow, and everything in front looks unnatural. You can also rotate, change, move this area where you need, and correct the sharpness boundaries.


You can view the result of your work again using the mask. It immediately shows all the elements that are blurred and those that remain clear. You can see this in the picture with the ships. As you can see, the yachts themselves remain sharp, but looking up, you can see how the picture begins to blur.

And here it is - “Bokeh” (“Bokeh”)
There is another tab that is available with any filter - “ Bokeh"("Bokeh"). For photographers, there is no need to explain what this is and that you can easily create a pattern of circles in the blur area. This addition will look most impressive in night photographs where there are point light sources.

To make the bokeh effect as noticeable as possible, set a high aperture setting on your camera. With small circles, the frame will not look so impressive. You can make the bokeh even more attractive using the color, which is available in the “ Bokeh Color"("Colored Bokeh").
Each of these filters is used for its intended purpose. By using Field Blur you can create the effect of photography with a wide open aperture. Second filter Iris Blur highlights the main element in the frame. With this function, you don’t have to search for the main subject for a long time, and you can then easily highlight any detail. A Tilt-Shift Blur Best used in landscape photography. Each of these filters can make your photo perfect.
If we look at the image in the preview area, we see two things. First, the original effect is applied to the entire photo and spreads evenly across the entire image area, just like we would get using one of the traditional filters in Photoshop, such as Gaussian Blur, Motion Blur, " Wind" etc.
The second and more interesting thing we noticed is the circular shaped icon located in the center of the image. This icon is known as a "contact pin", in the English version - Pin. By default, Photoshop adds the boulak ode, but we can add as many as we need:

This pin allows you to control the blur applied to the image. How it works? Controlling the outer ring of the pin ring is similar to controlling a stereo or amplifier. Simply hover your mouse over the outer ring, then press and hold the left key and drag the cursor clockwise or counterclockwise and you will see the dial rotate. Dragging clockwise will increase the amount of blur, while dragging counterclockwise will decrease it. Photoshop shows us a preview of the result as we drag, and an informative window appears with an option:

Blur Slider
If for some reason you do not want to adjust the degree of blur in the working document window on the pin disk, then you can do this using a traditional tool - the slider located on the toolbar. The slider and pin wheel are linked together and changing the settings of one tool changes the other. It makes no difference which knob you use:

Moving and adding pins
At this stage, the effect of the filter applies to the entire photo. But what if I want to change or completely cancel the effect of the filter in a certain area of the image? For example, a woman's eyes should not be blurred. They need to stay clear, so how can you undo the filter in the eye area? With the help of a new filter, this is easy to do. I just need to add another pin to the document.
Before adding a new pin, I'll move the old one up a little (as shown by the red arrow in the picture), then move the mouse cursor over the place where I want to place the new one, and the cursor will take the form of a pin icon with a plus sign:

Now I just have to left-click in this place. Notice that the original pin is still there and visible, but the outer ring around it is gone. This is because although both pins have an effect on the image, we can only adjust the one pin that is currently active at a time:

With a new pin positioned near the woman's eye, I can remove blur from that area of the image by either dragging the outer ring of the pin counterclockwise or dragging the slider in the toolbar to the left to a value of zero. The blur effect around the second pin has now been removed, but the blur effect in the area around the first pin remains:

Now I will repeat these steps with the other eye:

What if I want to go back and re-adjust the value of the previous pin? No problem! I just need to click on it to reactivate, which will make an outer control ring appear, and then I can rotate the ring or drag the slider in the toolbar to change the blur value in that area of the photo.
It's important to note that we are not making any permanent, physical changes to the image at this time. Photoshop simply gives us a preview of what will happen to the image after applying the effect:

Temporarily hiding and removing pins
The only problem with this tool is that they tend to clutter the image, making it difficult to see the effect of the filter. We can temporarily hide pins by pressing and holding the keyboard key H ("H" is the first letter in the word "Hide"). When the key is pressed, the pins disappear; when released, they appear again.
You can also compare your work-in-progress with the unblurred original at any time by unchecking the Preview option in the options bar at the top of the program window. To return the blur view back again, check the checkbox again. You can also turn the preview on and off by pressing the P keyboard key:
To remove an unwanted pin, click on it to activate it and press the Delete key on your keyboard. Or, if you want to remove all the pins present in the document, click on the “Remove All Pins” button located in the options bar:
Applying a tool action
Finally, when we're done adding, adjusting, and moving pins and you're happy with the results, press the Enter key or the OK button at the top of the Options Bar. This action will apply the effect to the image and close the blur gallery:
Look again at the original (left) and the final result (right):


If you open the aperture of a professional camera to its maximum, you get an interesting effect: the background of the photo is slightly “blurred.” This effect can also be achieved in Photoshop to add expressiveness to your photo, even if it was taken on a regular point-and-shoot camera. We'll show you how to create beautiful blurs in Photoshop in five simple steps.
Step 1. Let's divide the photo into foreground and background. Open your photo in Photoshop that you want to edit.
On the toolbar Layers(Layers) right-click on the photo layer and select Duplicate Layer(Duplicate Layer). This will be our background.
 Step 2. Let's remove the foreground object from the background. Go to the new created layer. From the toolbar, select Stamp(Clone Stamp). Hold Ctrl and click on the background area next to the object. Then release Ctrl and click on the object itself. This will copy a piece of the background onto the object. Repeat the action until you completely cover the object with the background.

Step 3. Let's get started with blurring in Photoshop. From the main menu select Filter > Blur(Filter > Blur). A menu of blur filters will open; in it you can choose the one that best suits the situation of your photo. For example, if the subject in the photo is moving, you can select Motion blur(Motion Blur), if motionless - Field blur(Field Blur). For example, let's use the second one.
 In the settings panel Field blur(Field Blur) Move the slider left and right to set the intensity of the blur in Photoshop. This will make the background blurry.

Step 4. Now you need to return the object to the photo! To do this, do the following:
- Select from panel Layers(Layers) is the layer that you just blurred.
- Click on the button Add a Layer Mask(Add Layer Mask) at the very bottom of the panel.
- Click Ctrl + I.

Step 5. The blur will disappear from the photo, but it won't go away! Select from the toolbar Brush(Brush) and carefully move it across the photo around the object. Where you press with the brush, the blur will return. Use brushes of different sizes to carefully outline the object.

After this, save the finished photo. The result will be the same as in the picture.

This way you can create a beautiful and believable blur in Photoshop. The object (or objects, if you want to outline several) in the foreground will be sharp, its edges will be neat, without transitioning from blurry to sharp. The background will be soft and will not distract attention from the subject - like in a photograph taken with a professional camera.
(Optional) If your image contains multiple layers, select the layer containing the image you want to sharpen to work with. The Sharpen Mask filter can only be applied to one layer at a time, even if the layers are linked or grouped. Before you apply the Sharpen Mask filter, you can merge the layers.
Choose Filter > Sharpen > Unsharp Mask. Make sure the View option is selected.
Note.
Click and hold down the image in the preview window to see the image without adjusting sharpness. You can drag and drop to see different parts of the image in the preview window, and the “+” or “–” buttons control the image scale.
Although the Sharpen Mask dialog box has its own preview window, it's best to move the dialog box so that the results of the filter are visible in the document window.
To determine the number of pixels processed by the filter around edge pixels, drag the Radius slider or enter a value. The larger the radius value, the wider the edge effects spread. The wider the edge effect spreads, the more the increased sharpness will be visible.
The radius value may vary depending on the user's taste, as well as the size of the final reproduction and the output method. For high-resolution images, radius values of 1 and 2 are typically recommended. A smaller value sharpens the pixel edges only, while a larger value sharpens a wider area of pixels. This effect is not as noticeable in print as it is on screen because the two-pixel radius takes up less space on a high-resolution printed image.
To set the degree to which pixel contrast is increased, drag the Effect slider or enter a value. For images that are printed at high resolution, values between 150% and 200% are generally recommended.
Set the difference by which the pixels in question will be recognized compared to surrounding pixels as edges for subsequent filter processing. To do this, drag the Threshold slider or enter the appropriate value. For example, a threshold of 4 means processing all pixels whose tone values on a scale from 0 to 255 differ by 4 units or more. Thus, adjacent pixels with values of 128 and 129 will not be processed. To avoid noise or posterization (for example, in images with skin tones), it is recommended to use an edge mask or try to find a threshold value between 2 and 20. The default threshold value (0) sharpens the entire image.
One of the most popular questions among beginning photographers is how to get a blurred background in a photo. This is understandable, since a blurred background gives the photo a more interesting look, emphasizing the subject. A photo with a blurred background immediately looks much more professional and artistic.
Let's start with the fact that in photography, there is a term for a blurred background, Bokeh (emphasis on the last syllable). Despite the fact that the word sounds French, its roots lie in the Japanese language. True, the term Bokeh usually refers not just to blur, but to the artistic component of blur. For example - “This lens gives beautiful bokeh, but that one is very simple.”
There is an opinion that to obtain a blurred background, or bokeh, you definitely need a high-quality expensive lens with a large aperture or a very good camera.
There are two misconceptions here. Firstly, the camera itself plays virtually no role, since the background blur is created by the lens optics, and they can be quite good even on an “advanced point-and-shoot camera.” Secondly, indeed, with a good fast lens it is easier to blur the background and the bokeh will be more beautiful, but this can only be achieved if other conditions are met, which will be discussed below.
The blur itself can be obtained on a simple kit lens and even on a soap dish, if you follow 3 basic rules, which will be discussed below.
Rule 1: Open aperture and shallow depth of field
You may already be familiar with the concept of depth of field. If not, then DOF is the Depth of Sharply Imaged Space. Most often it is simply called “depth of field.” Let's say you focused on a certain object. This is the focal point. Everything that is sharp in the frame before the object and behind it is the depth of the sharply depicted space. Moreover, the sharpness gradually decreases from the focusing point. Providing that same blur.
DOF itself is the key point in obtaining a blurred background in the picture. For blur, we need to get a small depth of field.
Depth of field depends on several parameters, one of which is the aperture value. The aperture is those blades inside the lens that can be closed or open, changing the size of the hole through which light passes through the lens.
The aperture value is characterized by the F number. The smaller the F, the more open the aperture is. The larger the F, the tighter the diaphragm is clamped.
The smaller the hole is open (large F), the greater the depth of field relative to the subject. The wider the aperture is open, the smaller the depth of field.

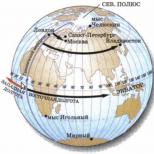
Dependence of depth of field on aperture and distance
Look at the illustration above. The focusing point is at a distance of 6.1 meters. The lower the F value, the fewer objects will fall into the sharpness zone. At f/1.8, only what is half a meter from the subject and a meter behind it will fall into the sharpness zone; everything else will be blurred. At f/16, objects at a distance of even 6 meters behind the focusing point will be quite sharp.
Thus, the first rule for obtaining a blurred background in a photograph is that the lower the F value (and, accordingly, the larger the aperture is open), the more blurred the objects in the background are. As you can understand, in the foreground, if there is one, we will also get blur.

Left - F22, right f2.8 with other parameters unchanged
Rule 2. Focal length
Focal length is one of the characteristics of the lens and the second factor that affects the depth of field and background blur. We will not go into a technical explanation of what focal length is now. At the everyday level, we can say that focal length is how much your lens “brings closer” to the object. The standard range of focal lengths of “whale” lenses for DSLRs is 18-55mm. That is, at 18mm, our lens covers a large space, and at 55mm we “bring closer” the object.

One scene at different focal lengths
Due to the characteristics of optical designs, the depth of field depends on the focal length. At the same F value - at a long focal length, the depth of field will be shallower. That is, the closer the lens is, the shallower the depth of field will be. That's what we need.
Hence the second rule. If you want to blur the background, use long lenses or zoom your lens as close as possible.

When changing the focal length and keeping F constant, we get different blur
Rule 3. Real distance
The third factor that affects the depth of field is the distance to the subject and the background. The closer the object is in reality to the lens, the smaller the depth of field.
To blur the background, you need the distance from your camera to the subject to be many times smaller than the distance to the background. Let's say you're doing a portrait. There will be good blur if you are only 2-3 meters from the model, and 10-15 meters from the background behind her.
Therefore, let’s formulate the third rule as follows: the closer the subject is to the camera and the further the background is from it, the stronger the blur.

the toy was photographed at the same F, but at different focal lengths and different real distances from the camera to the subject
Of course, it is worth remembering that if, to obtain a long focal length, you have extended the lens zoom to maximum, you will have to step back to compensate for the zoom approach of the subject. Otherwise, in the example above, not the entire bear cub would have been included in the frame, but only its nose.
Let's try. DSLR Simulator
Play around with depth of field and background blur using camera simulator software from CameraSim.
- Turn on the “Tripod” checkbox
- Set the mode to manual or aperture priority
- Change combinations of parameters - distance, focal length, aperture
- Click on “Take a photo!”, since the influence of the aperture value on blurring the background of the photo can only be assessed by the result. You won't notice it in the viewfinder.
Let's sum it up
In order to get a blurred background in a photo, you need to get a shallow depth of field relative to the subject. And for this you should:
- Open aperture to maximum
- Zoom in as close as possible or use a long lens
- Be as close to the subject as possible and move the background as far away from it as possible.

Try and experiment! Remember that blur depends from the totality three of the above parameters.
You can get exactly the same result with different combinations of these three parameters.
If you don't have an expensive fast lens that can be set to f/2.8 or less, try to compensate for this with two other parameters - shoot at a closer distance, at maximum zoom.