If the battery is cold and the pipe is warm. Cold radiator: causes of coolant circulation disorders and their elimination. Will the heating bill be recalculated?
Bidet installation
Bidets are now produced in two main types: simple bidets and bidets with an upward flow of water. Like toilets, both types of bidet are available with vertical, horizontal and oblique outlet. Therefore, when choosing a specific bidet model, also pay attention to the release form, because. it is necessary to take into account the position of the sewer socket in the apartment and the form of release of the selected model, so that you do not have to change either the bidet model or the sewer socket later.
If you have a main water supply, then a mixer with ball valves is installed on the bidet, and not a single-lever mixer.

A simple bidet model is a cross between a low sink and a toilet. A bidet is connected to the sewer in the same way as a regular toilet, but instead of a drain tank, taps with a mixer are attached to its edge. The main disadvantage of such a bidet is that it is quite cool to sit on it and for many it may be too uncomfortable.

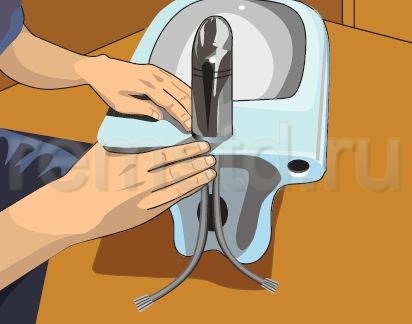
A simple bidet is connected in much the same way as a sink: first, a faucet with taps is installed and screwed on, and then a drain is inserted into the bidet, to which the siphon is connected in the same way as when installing the sink. After that, you can install the bidet in the chosen place, but do not attach it to the floor yet.

Next, we mount the mixer nozzles to the water supply pipes (for this, it is best to use flexible pipes). We connect a drain pipe to the siphon pipe using a compression connection, that is, we insert it into the sewer socket (although for a bidet you can make a drain from the sewer, which immediately provides for a threaded connection). We fix the bidet to the floor in the same way as the toilet, using special bolts. There are also wall-mounted bidets that are not attached to the floor, but to a special mounting frame.
|
|
|
|
|
|
|
|
|
|
|
|


A bidet with an upward flow of water is a little more complicated. The flow of water passes inside the seat rim, heating it, and then, under the action of a special regulator, it gushes up. But since the water supply hole is at the bottom and dirty water flows directly onto it, a special water supply is provided for this design, the main purpose of which is to ensure that contaminated water is not sucked back and does not pollute the water in the water supply. Even before installing such a bidet, it is necessary to assemble and connect the adjustment mechanism and only then connect the bidet to the water supply and sewerage.
Recently, quite often, a bidet and a toilet are combined in one complex plumbing fixture.
Combination of bidet and toilet
In small apartments, the issue of lack of space for additional plumbing fixtures is especially acute. Therefore, it is often not possible to install a bidet. In this case, the option is suitable when the functions of a bidet and a toilet are combined in one device.

You can purchase and install a shower toilet. Such a toilet has a mixer with two taps in the center of which there is a water supply pipe in the lid area. In addition, a shower hose can be connected to the toilet.

If you already have a toilet installed that you are not going to change, you can purchase a bidet toilet cover. The principle of its operation is the same as that of the shower toilet, the only difference is that the nozzles and the mixer with two taps are mounted not on the toilet body, but on the lid. The taps are located on the sides so that there is a place for supplying hot water on one side and cold water on the other.

Some types of covers can be connected to the mains. These covers can have useful functions, for example, to heat water without connecting to hot water, which is quite convenient in the absence of centralized hot water supply, to ventilate and freshen the air in the room. Sometimes a remote control is included in their kit (although it is unlikely that you will need to control the bidet remotely).
The bidet cover is very easy to install. We open the toilet lid, put the bidet lid, fasten it with bolts with fasteners that are included in the kit, connect hot and cold water. When connecting electricity, you must strictly follow all the instructions and be sure to properly ground, which is best done together with an electrician.
However, despite all the attractiveness of the combined shower toilet, it is better to install a separate bidet and a separate toilet, since the combination of these two functions is unhygienic. Installing a toilet, urinal or bidet - all three plumbing fixtures undoubtedly share common installation steps. The devices are simple and light in weight, so you can always install them yourself.
But the next device is not something to be installed, even brought into an apartment - sometimes, the task is not an easy one for one person. It is, as you might guess, about installing a bath, but more on that later in a separate article.
And to eliminate all sorts of questions, a few videos on how you can install a bidet yourself:
Today, a bidet is becoming part of the everyday life of an increasing number of our compatriots.
If you decide to become the proud owner of this extremely useful device, it will not be superfluous to learn how to install it - this will save you some money.
Let's see how to install a bidet of various types with your own hands.
Let's start with the easiest variety to install - the shower toilet. As the name implies, this device combines both functions, which is very convenient for those who do not have free space in the bathroom.
The bidet toilet is installed in exactly the same way as a conventional toilet, only it will be necessary to connect hot and cold water supply to special pipes using a flexible connection.

Bidet and toilet
A tie-in is made into the “hot” pipe in the usual way, but it is most convenient to connect to the “cold” pipe in the place where there is already a tie-in for supplying water to the tank: a tee is screwed here, and then lines to the tank and to the mixer are connected to its outlets built-in bidet.
If the model is electric, on the wall behind it (so as not to be conspicuous) you will have to install an electrical outlet with grounding. It must be connected through an RCD that trips with current leakage from 10 mA.
Connecting a separate bidet
Although the freestanding bidet looks like a toilet bowl, its installation is more similar to the installation of a washbasin. They operate in the following sequence:
- The device is assembled (connect a mixer and a siphon to the bowl).
- Having chosen a suitable place, attach the bidet to the floor or wall (hanging model).
- Connect water to the mixer.
- Connect the siphon to the sewer.

Bidet connection diagram with dimensions
For an electric model, a wire is laid in the box and a socket is installed.
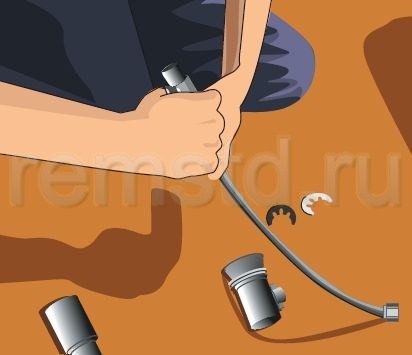
Faucet and siphon installation
There are three holes in the bidet bowl:
- to install the mixer;
- for connecting a siphon;
- to connect the overflow pipe.
The mixer is installed like this:

- A gasket is put on the studs on the bottom of it (usually supplied in the kit).
- Next, the mixer is installed in place, while the studs are passed into the holes intended for them in the bowl.
- Under the bowl, another gasket is put on the studs, and behind it is a metal washer.
- Nuts are screwed onto the studs and tightened with moderate force. If the design of the bidet does not allow you to freely operate with an open-end wrench, you should use an end wrench.
While the bidet is not fixed, you can screw a flexible hose to the mixer nozzles. There is already a gasket in the tubes, so it is not necessary to seal the connection with tow or FUM tape. The force with which the flexible hose nut is tightened must be moderate, otherwise the gasket may be damaged.
To ensure that the gasket is not damaged when tightening the nut, place a paronite gasket over the nut.
The siphon is not always supplied with the bidet. If you have to purchase it separately, do not forget to pay attention to the presence of a branch pipe for connecting the overflow pipe.

Siphon connection
Installation order:
- If the bidet comes with a bottom (drain) valve that must open simultaneously with the mixer, then you must first install it according to the instructions. Subsequently, the lever of this valve will need to be connected by a rod to the mixer. If there is no such valve, we install a drain grate on a gasket coated with silicone sealant. To fix it, a nut with a wedge-shaped ring is used.
- A siphon is connected to the bottom valve or grate.
- A corrugated outlet hose is connected to the outlet of the siphon using the nut on it.
- A grate designed for it is installed on a gasket in the overflow hole.
A corrugated hose is connected to the overflow grate with a nut, the second end of which is fixed on the overflow pipe of the siphon.
Floor/Wall Mounting
The place for the bidet should be chosen so that it is located closer to the toilet, but at the same time it is convenient to use it. There must be a free space of at least 0.7 m in front of the instrument. Having decided on the place, Proceed to fixing the bidet.
Here is how the floor model is installed:

- The sole of the device standing on the floor is circled with a marker and they also mark the position of the mounting holes.
- Next, the bidet is placed on its side and its sole is again outlined on a piece of linoleum or rubber pressed against it. Again, note the position of the mounting holes.
- A gasket is cut out along the applied contour from linoleum / rubber.
- In the floor, according to the markings, holes are drilled with a diameter corresponding to the diameter of the dowel sleeves or special fasteners for toilet bowls - depending on which of them will be used. Ceramic tiles should be driven as carefully as possible, using a special spear drill and setting the drill chuck to a low speed. Impact, of course, is unacceptable.
- After removing the debris remaining after drilling, sleeves for fasteners are installed in the holes.
- Next, the gasket is put in place (on the floor, as the reader remembers, the outline of the sole was drawn). Silicone sealant can be applied to both of its surfaces.
- It remains to install the bidet on the gasket and screw it to the floor with the selected fasteners.

Scheme of attaching a hanging bidet to the wall
Whoever deals with a hanging bidet should do the following:
- Assemble the frame (called "installation") as directed in the instructions. Adjustable legs must be available.
- Insert the elbow with the cuff installed into it into the holder for the sewer pipe on the frame.
- Set the frame to the desired position, controlling the horizontal and vertical, respectively, level and plumb. The legs must be adjusted so that the bidet is at a height of approximately 40 cm.
- Mark the position of the mounting holes on the wall and floor with a marker.
- Having set aside the installation, drill holes and, having removed debris, insert dowel sleeves into them.
- Install the frame and screw it on.
- Connect the sewer pipe elbow installed in the frame to the general sewerage system.
- Fix the water pipes on the frame and connect hot and cold water supply to them. It is pipes that need to be connected, and not flexible pipes, since all communications, due to the hidden installation, must be as reliable as possible.
- Screw shut-off valves to the nozzles and then, after supplying water to the system, check the tightness of all connections.
- Screw the studs into the frame, fixing them with nuts. After that, protective sleeves must be put on the studs, which will prevent clogging of the threads during the installation of drywall.
- Install a drywall partition and pass water pipes and a sewer socket through it.
- First, put a special rubber or silicone gasket on the studs, then the assembled bidet. After that, nuts are screwed onto the studs, fixing the device. Tighten them with moderate force so as not to deform the drywall.
It should be noted that the gasket between the bidet and the wall plays a very important role. If it was not included in the kit, you just need to apply silicone (sold in tubes) to the bowl and, after waiting for it to dry, install it.
Water connection
To connect the bidet to the water supply, you need to screw the nuts of the flexible connection connected to the bidet mixer onto the tees cut into the pipes (for the floor model) or onto the nozzles installed in the frame (for the suspended one).

Connecting the bidet cover to the water supply
In all cases, it is desirable to install shut-off valves, through which the bidet can be cut off from the water supply without turning off the entire system in the apartment.
Connection to the sewerage system
Connecting a bidet to the sewer is no different from connecting a washbasin:
- A rubber cuff must be inserted into the socket of the sewer pipe. Since rubber dries out over time, it can be lubricated with silicone sealant for reliability.
- The end of the corrugated outlet hose connected to the siphon is also lubricated with a silicone-based sealant.

Installation diagram for bidet
After that, it remains only to insert the outlet corrugated hose into the cuff of the socket of the sewer pipe.
Bidet drain
During the use of a bidet, water often gets on the floor. Therefore, it is very advisable to arrange a drain in the floor in the same way as they do in public showers.
There is a lot of work to be done:
- The floor is knocked down to a concrete base.
- The base is waterproofed.
- A ladder is installed and connected to the sewer - a drain funnel with a siphon.
- Sheets of extruded polystyrene foam are laid on the floor. The ladder and the pipe extending from it are lined with them, for which grooves must be cut in the foam.
- A film is laid over the foam, and then a screed of such thickness is laid so that the ladder is filled along the bottom edge of the flange.
- The floor is covered with ruberoid. A hole is cut out in it with a diameter corresponding to the internal diameter of the drain, so that the flange is covered (holes must be cut out for the screws).
The upper part of the ladder is installed, after which the screed is laid with a slope and the tiles are laid.
Related video
In the 17th century, a bidet was invented in France - a foot bath designed for intimate hygiene, and more specifically for washing intimate areas. Over the years, the bidet has changed and now resembles an ordinary toilet, only with a mixer instead of a tank. The similarity with the toilet is visual, but in fact it is more correct to compare the bidet with a bath or washbasin.

Peculiarities
Such a plumbing fixture has recently begun to be popular. Has humanity become less hygienic? It didn't. There are several reasons for its lack of popularity. First, not everyone is aware of the purpose and usefulness of a bidet. After all, it can be used not only for hygienic purposes, but also as a foot bath. It is very convenient for people suffering from diseases of the musculoskeletal system, hemorrhoids, it is also convenient for small children and the elderly.
And these are not all the benefits. With a bidet, you won't have to shower or bathe more often than you need to. This will save time cleaning the tub.

Well, the second reason for its unpopularity is the small size of the toilet room. There is simply no place to put it. But this can also be corrected. A bidet is installed in the bathroom or buy a toilet with a bidet function, which will save space.
There are cases when a bidet was purchased as an element of luxury and never used. But now you know that a bidet allows you to create a comfortable environment after going to the toilet.

If you are thinking about installing a bidet, know that installing it yourself will not be difficult. Together with this device there is an instruction according to which it is necessary to strictly observe all points. It is desirable that the instructions during installation were in sight.
Buying a bidet begins with choosing a place in the bathroom, calculating its size, the location of sewage and water pipes. Depending on the type of installation, the pipes leading to the plumbing fixture can be open, hidden in the wall or built into the housing.
The hygienic device is floor, mounted and combined type with a fountain-like and downward flow of water. Different style and with different functions: hair dryer, hydromassage, air deodorization, etc.

Also, to connect the bidet, you need to stock up on a screwdriver, wrenches and adjustable wrenches, a perforator, tow, silicone sealant, mounting tape.
It is better to buy a bidet immediately with a toilet bowl of the same brand. So the interior will be more harmonious. And if the toilet has already been purchased, try to remember the manufacturer's article and series in order to choose a similar bidet model. The type of bidet connection must be the same as for the toilet.
It should also be borne in mind that mixers are usually purchased separately.
Whatever the model of the hygiene device, it has an automatic drain valve. To connect a floor bidet, a special fastener for the toilet is required, and a flexible tube serves as a connection to the sewer.
Assembling the mixer
A faucet with a floating head that rotates 360°C is mounted on the plumbing fixture. It has a special lever for opening and closing the drain. There are several types: single-valve, two-valve, with a photocell, thermostatic. The last type is the best option.
The assembly of the faucet on the bidet is not much different from the assembly for the sink and proceeds as follows:
- put on the rubber gasket and decorative trim on the bottom of the faucet;
- screw the flexible hoses of warm and hot water to the faucet. Screw the pipe carefully, without tightening it too much, so as not to break the tightness;
- connect the mixer and the plumbing fixture with studs, after putting rubber pads on them. Screw the studs with your hands, and then tighten with a screwdriver;
- put on a persistent metal washer, put nuts on the studs;
- install the mixer in the center and secure with nuts;
- treat the joints with sealant.


We collect the siphon
Like the faucet, the siphon is sold separately. It has different models and connection technologies, so check with the seller when choosing a siphon. Any model is mounted simply and has a long service life. Bidet siphons are made of plastic, brass and stainless steel.

The siphon is installed like this:
- install a drain grate with a rubber pad;
- secure the grate with a wedge nut;
- lubricate the ring of the outlet pipe with sealant and insert it all the way into the socket of the sewer pipe;
- check the connection for tightness;
- connect the siphon to the outlet pipe and fasten with a nut.

When making connections, use tow or plumbing linen. Tow is wound on the thread strictly in its direction, in which case the wound threads will not fluff.
Combined with toilet
If the dimensions of the bathroom do not allow you to connect a hygiene device, you can buy a toilet combined with a shower, or purchase a bidet cover.

A special nozzle is built into the side of the shower toilet, and an electronically controlled device is mounted into the tank.
The nozzle extends if necessary, without touching the walls of the bowl. It also self-cleans before starting work and after under the pressure of water for a few seconds. Water supply is carried out using buttons mounted on the outside of the bowl. Very rarely there is water supply with the help of pedals.
The functions of the toilet-bidet are the same as those of a conventional bidet: blowing, heating.
If you don't plan on replacing your toilet, install a bidet cover. It is the easiest to install. It is enough to connect it to the water supply and electricity, and then attach it to the toilet like a regular lid according to the instructions.
When the siphon and mixer are assembled, the bidet itself is connected.
It is mounted in the same way as a simple toilet. The plumbing device is placed in the required place, markings are made, holes are drilled with a drill, then bolted. Finally, water supply and sewerage are connected.
With rising water currents
Installing a bidet with a gushing water pressure is more difficult. The fact is that water circulates inside the rim of the lid, heating it. Actuated control mechanism pushes the water up in a fountain
Such a device is equipped with a special eyeliner that does not suck in the used water pouring onto the fountain.
Before connecting the bidet, the water supply regulator is assembled and connected, and then the water supply and sewerage are connected. After the plumbing fixture is fixed.

Suspended
Built-in bidet has its advantages:
- Hidden communication that cannot spoil the design of the bathroom with its appearance.
- Space saving. The bidet bowl does not protrude as much, which saves some space. This is a great option for small spaces.
- Easy to clean the room, as this plumbing fixture does not rest on the floor.
- And, of course, easy installation.
The hanging bidet consists of a supporting frame and a bowl. The installation is the support of the bowl, as well as the place of installation of the bidet. It allows you to accurately adjust the height of the plumbing device.


The technology for mounting a hanging bidet is as follows:
- prepare a niche for installation. For this, a recess is made in the wall according to the dimensions of the supporting frame;
- bring water and sewer systems;
- install the installation by attaching the lower legs to the floor and the upper fasteners to the wall;
- connect the outlet of the installation to the sewerage system, fix the water pipe on the bar and screw the studs into the supporting frame. The bowl will be mounted on the studs;
- sew up the niche with drywall;
- attach the bowl and connect the bidet to the water and sewer pipes. Between the wall and the bowl, be sure to put the rubber or silicone gasket that comes with the kit. It will become a buffer that will protect the wall and bowl from destruction, and also compensates for the load on the installation studs;
- secure the bidet by tightening the nuts.
To maintain personal hygiene, consumers are increasingly paying attention to the bidet, installing this type of equipment in their homes. In some cases, the bidet is bought separately, in others - in the form of stylish plumbing kits for the bathroom, which, in addition to the toilet and sink, include a bidet. In this case, all equipment has the same design and fits perfectly into any interior. Many owners wonder how to install a bidet . At the same time, the installation process of this item practically does not differ from the installation of a toilet bowl, although the bidet has a slightly different design.

Bidets greatly increase the comfort during hygiene procedures
When choosing a bidet, you need to consider the size of your bathroom. So, for small spaces, a hanging device would be the best choice. For its installation, you will need to install a special mount hidden in the wall.

Installation is a very stylish and convenient solution in bathroom design
In larger rooms, you can use the floor structure. Installation of this type of bidet is no different from installing a toilet.
In addition, it is necessary to determine the method of water supply - using a mixer or installing two separate taps. Usually, the first method is used when using a storage-type water heater in a hot water supply system. The second case is relevant for centralized hot water supply.
In order to install a bidet on your own, you need to properly assemble the water supply and drainage mechanism, install the structure, and then, taking into account all the rules, connect the device to the water supply and sewage systems.
When choosing a place to install a bidet, it should be remembered that the bathroom is conditionally divided into two zones. One has a bathtub and washbasin, and the other has a bidet and toilet. It is recommended that the free space in front of the bidet is at least 0.7m and its height from the floor is no more than 0.4m. The most convenient distance between the device in question and the toilet will be 25 - 30 centimeters. Increasing this distance is not recommended as it will reduce the comfort of using this equipment.
Installation process
Self-installation of a bidet does not require any special qualifications, although it does require some plumbing skills. For installation work, you will need the following tool:
- impact drill or hammer drill;
- a set of drills for concrete, as well as feather drills for ceramics;
- plumbing (gas) and adjustable wrenches, as well as a set of open-end wrenches;
- pliers;
- fum tape or plumbing linen (tow) and special packaging paste;
- moisture resistant silicone sealant.
Before proceeding with the installation of the bidet in place, it is necessary to assemble its design. Typically, upflow bidets have a more complex device, so all mechanisms are installed at the factory, and the consumer only needs to install a water supply device (faucet or mixer) and connect the device to the mains.

Bidet design
Simple bidets have in their design a special mixer installed on the edge and a siphon to drain used water. Usually, only a siphon is included in the package, the mixer will have to be purchased separately. In this case, attention should be paid to the coincidence of its installation size with the diameter of the hole in the bowl.
Faucet installation
Installing a bidet faucet is no different from installing a similar type of sink or sink. It is installed in the top opening of the bidet and secured with a moon washer, nuts and studs. Before installation, it is necessary to connect the supply hoses to the mixer. Sometimes it is not possible to tighten the nut located between the metal ends of the flexible hoses. In this case, you can use pliers by setting them parallel to the hairpin.
When attaching a flexible hose to the mixer, do not overtighten the threaded connections, as this often leads to damage to the rubber sealing ring.

Siphon device
Assembly and installation of the siphon
When choosing a siphon, it is necessary to focus on its size, shape and material of manufacture.
The assembly and installation of the bidet siphon is similar to the work carried out when installing the sink:
- by means of a rubber seal, a neck (funnel or drain grate) is installed in the bowl;
- on the reverse side, the funnel is fixed with a plastic ring mounted on a rubber gasket;
- attach the siphon body to the funnel and tighten the union nuts;
- a corrugated drain pipe is attached to the bottom of the siphon.
All rubber gaskets and seals are best treated with silicone sealant. This will prevent leaks in the future.
When assembling the bidet, do not forget to install soft material gaskets between the ceramic part and the metal elements. They will not damage the shiny porcelain surface.
Video. Assembly of the structure and installation of a bidet
Bidet installation
If you are experienced in installing a toilet, installing a bidet will not cause you any problems, since these works are almost identical. For correct attachment of the device, it is necessary to try it on the installation site and check whether the length of the hoses is sufficient to connect the device to the mains.
Next, mark the attachment points. Move the equipment aside and carefully make holes. Tiles are best drilled with special feather drills. They will keep the surface of the tile and allow you to work neatly. Then dust and debris are carefully removed and plastic dowels are inserted into the holes. After setting the bidet in place, attach it to the floor.
To fix the bidet, it is best to use a special set of fasteners designed to install the toilet.


Installing a bidet is within the power of even an unprepared person
Connection to sewerage and water supply
Best of all, if installing a bidet is one of the final steps in a bathroom renovation. At the same time, the necessary drainage of the sewage system is preliminarily made, and stopcocks are installed on the water pipes at the points of connection to the mixer.
The corrugated outlet pipe is inserted into the sewer socket (a simple compression connection is made), and the flexible supply hoses are connected to the hot and cold water supply pipes. At the same time, threaded connections are sealed with a fum-tape or sanitary flax treated with a special paste.
When installing flexible supply hoses, carefully tighten the nuts at their ends - they are often made of brittle metal and can crack if pressed hard.
After connecting the communications, open the shut-off valves and check the connections for leaks and leaks.

Installing a bidet cover will allow you not to change the interior of the bathroom
Installing the bidet cover
With a small bathroom, you can purchase not a separate device, but a design that combines a bidet and a toilet. Many plumbing manufacturers produce appliances of this type. If you do not plan to install new or replace existing equipment, then the best way out is to install a bidet toilet cover. The most modern models of such lids allow you to set a comfortable air and water temperature, are equipped with a microcomputer, have the functions of air deodorization and additional water purification.
Simple models are equipped with a mixer and nozzles located on the sides of the lid. In this case, the supply of hot water is carried out on one side, and cold - on the other.
Installing a bidet cover is much easier than installing a separate device for this purpose. To install it, remove the toilet lid, install the bidet lid in its place and fix it with the bolts from the delivery set. Next, the device is connected with a flexible connection to the pressure pipelines. If necessary, connect electricity, be sure to ground the device. Consulting an electrician will allow you to carry out these works correctly.
Yet the most hygienic is the presence of separately installed bidet and toilet.
Proper assembly of the bidet, as well as its installation and installation in accordance with all recommendations, will allow the device to work for a long time, helping to maintain hygiene and increase the comfort of your home.
Video. Electronic bidet lid