How to make a beautiful inscription on a photo in Photoshop. Detailed lesson. How to make a beautiful lettering in Photoshop
Let's look at how to make an inscription in Photoshop beautifully and quickly. All of the methods below can be used in any version of Photoshop.
The easiest way: pasting text
If you quickly need to add a simple inscription to a photo, you can only use the standard “text insertion”, which is located on the left of the program’s toolbar (dashboard):
- open the photo in the editor window;
- Find the “Text” element in the toolbar, as shown in the figure:

- Now click the pointer on the place in the picture where the inscription will be placed. Start typing text;

- To change the font size and type, inscription color or text position, use the corresponding keys that are located at the top of the dashboard that opens:

- let's adjust the text deformation using the corresponding button;

- To remove the frame that appears around the text, you need to change the layer style. Go to the appropriate window and select the layer with the entered inscription;

- in the layer style settings window that opens, adjust shadows, strokes and other effects.

- Use your mouse to drag the block with the inscription onto the desired part of the photo. Save your changes.

This way you can very quickly add standard types of text to a picture in Photoshop.
To achieve more textured lettering, use the following methods.
Read our other articles about working in Photoshop:
Choosing a font
In this method, we will create an inscription by installing additional downloaded fonts, create a gradient fill of characters and their stroke.
You can download additional fonts for Photoshop from third-party resources.
The most popular of them is 1001 free fonts. Select the font you like and download it, then unzip the archive.
Move the TTF file to the Windows Fonts system folder, which is located in the Control Panel.

After moving the file, restart the Photoshop editor so that the new installed font is added to the program.
Now click on the Horizontal Text Tool.
Write it anywhere in the photo.
Use the top panel to select a font (in addition to the standard elements, this tab will also display the installed font).

Select the character size. Now you can start adding various effects. Open the layers window (Window tab, Layers).
Select the text layer. In the Layer Styles window, add a shadow. To do this, you need to adjust the opacity setting to about 75%.

All values are approximate, you can adjust them to your liking, creating new effects. On the right side of the Layer Style window there is a preview of the custom font.
Now let's add a glow to the outer part of the text. To do this, in the same “Layer Style” window on the left, check the “Outer Glow” checkbox.
On the right side of the window, set the Zoom to 8% and Size to 27 pixels. To increase the area of the glow, adjust the Swipe element.

Click on the gradient color to open the shade picker. You can select a color using the mouse or enter a shade code. Let's enter #fbfea0.

Now let's create a stroke for the characters. Click on “Stroke” and select the outline size “3” and the stroke color under the code #031f01.

Close the Layer Styles window. Similarly, you can add another inscription with a different font and customize its stroke, outer glow and gradient.

Create a stylized inscription
Creating stylized text is an integral part of graphic design. In this example, we will create text whose characters look very similar to candy canes.
Open a new project in Photoshop. The sheet size should be 800×600 px. Duplicate the background layer.

Now click on the duplicate and open the Layer Styles window. On the left side of the window, select “Gradient Overlay” (or “Gradient Overlay”). On the right, configure the parameters: Radial Style, Scale – 50% (Scale). Then set the color of the gradient, the left point will have the code #ffffff, and the right one will have the code #979797.

If you close the style settings window, you will see that the image has acquired a gradient texture.

Next, download the texture file from the link. Open it in the project. The downloaded image must be located above all other layers.
You can also create a different scale for the texture, but we recommend leaving it as is for now.

Download the “Bubble Gum” font to your PC from the link and install it. Don't forget to save the project before you reload the project into Photoshop.
Add text to the project page using the newly installed font. Set the size to 170 pt, view to Normal.

Note: Each new row should only be created in a separate Layer tab
In the Layer panel, select two text layers (if you created three lines, then select three layers) and create duplicates of them.
Set the fill value to 0 (Fill parameter) for each duplicate text line layer.
Click on the original text layer in the corresponding menu to open the Layer Style window.
Now open the “Bevel and Emboss” tab. Now set all the settings similarly to those shown in the figure below (color code in the “Shadow Mode” parameter is #878787):

Now go to the contour tab and set the following settings:
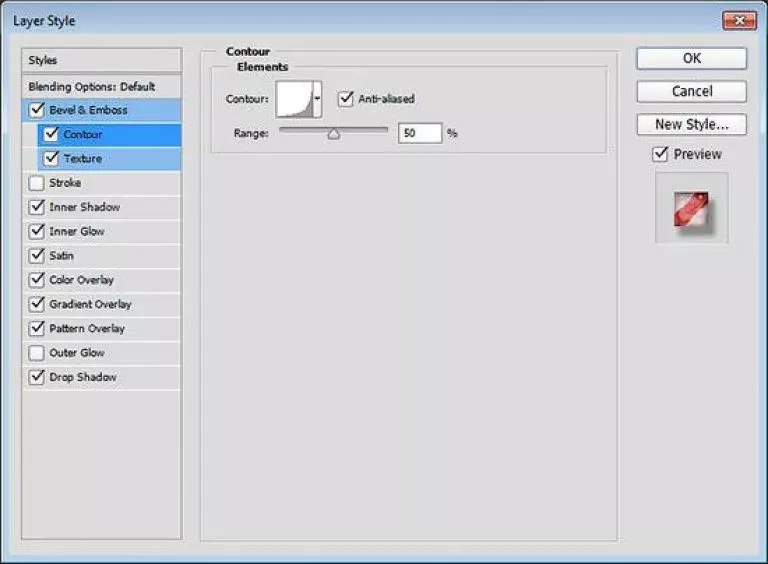
In the “Textures” tab, click on the built-in “Diagonal Stripes” pattern.

Now you need to adjust the inner shadow. Go to the appropriate tab and set the following parameters (Color - #ffffff):

Adobe Photoshop is the product that you will definitely need to create interesting images or edit photos. Using Photoshop, you can realize your creative potential or develop your professional skills if you, for example, are a designer. Today's lesson on using Photoshop is dedicated to lettering and how to place them correctly. So:
How to make an inscription in Photoshop?
At first glance, the task of writing text on a picture or photograph seems more than simple. And indeed it is. To create an inscription, select the “T” icon in the toolbar. In the window that appears, you must enter the desired text and click on the empty space to attach it to the image. But what's the matter? Why don’t these letters fit into the overall background and mood of the photo? This is where the difficulties begin. The text must not only be, that is, present in the photograph, it must also be combined with the general mood of the image. But this task is no longer the easiest. However, do not become discouraged and fold your arms after the first failures. Photoshop has powerful capabilities that will help you turn your text on an image into a work of art, or simply make it adequate, and most importantly, readable.
To edit the written text, click on the area with it. Now we have the opportunity to somehow change the text itself and the letters. You can control various options using the text editing toolbar, which is located above the work area. The first section is the font. From the many proposed options, you need to choose the font that would fully meet your goals when creating the final image. In order to select a font, you need to click on the arrow next to the name of the last used font. Be careful. Only the selected printed text is edited. If the text has already been written, you need to select it to change it. Let's assume that you have decided on the font. Let's move on to make the inscription in Photoshop.
The next option is the font size, which is indicated by numbers. The higher the number, the larger the size. Try to make the inscription look harmonious throughout the image. Its size should not exceed the size of the largest objects in the drawing or photograph. However, in this case, only your imagination can dictate the rules. The next small window helps us choose how the text will be displayed. Choose different options and you will understand which character will suit your image.
The next option will help you decide on the text color. This is very important for creating the final design of the picture. The color of the letters should match the entire image, and most importantly, its idea. Now, dear reader, you can experiment on your own with the rest of the text editing functions that Photoshop offers us.
We'll talk a little about using different backgrounds when placing text on an image. It is better to place the inscription on a uniform background. This way, the text will be visible and the picture will be clear as a whole. All images of large objects, such as the sky, water, clouds, and so on can serve as a uniform background. Any text on a uniform background is clear and readable. This is how you need to make an inscription in Photoshop.
The most important tool for editing text is called up by double-clicking on the image layer, which is located in the list of layers. Using the window that opens, you have the opportunity to fine-tune the text image. There is no point in describing each of the options, since there are a huge number of them. Experiment and use your imagination. Remember that any action taken can be undone using the back arrow icon.
Hello my loves! All people necessarily communicate with each other, try to express feelings and emotions. Poets express their feelings in rhymes, sometimes intricately composed. And today I will touch on the topic of something without which communication is simply impossible, without which you cannot express your feelings for another person, tell him something very important and valuable to you. I hope you have already guessed. These are, of course, words, sounds, letters. And when you cannot express all your feelings and thoughts with one image or photograph, text comes to your aid. And in order to insert text into a photo, we need a little knowledge of Photoshop. And we will start with the simplest.
To test the pen, so to speak, let's practice on an ordinary white sheet. The Horizontal Text tool is located in the Tools panel. Along with it, the tab contains the “Vertical Text”, “Horizontal Text Mask” and “Vertical Text Mask” tools. I think everyone knows what horizontal text is. But vertical text is the same letters, only they are written not after each other, but under each other, let’s say, like on signs. Text mask, this is text when using which the image is painted over with a mask with a layer of a reddish tint and you print on top of this layer, but after finishing using it, the text that you wrote becomes a selection on your image, which is very useful in many cases. In order to write with this tool, you need to click on the field on which you are going to write text. And from the place where you click and your proposal will begin. A keyboard is usually used to write. And when you finish writing, you should click on the check mark or cross at the top right of the panel of this tool. If you press the cross, then everything will be canceled, if you check the box, then you will accept the changes made with the text. It’s somewhat reminiscent of a matrix: a red or blue pill.
Now let's start exploring the top bar of this tool. On the left we see an icon that can change the orientation of the text. That is, you wrote a word in vertical text and pressing this key turns it horizontal and vice versa. To the right of this tool there is a menu in which we can set the text typeface, that is, the writing font. The writing font can be classic, uppercase, thick, thin, or whatever you want. And in this menu you can select your font, just click on the small triangle and below it a menu will appear in which you can select fonts.

Even further to the right we can set the point. Few people know that font size is the font size. There is the same menu as the headset, in which you can either enter the value yourself or select from the pull-out menu below.

The next menu on the right is responsible for the anti-aliasing method. From the name it is clear that the anti-aliasing method is how much and to what degree the text will be smoothed. There are five anti-aliasing methods: None, Sharp, Clear, Rich, Smooth. In the image they are presented in this order.

Next comes the familiar panel from Word, text alignment on the left, center and right. Everything is clear here. Next is a square with a color, by clicking on which you can call up a palette in which you can select the color of our text. Alignment is followed by text deformation, which, when clicked, opens a window. In this window, you can either specify the distortion parameter yourself or select one of the provided distortions from the list.

After deforming the text there is a “Palette of characters and paragraphs”. If you click on this icon, then this palette will appear in front of you. This palette is amazing because it contains all the text settings listed earlier and more in-depth text settings. Here you can find such amazing settings as: kerning, leading, cracking, capitals, above the index, below the index, various indents and alignments. It’s not difficult to figure all this out yourself at random. So I have hope for you.
Let's now look at something more complex. For example, write text around some object or above some object. So I want to invite you to write something good over these desert burkhans. First, let's select our dunes. If you don’t know how to select, refer to the lesson “How to select in Photoshop? " on our website.

When we have selected, we need to select the “Rectangular Marquee” tool, or press the “M” hotkey. Right-click on the selection with this tool and find the “Create work path” item there. The “Tolerance” box will appear; the larger the tolerance, the more angular the contour lines will be. When you press the “Ok” button in the “Tolerance” menu, our selection will stop blinking and turn into a solid line.

Now that our outline is formed, we can take the “Text” tool, point it at the working outline, and our cursor will change, as if crossed out, this will mean that we can type on the outline. By clicking on the contour, a wand will blink on the contour, with which we can print text. And let's write something interesting on the dunes. Now right-click on the mini-image of the text in the “Layers” menu and select “Rasterize Text”. Rasterize means converting from a vector image to a raster image, in other words, our text will become a picture, not text. This is how interesting it turned out for us.

Today we looked at the most basic and important functions of text in Photoshop. Now you can independently make sure that the image fully conveys all the necessary feelings and emotions. Work wonders on emotionless images and bring the word where it's needed.


A graphic editor will help you make an exclusive virtual postcard with your own hands or sign photos. A text inscription can be added, for example, using regular Paint, but it will turn out to be too simple. To make the text look aesthetically pleasing or even stylish, it is better to use a more advanced program. You will learn how to make an inscription in Photoshop that will look beautiful in this simple lesson.
Stage 1. Setting parameters and creating an inscription
First, you need to select the “Text” tool from the set on the left; by default, the text orientation will be horizontal. If you need a vertical one, hover your cursor over the “Text” tool and click the right mouse button, and then “Vertical Text”.
In the top menu above the working field, configure the tool: select the font, its style (bold, italic), size, color, flow, location of the inscription. You can also deform it, for example, select the type of distortion “Arc”, “Flag”, and so on.
Now place the cursor on the image in the place where you want to write the text. Perhaps it will be more convenient and clearer to make the inscription in a separate file, and then transfer it to the picture.
Type the text. If the size, font or other parameters are not satisfactory, select the text and change the appropriate settings. Although this can be done later. Once the inscription is ready, click the checkmark in the top menu on the right. To cancel changes, you need to click the crossed out circle next to it.
You can use original fonts that are not in the standard set; they are offered in abundance for downloading on the Internet, after which they need to be saved to the “Fonts” folder in the control panel. They will be available not only in Photoshop, but also in other programs that use fonts, such as Word.
You can change the color not of the entire text, but of individual words or letters. To do this, just select part of the text, change the color in the top menu and click the checkbox to save.
But this is not all that can be done. We have prepared only a text template, now we will make it beautiful, for this the editor provides a lot of opportunities.
Stage 2. Stylization of the inscription in Photoshop
The inscription still looks ordinary; to make something original out of it, you need to go into the layer settings. To do this, find the “Layers” window in the toolbox, which by default is located to the right of the work area, and double-click on the layer with the text. You need to click on the empty field next to the layer name, and not on the name itself. In the second case, renaming the layer is activated, but you want the settings window to open.
In the window that opens, there are styles on the left, and settings for each of them on the right. In the example (Fig. 1) you can see the blue inscription in the original, and under it what can be done with it. The settings applied here are Shadow, Inner Shadow, Outer Glow, Emboss, Outline, Gloss and Gradient Overlay. To apply a style, you need to check the box next to its name.
Each of the styles can be further customized; to do this, you need to select it, and settings will appear on the right. For example, you can adjust the transparency, offset, size, and color of the shadow; choose a texture pattern and its scale, and so on.
All changes that will be made to the styles will be immediately visible in the image. After finishing editing the inscription, you need to click the checkmark in the top menu above the work area.
It is enough to practice a little, and you should certainly get a beautiful inscription in
Dear friends, from this lesson you will learn how to make a beautiful inscription on a photo in Photoshop.
Especially for you, I have made step-by-step instructions on how to add beautiful text to your photo or image, and if you want to learn how to do it yourself, then this tutorial is for you.
In this lesson, we will also learn how to search for new fonts for Photoshop, learn how to install their program, learn how to change the size and resolution of an image, and get acquainted with the cropping and free transformation tools.
I hope this lesson will be useful to you and after studying the lesson you will be able to make a beautiful inscription in Photoshop without any problems.
Before we start, let's select a photo to which we will add text.
For the lesson I chose this photo of nature. We immediately need to decide what we will do with this photo (the picture is of excellent quality and has a resolution of 300 pixels per inch - you need to immediately understand that the higher the resolution, the better the quality of the photo, but there is also a minus - it will take up more disk space) :
1. Print in a photo salon.
2. Publish on the Internet (if you plan to publish the image on the Internet, then you can safely set the resolution to 72 pixels per inch, now I’ll show you how to do this).
I chose the second one.
Let's get to the lesson itself.
Changing the size and resolution of a photo in Photoshop
1.Open the image in Photoshop.

Just look at the picture, it has a large size: width 1024, height 768 and resolution: 300 pixels per inch (to display this window, go to the menu Image - Image Size, Image - Image Size).

For a picture for a blog, I need to make it the same size as the width - 550 pixels(height is not important to me), as well as permission to do - 72 pixels/inch, you need to crop out what is not needed in the image. There are two ways to do this:
a) you can just in the window Image Size, first set the resolution to 72 pixels per inch, set the width to 550 pixels and click OK.
b) you can immediately remove everything unnecessary from the photo in one action, make it 550 pixels wide and with a resolution of 72 pixels. Wondering how to do this?
Cropping photos in Photoshop
Take the tool Cropping(Crop, C) and set the following parameters in the tool settings panel at the top.
Afterwards we simply draw the area on our photo. Select the desired area (you can change the area by grabbing the nodes in the corners of the image with the mouse) and click Enter(cutting off everything unnecessary).

As a result, we get an image with the parameters we need - 550 width and 72 dpi resolution.

We have prepared all the pictures. Now we need to add a nice caption to the image.
Adding new fonts to Photoshop
2. You can use a standard font, but you and I are not looking for easy ways, right?) That’s right, let’s figure it out once and then constantly use this skill - we’ll find a font we like on the Internet, download it to the computer, add it to Photoshop and then Then we’ll make a beautiful inscription.
We go to any search engine, I use google.com, entered the phrase “ Russian fonts” (you can also try Russian fonts in English), I went to the website xfont.ru and chose this one font(Archangelsk Regular).

In order to load a font into Photoshop, you need to copy it to the folder with fonts, folder name Font on your computer, this folder is located at drive C in folder Windows, and there is a folder Font
Here is the full path - C:\Windows\Fonts.
You can also open the folder with fonts, simply through Start - Control Panel - Fonts.

Afterwards, you must restart Photoshop for the changes to take effect.
We restarted, open our photo and start working with the text in Photoshop.
Adding a beautiful inscription to a photo in Photoshop
3. How to write text in Photoshop and overlay it on a photo? We just take the tool Horizontal text(Horizontal Type Tool, T).. In the settings, select our font - Archangelsk, set the size - 25 points, rich and any color.
And we write the text we need, in my example Italy, 2012.

Now let's add effects to our text. Go to the palette with layers (menu Window - Layers, Window - Layers), double-click on this layer with the left mouse button and select the following settings:

Add a shadow to our inscription. Select an item Shadow, set Opacity - 75% , Offset - 10 pixels and Size - 10 pixels.

Add an external glow for the inscription, select the item External glow, set the color, scope - 8% , size - 27 pixels.

Make a gradient fill for the inscription. Select an item Gradient overlay, click on the gradient, click on the lower left slider and set this color #fbfea0, then click on the lower right slider and set this color #ffef04.

All that remains is to add a stroke for the inscription. Select the Stroke item, select the size - 3 pixels and color #031f01.

As a result, we got an excellent inscription with effects.

You can add another inscription below, just write the inscription in a different font (I think now after studying the lesson, you will do this with ease). You can also make text at an angle, select the desired text layer/several layers in the layers palette, then use Free Transform (menu Edit - Free Transform, Edit – Free Transform or just press Ctrl+T), rotate the layer to the desired angle and press Enter.

That's all, thank you for your attention, I hope my lesson was useful to you and now you will have no more questions how to make and write beautiful text on a photo in Photoshop!
If you have questions, feel free to ask them in the comments, don’t be shy, I don’t bite)
Best regards, Sergey Ivanov.